Contents
Have an another version? ILINX version 8.0 , Older versions are included only in the installation package.
About
This document describes how to install, configure, and run the ILINX Import application.
ILINX Import is an application that imports a wide variety of image and document files into a file or capture system.
The documents are uploaded from a watched directory, which is configured in an Import Profile, as well as any index field mapping desired. Once imported, the files can be processed and placed into an imaging or document management system.
System Requirements
Supported Installation Configurations
For general information on supported and recommended hardware, OS, web browsers, databases etc. for ILINX products, please refer to the ILINX Support Matrix.
Operational Considerations & Limitations
Please note that there are many factors that affect the ILINX Import’s operational performance. One major factor is the size of the file being processed.
Generally, all individual file conversions should be limited to a maximum total file size of 250MB. There are many variables that could affect this limit, such as shared machine resources (i.e., memory) and processors. It is possible you may experience problems with slightly smaller file sizes, while it is also possible that ILINX Import could process larger file sizes, all depending on the environment.
In addition, converting documents to PDF format could result in very large files and presents an additional consideration. The final size of the converted PDF is dependent on the original document characteristics including; format (TIFF, PDF, Word, JPEG, etc.), number of pages, color depth, page complexity, etc.
If you expect that your processing requirements will exceed the operational guidelines described here, please consider these options:
> Test the upper limits of your conversion needs in your environment with your largest documents.
> Increase size of server farm and or machine resources (i.e., memory, processors, etc.).
> Break large documents into multiple, smaller documents.
If you have questions, contact ImageSource Technical Support for assistance.
Job Creation Wizard
The ILINX Import user interface is where the import profiles are managed for both file system and ECM Capture targeting. It is designed to establish the correct dependencies of job configurations in the correct order, and to aid in preventing user input error by validating user input on each screen.
Note: You can map metadata fields to the IBM FileNet P8 Creator and DateCreated fields using ILINX Import. In order to accomplish this, ensure the following rights and permissions are set in IBM FileNet P8:
> Modify certain system properties at the Object Store level
> Modify all properties at the Document Class level
FileNet is particular with its date/time fields and requires the DateCreated field to be filed accordingly.
The ILINX Import job creation wizard can be launched from the Available Jobs main screen of ILINX Import and supports the functions New, Edit, Copy, View, and Delete.
Available Jobs
Screen Elements
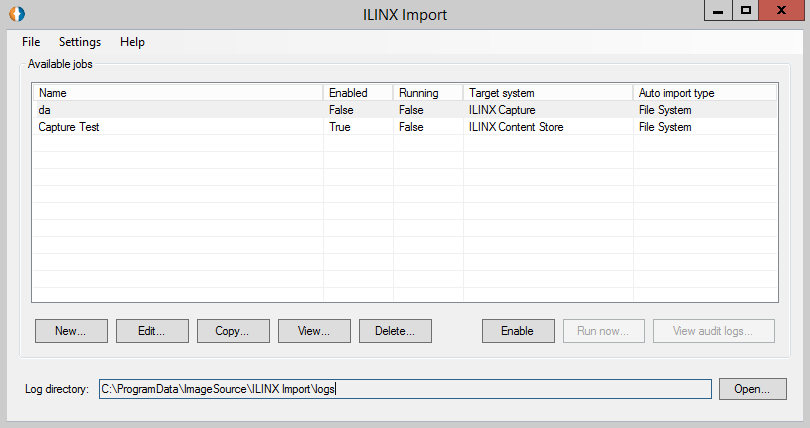
This is the home window for ILINX Import. It provides a list of the currently configured jobs on the system, including the display of the following fields:
> Name – The job name entered when setting up the new job.
> Enabled – This column shows the current availability of the job. The two available states are shown below:
– True – The job is currently available to be run by ILINX Import.
– False – The job is not currently available to be run.
> Running – This column shows the current status of the job. The following are the two states a job can be in:
– True – The job is currently running.
– False – The job is not currently running.
> Target system – Selecting the target system designates where a job will import files, whether to a file system, ILINX Capture, Kofax Capture, ILINX Content Store, or Oracle IPM repositories.
> Auto import type – The four options for import type are shown below. Each will be described later in this document.
The option buttons on this home window are:
> New – Clicking on this button will create a new job form. This option is highlighted by default if no job is selected.
> Edit – By highlighting an existing job in the available jobs window and clicking on the Edit button, the job becomes available for editing.
Note: You cannot edit a job while it is enabled.
> Copy – By highlighting an existing job in the available jobs window and clicking on the Copy button, the job will be duplicated and a new job will be created, adding – Copy to end of the original name.
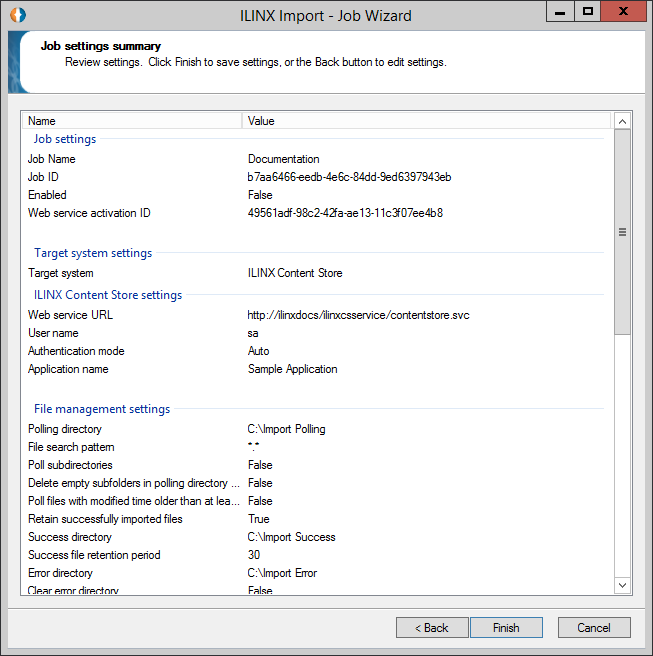
> View – By highlighting an existing job in the available jobs window and clicking on the View button, the job settings summary will display.
– Download – Once the Job Setting Summary window is open, you have the option to download the summary into a PDF format by selecting the Download button.
> Delete – By highlighting an existing job in the available jobs window and clicking on the Delete button, the selected job will be deleted.
Note: You cannot delete a job while it is enabled.
> Enable/Disable – By highlighting an existing job in the available jobs window and clicking Enable, the selected job will start. If the selected job is currently running, this button will display as Disable. Selecting Disable will stop a job from being available to run, allowing you to edit or delete it.
> Run now – If the job highlighted has been configured to use a schedule this button is enabled. Clicking Run now will run the job outside of the configured schedule.
> View audit logs – When tracking is enabled, the audit logs button provides convenient access to the audit logs.
Menu Options include:
> File > Exit which includes a keyboard shortcut
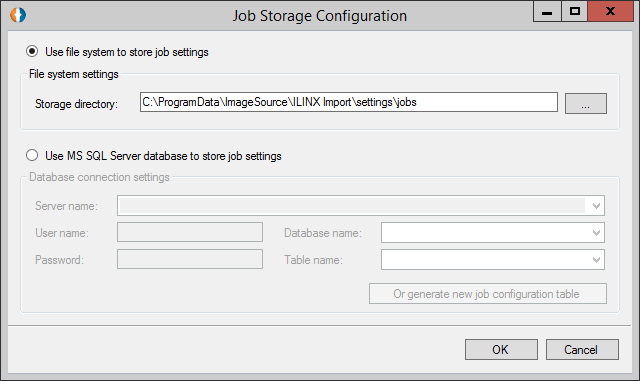
> In the Settings drop-down menu, it is possible to configure job storage for all ILINX Import jobs. Below are the job storage options for ILINX Import. The storage directory can be designated to a native location on your machine, or can be routed to a Microsoft SQL server database.
Note: If database connections change and you are using the MS SQL Server database storage option, changes must be made within the jobstoragesettings.xml file located in the storage location.
> Help > About opens the about screen which provides the version number, copyrights, and available Resources.
Creating a New Job
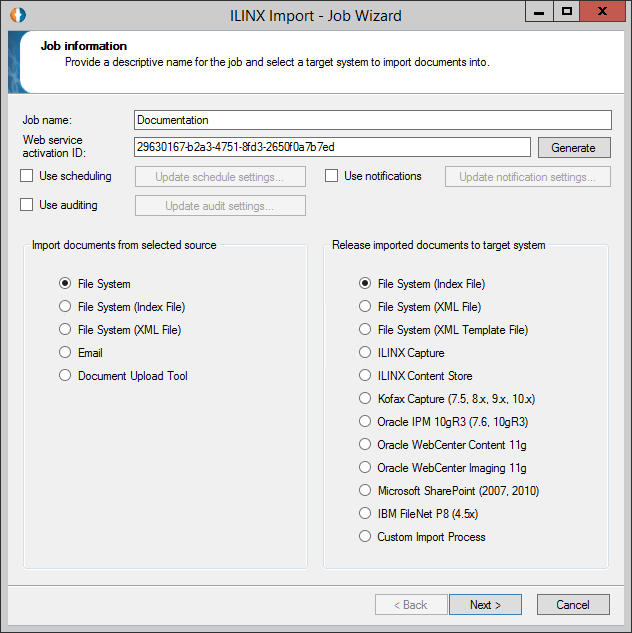
When you click the New button, the Job Information dialog will appear, and the wizard will guide you through the creation of your job. This screen allows you to pick the source from which you will import documents and the target system that they will be imported into.
Job Information
Screen Elements
The elements for this screen are:
> Job name – This required field is used to specify a unique name for a new job configuration or display the name of an existing job in Edit mode.
> Web service activation ID – This field is needed to provide a key at the programming layer. An ID is automatically generated when the wizard begins. This is used only in the application programming interface.
> Use scheduling – Checking this box enables the Update schedule settings button. Clicking on the button brings up the Schedule settings dialog box where you can set up or update job schedules. Enabling scheduling will allow the Run now button to allow the job to be run outside of the configured schedule.
> Use auditing – Checking this box enables the Update audit settings button. Clicking on the button brings up the Configure audit database dialog box.
> Use notifications – Checking this box enables the Update notification settings button. Clicking on the button brings up the Notification settings dialog box where you can configure how and when notifications are sent.
> Import documents from selected source – ILINX Import can import from the following sources:
– File system – Imports documents directly from a watched folder into the target system; the document name will be used to populate index fields.
– File system (index file) – A text file with index values and paths to the documents is placed in the watched folder. The job will use file paths in the text document to find files for upload.
– File system (XML) – An XML file with index values and paths to the documents is placed in the watched folder. Import will use file paths in the XML document to find files for upload.
– Email – Import email files from a watched mailbox folder using email tags to capture the desired index values.
– Document Upload Tool – Uploads and imports native files into specified ILINX Capture database.
Note: For more information refer to the ILINX Import’s Document Upload Tool. Also requires a specific license to utilize this tool.
> Release imported documents to target system – ILINX Import can release imported documents to the following target systems:
– File system (index file)
– File system (XML file)
– File system (XML template file)
– ILINX Capture
– ILINX Content Store
– Kofax Capture (7.5, 8.x, 9.x, 10.x)– Use this option when importing files that will be processed in Kofax Capture.
– Oracle IPM 10gR3 (7.6, 10gR3)
– Oracle WebCenter Content 11g
– Oracle WebCenter Content Imaging 11g
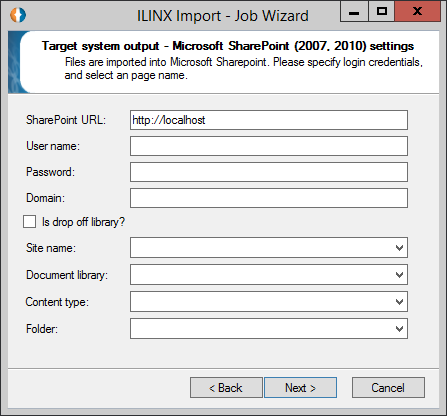
– Microsoft SharePoint (2007, 2010) No Longer Supported
– IBM FileNet P8 (4.5x)
– Customer Import Process
Note: The following two must be installed in order for ILINX Import to properly connect to IBM FileNet P8:
> FileNet Content Engine .NET API Runtime
> Microsoft Web Services Enhancements (WSE) 3.0 for .NET
Note: When a PDF goes through ILINX Import, it is important to ensure you have the proper registry designated for FileNet P8’s MIME Type. If you do not have the proper registry, the MIME Type in FileNet P8 will not be set. Below is the proper registry information:
Windows Registry Editor Version 5.00
[HKEY_CLASSES_ROOT\.”Your file Extension” “Content Type”=”image/tiff” // your mime type here
Each combination of document source and target systems will have its own unique configuration options. Some of these options will be discussed in detail in the subsequent sections. This guide will walk you through some of these examples.
Use Schedule Settings
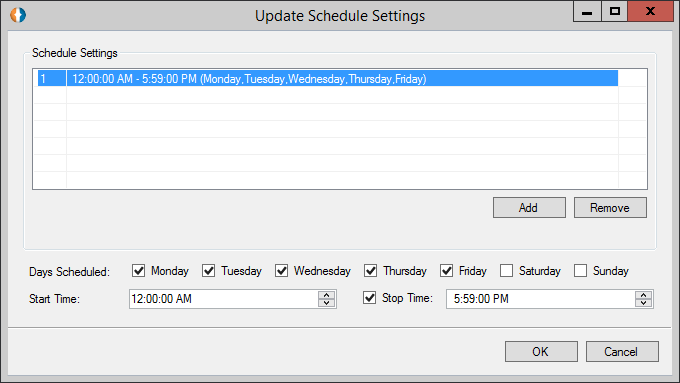
From the Job Information dialog, checking the checkbox labeled Use Scheduling will enable the button Update schedule settings. Clicking this button will open this screen where you can configure schedules for your import job.
Screen Elements
> Schedule Settings – This window displays all existing schedules and their configurations.
> Add – Create a new schedule.
> Remove – Delete a selected schedule.
> Days Scheduled – Check the boxes next to the days on which your job to run.
> Start Time – Use the up and down arrows to set a time for your job to begin.
> Stop Time – If you want your job to have an end time, check this box. Then use the up and down arrows to set the time.
Use Audit Settings
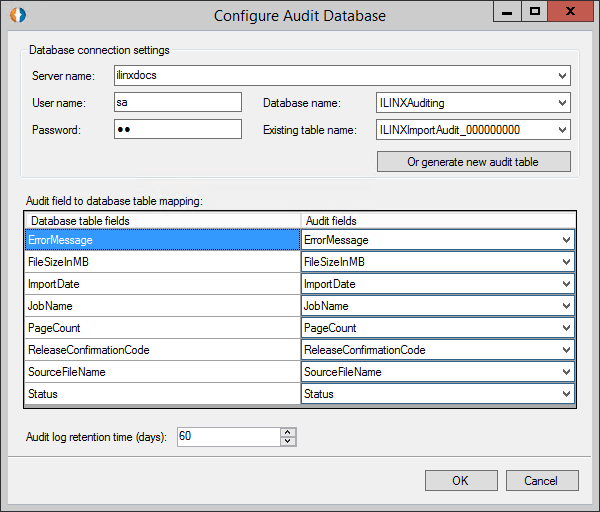
From the Job Information dialog, checking the Use Auditing checkbox will enable the button Update audit settings. Clicking this button will open this screen where you can configure settings for database auditing.
Screen Elements
> Database connection settings:
– Server name – Enter the name of your database’s server.
– User name – Enter the user name of your server login.
– Password – Enter the password of your server login.
– Database name – Select the database you want to audit from this drop-down list.
– Existing table name – Select the database’s table for auditing from this drop-down list.
– Or generate new audit table – Click this button to create a new table in your database for auditing.
> Audit field to database table mapping – Use the drop-down lists to assign what information you want to audit about each of the table’s fields.
> Audit log retention time (days) – Determine how many days ILINX Export should keep the audit log.
Note: You can configure database auditing on a job-by-job basis, or globally across all of your jobs.
Use Notifications Settings
From the Job Information dialog, checking the checkbox labeled Use Notifications will enable the button Update notification settings. Clicking this button will open this window where you can configure settings for how and when notifications are sent.
Screen Elements
> General notification settings:
– Send a notification if this job is disabled.
– Send a notification if a file is moved to the error folder.
> Email Notifications:
– Send Email Notifications – Check this box to enable the rest of the options.
– To email address
– From email address
– SMPT host
– Custom error message – You can enter a unique message for the notification in this field, such as specific instructions.
– Send test email notification
File Management Settings
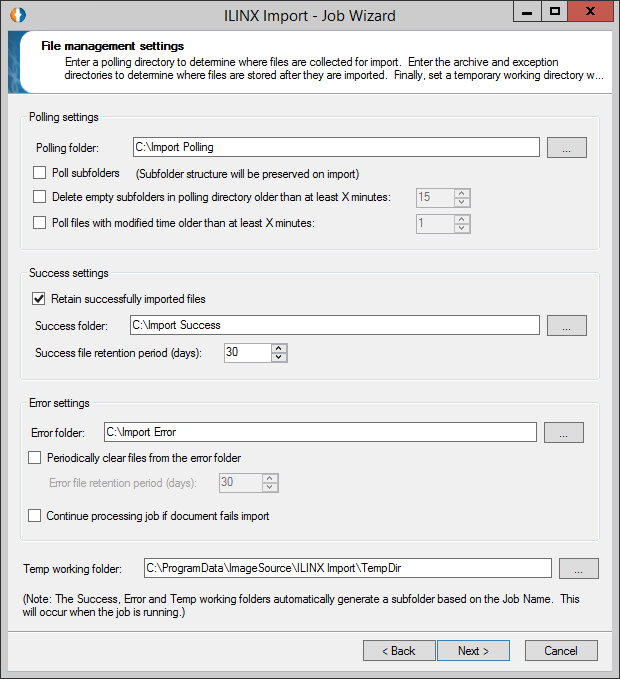
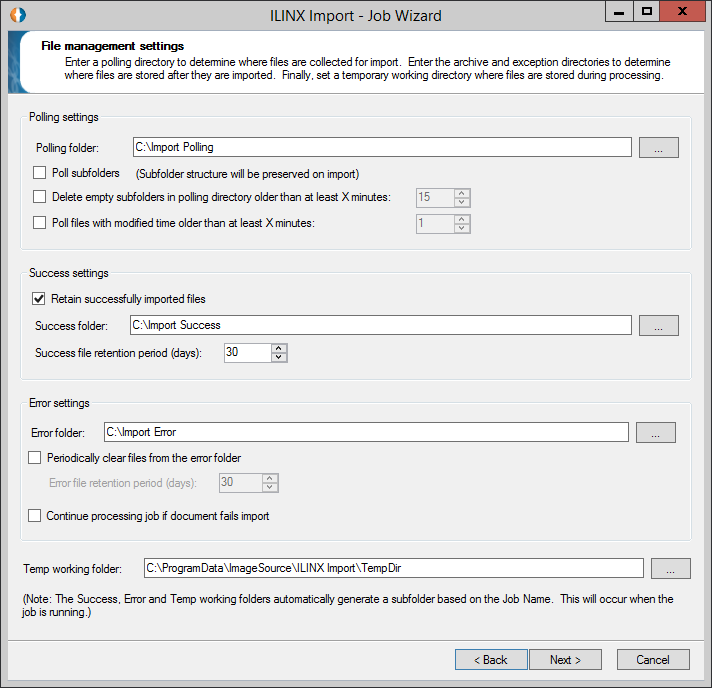
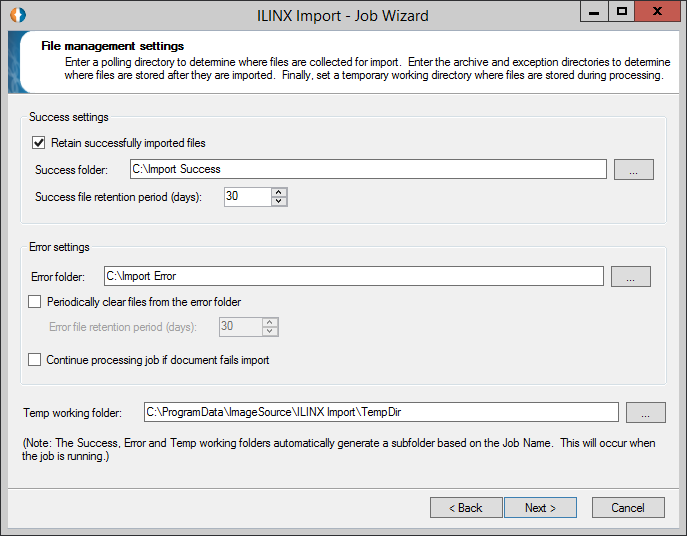
After clicking Next from the Job Information screen, the File Management Settings dialog will open.
Screen Elements
The elements for this screen are:
> Polling folder – Provide the directory location of the folder you wish to be polled for new files to be imported.
> Poll subfolders – Check this box if you wish subfolders to be polled for new import files.
> Delete empty subfolders in polling directory older than at least X minutes – Check this box if you want to specify that the polling directory should clear the files after the specified number of minutes.
> Poll files with modified time older than at least X minutes – Check this box ensure files are not imported prior to the file or batch of files completely copied to the polling directory.
> Retain successfully imported files – Check this box if you wish to retain successfully imported files.
> Success folder – Provide the directory location of the folder where you wish retain successfully imported files.
> Success file retention period (days) – This feature allows you to set the number of days you wish to retain successfully imported files in the success folder.
> Error folder – Provide the directory location of the folder where you wish place files that failed the import process.
> Periodically clear files from the error folder – Check this box if you wish to clear the error folder periodically.
> Error file retention period (days) – This feature allows you to set the number of days you wish to retain files that failed the import process in the error folder.
> Continue processing job if document fails import – Check this box if you want to keep the Import job running even if there was an error while importing a different document.
> Temp working folder – A default directory is entered but may be changed at any time if you wish the working directory for the jobs to be somewhere else.
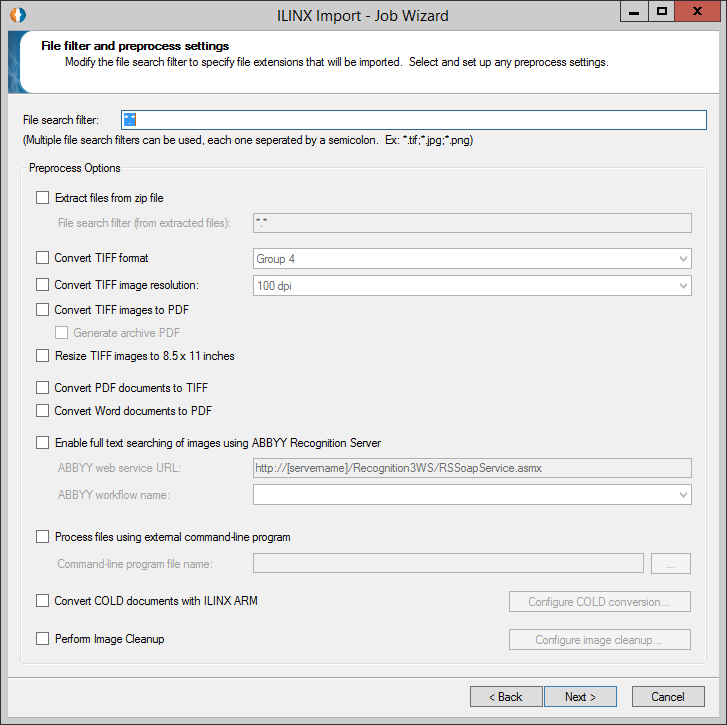
File Filter & Preprocess Settings
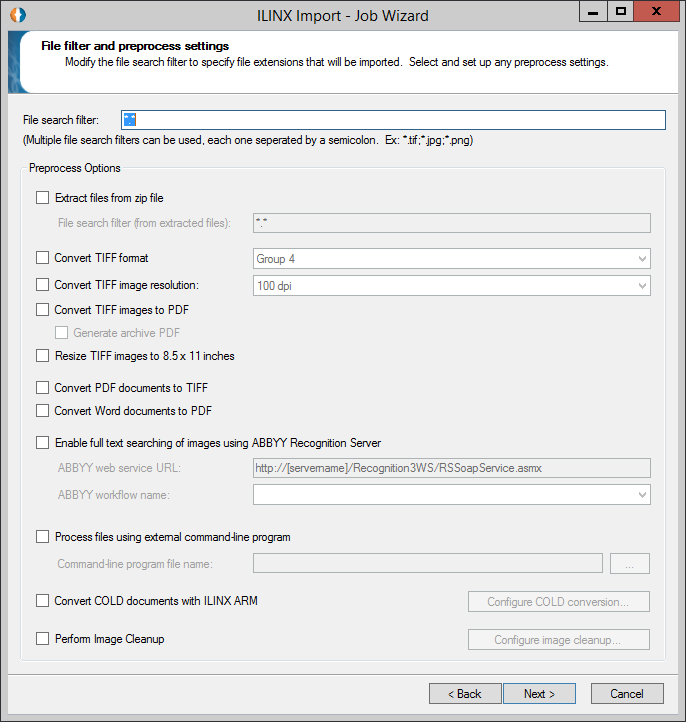
Screen Elements
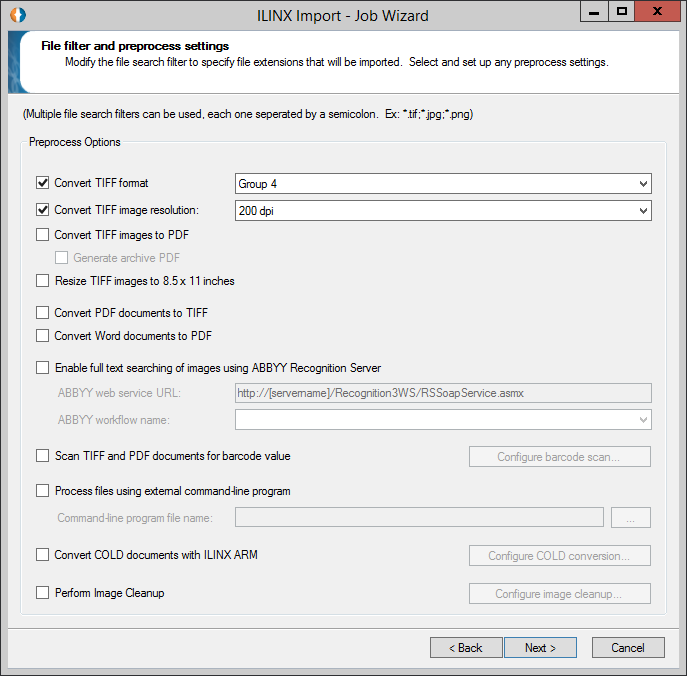
The elements for this screen are:
> File search filter – Enter file name extensions for those files that should be imported. Multiple filters may be used by separating with a semicolon.
> Preprocess options – Choose from the following options:
– Extract files from zip file – Check this box if you wish to extract zip files that are placed in the polling for processing.
– File search filter (from extracted files) – Provide the file extension of the type of file you want to search for in the files extracted from the zip files (example: .doc, .PDF, .txt, etc.).
– Convert TIFF format – Check this box to convert TIFF files that are placed in the polling folder. Select the format Group 4, LZW, JPG, Uncompressed, or just select Auto for the best format.
– Convert TIFF files image resolution – Check this box to convert TIFF files placed in the polling folder to a different image resolution, and then select the resolution desired from the provided drop down list to the right.
– Convert TIFF files to PDF – Check this box if you wish to convert TIFF files that are placed in the polling folder to PDF prior to processing. Once checked, the sub-option is available which enables PDFs to be generated as archive PDF files.
– Resize TIFF images to 8.5×11 inches – Check this box to convert TIFF image files placed in the polling folder to 8.5”x11” size.
– Convert PDF documents to TIFF – Check this box if you wish to convert PDF files that are placed in the polling folder to TIFF prior to processing.
Note: This conversion option requires no additional software.
– Convert Word documents to PDF – Check this box if you wish to convert MS Word files that are placed in the polling folder to PDF prior to processing.
Note: This conversion option requires Microsoft Word to be installed on the local machine. By using the Microsoft Word application engine to perform these document transformations, ILINX Import is able to produce the highest quality conversions possible.
– Enable full text searching of images using ABBYY Recognition Server – Use this option to enable the configuration of ABBYY Recognition Server to make images full text searchable.
» ABBYY web service URL – Input the web service URL.
» ABBYY workflow name – Input the ABBYY workflow name.
– Process files using external command-line program– Allows the user to browse and select a *.exe file. After Import finds an index file to process, it launches the custom pre-processor executable and passes the full path and filename of the index file it is about to work on to the executable as a command line parameter. If the Import job is configured as a “File system” job, the full path to the individual source file will be provided to the preprocessor. The following processing steps are executed when using a custom preprocessor:
1. Import identifies a source index file or document and launches the specified preprocessor passing in the full path to the source file.
2. Import monitors the custom preprocessor process until it exits or until 5 minutes have elapsed. If the preprocessor does not finish before the time out period, Import will terminate the custom preprocessor process and write an error into the log.
3. Import processes the index file or source document as usual, including job specified conversion operations, i.e. zip extraction, TIFF/PDF conversion, image resizing, etc..
Important Note: ILINX Import delivers a temporary copy of the inbound index file to the external application. Changes that are made to the index file by the external application will not be recognized by ILINX Import and will be discarded. Additionally, the external application can modify the target inbound documents, i.e. perform additional conversions, but it cannot change the original file name or file extension. Changing either the file name or the extension will result in an ILINX Import error and possible job failure. If you need to modify the file name, extension, or index information you will need to set up two ILINX Import jobs; the first can create new or modified copies of the original index file and documents and publish them to the file system (the polling directory of the second job), and the second can consume the updated information and process it as desired.
– Convert COLD documents with ILINX ARM – If you have ILINX ARM installed on your system, checking this box will enable the Configure COLD conversion button. Clicking the button will launch a window in which you can configure settings for the COLD conversion. For more information, see the section COLD document conversion settings.
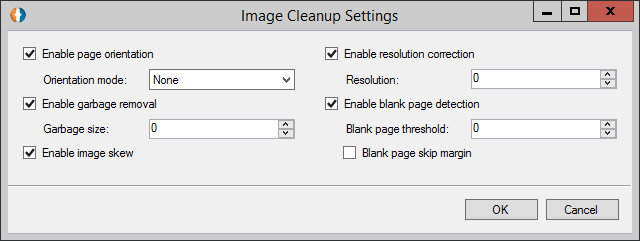
– Perform Image Cleanup – Use this option to clean or manipulate that document image. You can adjust to correct the resolution, detect blank pages, skew the page, edit the page orientation, and engage in garbage cleanup.
Note: The image cleanup capabilities are a separately licensed module. Please contact ImageSource for more information on this powerful tool.
The subsequent screens provide unique configuration options for each source and each target system. These are discussed individually in the following sections.
COLD Document Conversion Settings
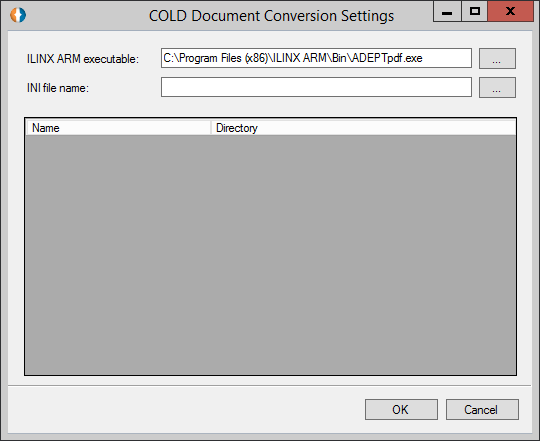
Clicking on the Configure COLD conversion button will open this window where you can configure a report management job.
Note: This feature requires that you have ILINX ARM installed on your system.
Screen Elements
> ILINX ARM executable – Using the browse button, select the location of the appropriate ILINX ARM executable for your file type.
> INI file name – Using the browse button, select the location of the initialization file for your job. This file determines many aspects of the job including where the COLD document is parsed and what information is extracted.
Perform Image Cleanup Settings
Clicking on the Perform Image Cleanup button will open this window where you can configure a report management job.
Screen Elements
> Enable page orientation – Select this checkbox and then None or Automatic from the dropdown box to orientate each page being imported.
> Enable garbage removal – Select this checkbox to remove the ‘noise’ or ‘garbage’ from the image being imported.
> Enable image skew – Select this checkbox to automatically de-skew images being imported.
> Enable resolution correction – Select this checkbox to adjust the resolution of the image being imported. Use the up or down arrows to select a specific resolution or type in a specific number.
> Enable blank page detection – Select this checkbox to delete blank pages in the document being imported. Specify a threshold by using the up or down arrow or enter a specified number.
Source Systems
Each ILINX Import source system provides slightly different configuration options but does not have unique configuration screens. The configuration options for the sources appear on the auto import settings page, which is titled in the following format, depending on the job source: Auto import – [JobSourceName] settings. The differences lie in the source field mapping section. The fields from your chosen source system will appear as values you can map to your target system’s fields.
File System
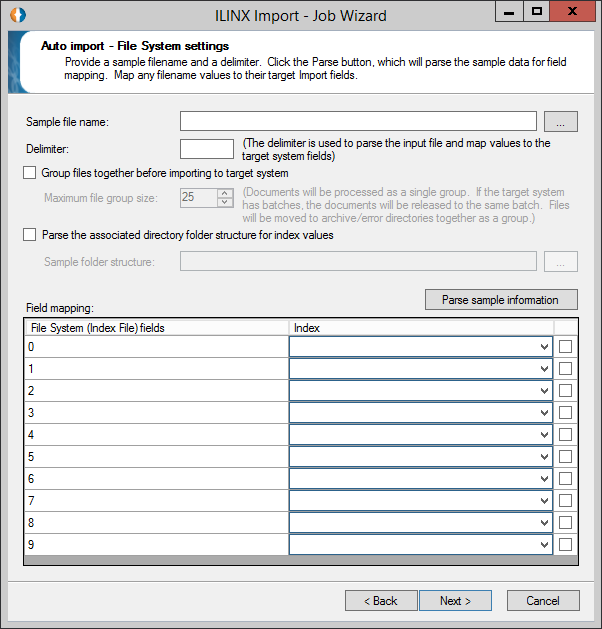
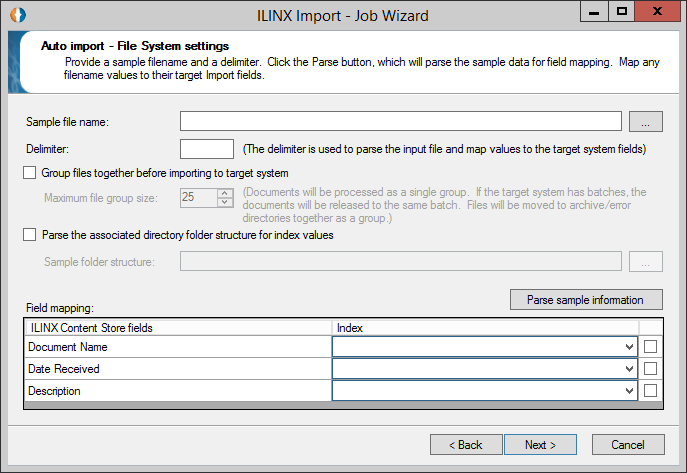
Selecting the File System import source will display the following options within the Auto import screen:
When you use the File System job source, you have the following unique configuration options:
> Sample file name: Here you will specify delimited sample column names for use in the Field mapping section below. This sample should accurately represent the file names of the documents imported from the source.
> Delimiter: This delimiter should be the same delimiter you are using to separate column values in your document file names.
> Group files together before importing to target system: Checking this box results in all the documents that are imported at the same time being aggregated in a group and released as a single batch.
> Parse the associated directory folder structure for index values: This option will take the file path of the files selected for import and separate the folder names into index values. Enter a sample into the Sample folder structure box.
> When you click Parse sample information, you will see the folders under Index in the drop-down menus in the Field mapping panel. You can map these to your target index fields.
> Field mapping: This table allows you to designate the target index fields that are to be mapped to the imported file.
File System (Index File)
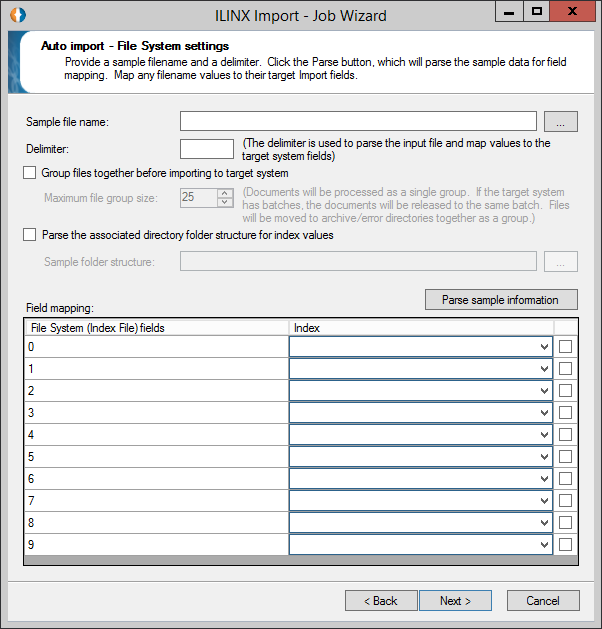
Selecting the File System import source will display the following options within the Auto import screen:
When you use the File System (Index File) job source, the following options are provided:
> Sample file name: Here you will specify delimited sample column names for use in the Field mapping section below. This sample should accurately represent the file names of the documents imported from the source.
> Delimiter: This delimiter should be the same delimiter you are using to separate column values in your document file names.
> Skip first line in the index file: Check this box if your index file has a header line, so that ILINX Import will know to skip it and not attempt to read it for import.
> Process each index line separately: This option causes ILINX Import to process each file in the import separately. The processing options you configured will run from start to finish on each file. This includes command-line processing programs; they will run with each file separately.
> Combine adjacent rows with matching index values into a single document: If two or more files are found with the same index values, these will be combined into a single document when imported.
> Use relative path to associate image files: This option allows you to use the relative paths within the delimited index file when referring to specific images that are to be included with the document.
> Parse the associated image file name for index values: This option will parse the file name based on the Delimiter you provide and assign the resulting values to the index fields you specify with the Image File Name Sample.
> When you click the Parse sample information button, the fields you supply will be placed into the drop-down menus in the Field mapping panel, which you can map to your target system index fields.
In addition, on the File filter and preprocess settings dialog, you will need to supply the extension of your index file so that ILINX Import will pick it up for processing.
File System (XML File)
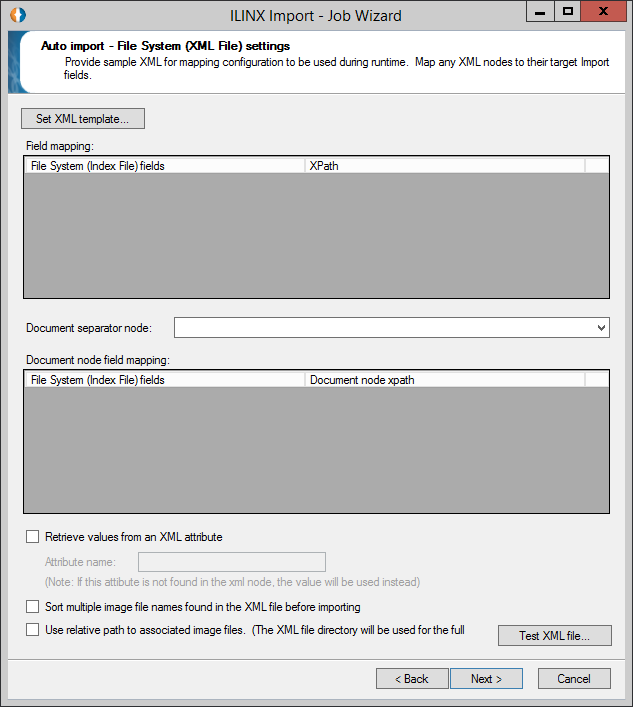
This job source gives you the following configuration options:
> Set XML Template: Clicking this button will open the XML Template dialog, where you can specify the format of your XML index file you will be using.
> Field mapping: Use field mapping to identify the index field values to the XPath.
> Document separator node: Specify the node name given in your XML template that designates the hierarchy for which fields are available in the panel below for mapping.
> Document node field mapping: This panel allows you to map the field values contained in your XML to your ILINX Capture batch and document fields.
> Retrieve values from an XML attribute: Checking this box will enable the Attribute name text box:
– Attribute name: Here you can specify the name of the XML attribute you wish to map to a target index field.
> Sort multiple file names found in the XML file before importing: If you are importing in an XML that contains multiple file names, checking this box will sort them alphabetically in the XML.
> Use relative path to associated image files: Use this option if the imageFileName field in the XML file lists relative paths (instead of the absolute paths) to the images you are importing.
> Test XML file…: This button opens the Test XML File dialog, where you can upload an XML file and parse it into its Name/Value pairs, which you can map to your target index fields.
In addition, on the File filter and preprocess settings dialog, you will need to supply the extension of your index file so that ILINX Import will pick it up for processing.
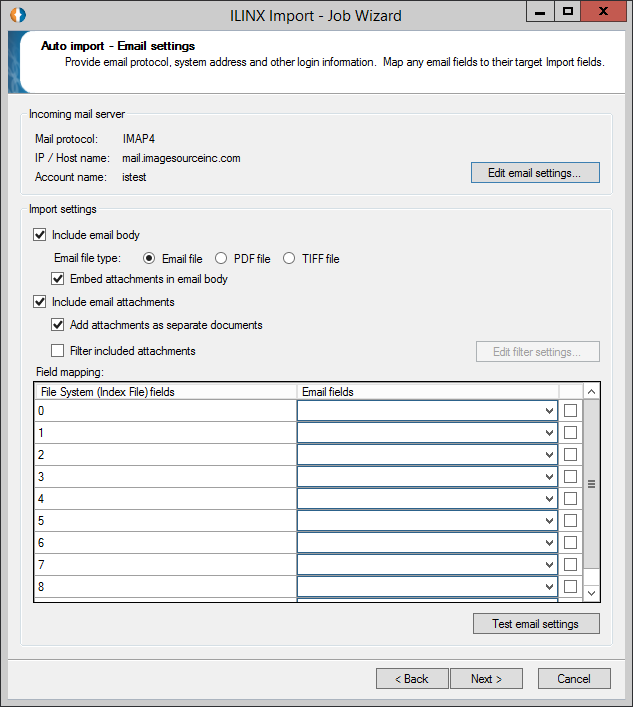
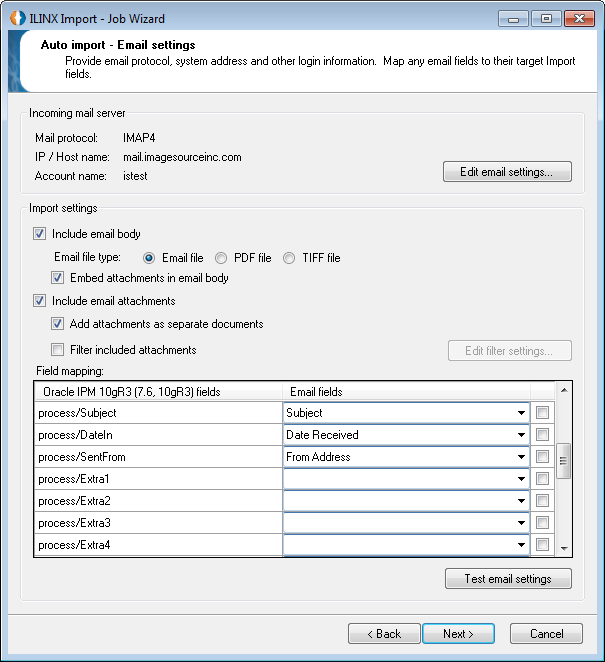
Use this option for watching an email inbox for messages containing keywords. When an email is identified for import, the values in the fields you specify (From Address, To Address, etc.) can be mapped to your target system’s document index fields.
Note: When using email import with ILINX Capture or ILINX Content Store, there is no built-in viewer for the message files. They will display as a question mark (?) icon, and when you double-click the file, it will be displayed in your default email message viewer.
Your first configuration options for this source will be shown on the Auto Import – Email settings page.
This page offers the following configuration options:
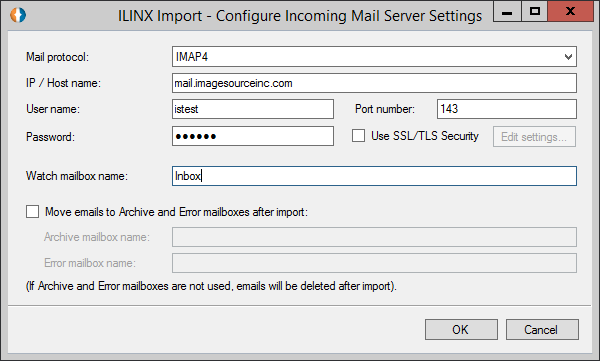
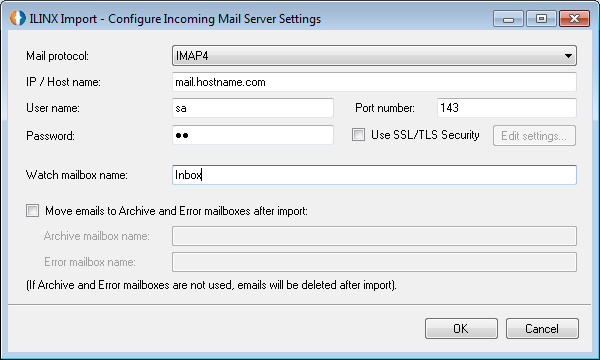
> Incoming mail server: This section displays the email configuration you’ve chosen by pressing the Edit email settings button to open the Configure Incoming Mail Server Settings dialog:
– This dialog requires you to input your Mail protocol, IP or Host name, User name, and Password. Port number and Security options may be required.
– Watch mailbox name: The mailbox that Import will poll for new content.
– Move emails to Archive and Error mailboxes after import: Checking this box requires you to give both an Archive mailbox name and an Error mailbox name.
Important Note: Unless you select mailboxes for the imported emails, they will be deleted off the server after import.
> Import settings: After entering the specific Incoming mail server credentials these settings will be enabled.
– Include email body: Check this box if you are primarily interested in importing the body of the emails. This enables the following options:
» Email file type: You can choose from three options of formats in which to save your email body: Email file, PDF file, or TIFF file.
» Embed attachments in email body: Choose this option if you want to import the attachments by including them in the .msg file that includes the email. If you select this option, when you open the email message with your default email viewer, the attached content will display as normal email attachments within the message.
Note: If you choose PDF or TIFF file formats, you will not be able to embed email attachments in the body of the email. This option will only import a PDF or TIFF version of the email body. However, you can still add the attachments as separate documents if you wish to import the email as a PDF or TIFF.
– Include email attachments: Check this box if you are primarily interested in importing the attachments of the emails. This enables the following options:
» Add attachments as separate documents: Choose this option if you want each attachment imported as a separate document.
Note: When imported as separate documents, each attachment will be of the same document type and have the same metadata as the accompanying email message.
» Filter included attachments: Check this box to enable the Edit filter settings button.
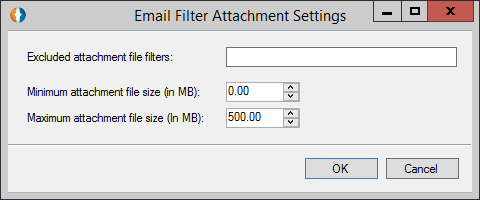
» Edit filter settings…: This button opens the Email Filter Attachment Settings dialog, where you can configure filter criteria for importing email attachments.
• Excluded attachment file filters: Here you can specify a comma-delimited list of file extensions you wish to exclude.
• Minimum attachment file size: Specify the smallest size (in MB) that attachments must exceed to be imported.
• Maximum attachment file size: Specify the largest size (in MB) that attachments may not exceed to be imported.
Note: This feature is especially useful when importing emails that may include icons or small images used in email signatures. These will, by default, import as separate documents if you check Add attachments as separate documents, or they will be embedded in the .msg file if you select Embed attachments in email body. You can filter out .JPG or .PNG files to prevent these from importing.
> Test email settings…: It is strongly advised that you press this button to validate your email settings before moving on. Otherwise, the job will fail when it attempts to run.
Target Systems
The sections below describe the job configurations unique to each import target. The majority of configuration options are the same across import targets, but each job has its own unique screen(s) for its configuration. These pages come after the source system pages and before the summary page. For general configuration options, see the Job Creation Wizard section. These standard configuration pages are straight-forward and will not be discussed in this section.
The following examples us the File System as a source type. This results in the Auto import page asking for a sample file name. This will vary slightly between job sources, depending on which you choose, but are similar enough that they will not be discussed individually.
File System (Index File)
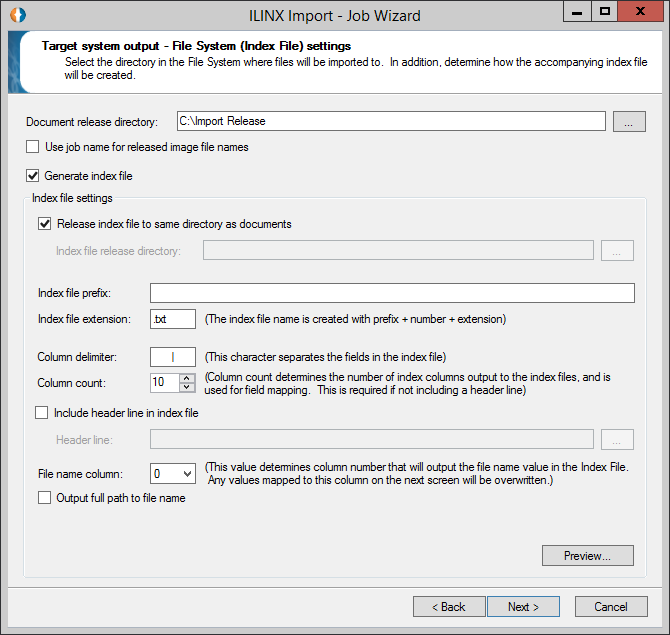
The first unique configuration screen for this target system is the Target system output – File System (Index File) settings screen. Here you can specify the Document release directory and Index file settings.
Within the Index file settings panel, you have the following options:
> Release index file to same directory as documents: ILINX Import will place the index file(s) in the same directory as you specified above.
> Index file release directory: If the setting above is not selected this entry box will be enabled. Enter or select the directory where the index files are to be released to.
> Index file prefix: The index file name is created with the following format: prefix + number + extension. You may specify a prefix here.
> Index file extension: The index file name is created with the following format: prefix + number + extension. You may specify an extension here.
> Column delimiter: Here you can specify what character will be used in the index file as a delimiter between index field values.
> Column count: The number entered here determines the number of columns that will be output to the index files as well as used in the field mapping.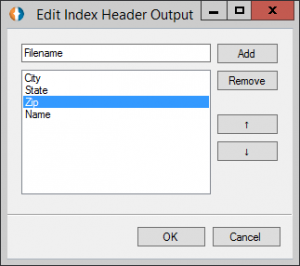
> Include header line in index file: This option allows you to create an index file header with the names of the document index fields. Click the Browse button to open the Edit Index Header Output window:
Add as many fields as you wish. You can rearrange them using the arrows on the right-hand side. When you are finished, click OK.
> File name column: This number should be the corresponding column number where the filename for the document is stored. For example, if you have the following metadata:
Img1234.tiff | Bob Jones | Seattle | Washington
Then the column number for the filename would be 0. If you are importing documents from an ILINX source, the default column for the file name is index 0. If you select a column here and reassign the column on the following page, the configuration setting on this page will take precedence, and the value you map on the next page will be overwritten.
> Output full path to file name: Specify whether the absolute path or the relative path will be output to the file name column. This is usually determined by whether the index file(s) will be output to the same directory as the files themselves. If so, you can leave this unchecked. If the index file(s) will be stored in a different directory, check this box.
> Preview: Click this button to be shown a preview of your index file.
Once you have finished configuring your options on this page, click Next. Configure the Auto Import screen as specified under the ILINX Import Source Systems settings of this document.
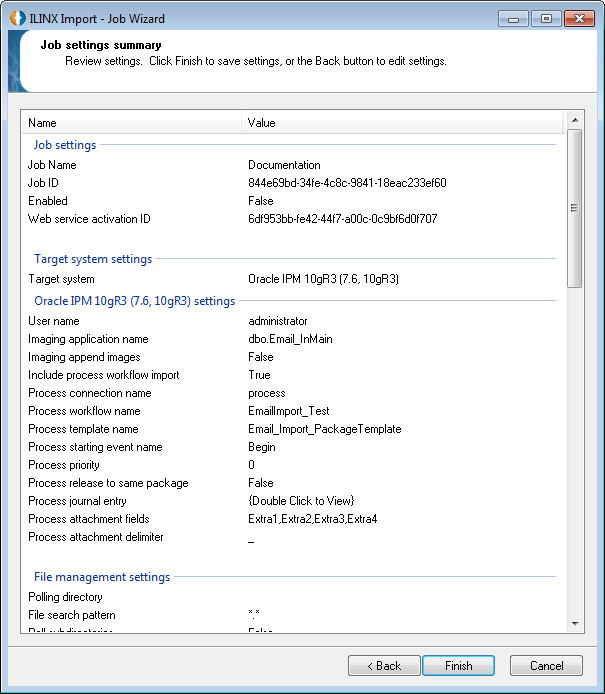
Once you have configured these options to your satisfaction, click Next. The following screen is the Job settings summary page. Verify your settings, then click Finish.
File System (XML File)
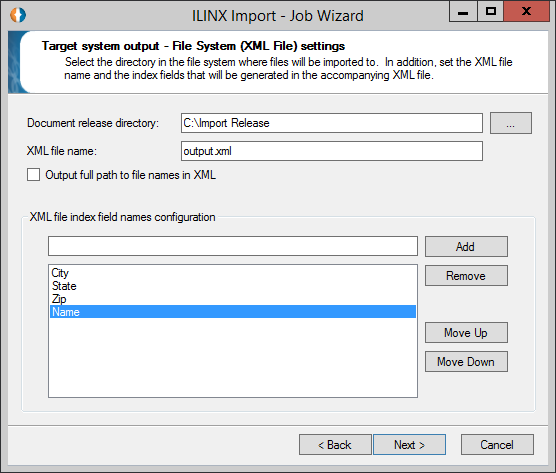
Choose this target system if you wish to output documents to your file system with an XML index file. The first unique screen for this job is the Target system output – File System (XML File) settings page.
The elements on this page are as follows:
> Document release directory: The directory where you wish to release the documents.
> XML file name: The name you wish to use for your XML index file.
> Output full path to file names in XML: This option determines whether the relative path or the absolute path for the document files are output in the XML index file.
> XML file index field names configuration: Put the names of your document index fields into this list using the Add button. You can change their order by using the Move Up and Move Down buttons. You will map your source fields to the fields you specify here on the next configuration page.
Once you have finished configuring your options on this page, click Next. Configure the Auto Import screen as specified under the ILINX Import Source Systems settings of this document
When you finish your configurations, click Next. The following screen is the Job settings summary page. Verify your settings, then click Finish.
File System (XML Template File)
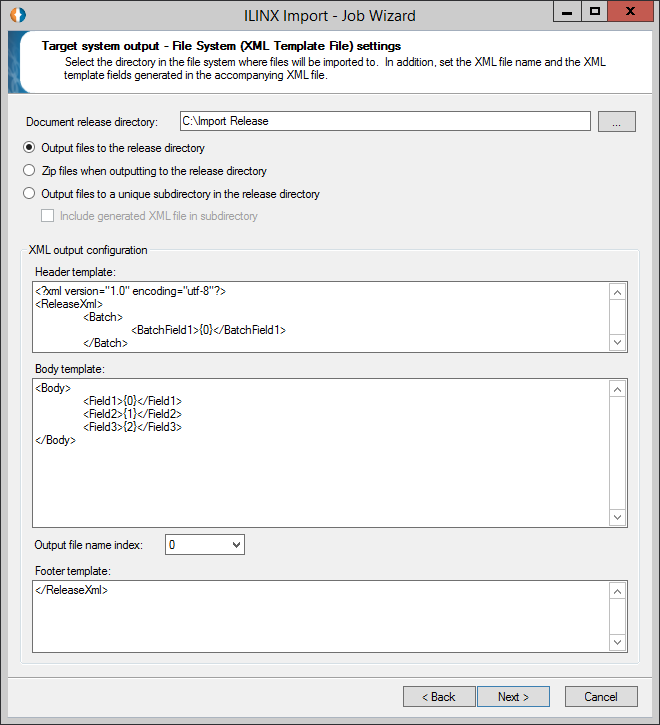
This target option will output an XML file in the format you specify within the template. The first configuration page for this target is the Target system output – File system (XML Template File) settings page.
This page has the following configuration options:
> Document release directory: Here you can specify the directory where documents will be released.
> Output files to the release directory: Selecting this option will release all files to the directory indicated above.
> Zip files on release: Selecting this option will result in the files being zipped before being placed in the target directory.
> Output files to unique subdirectory on release: Checking this option will result in each batch of imported documents being released into its own subdirectory within the selected target directory.
– Include generated XML file in subdirectory: Choose whether you want to place the XML file generated by ILINX Import in the subdirectory.
> XML output configuration: Within these subsections, you can formulate your XML template. The fields you enter here will be available on the next screen to which you will map source index fields. Edits may be made to the Header template, Body template, and/or Footer template.
Note: The column Index values begin at 0.
> Output file name index: Specify your Output file name index, which should correspond to the column number where the file name of the document can be found.
Once you have finished configuring your options on this page, click Next. Configure the Auto Import screen as specified under the ILINX Import Source Systems settings of this document.
When you have configured these options to your satisfaction, click Next. The subsequent screen is the Job settings summary page. Verify your settings, then click Finish.
ILINX Capture
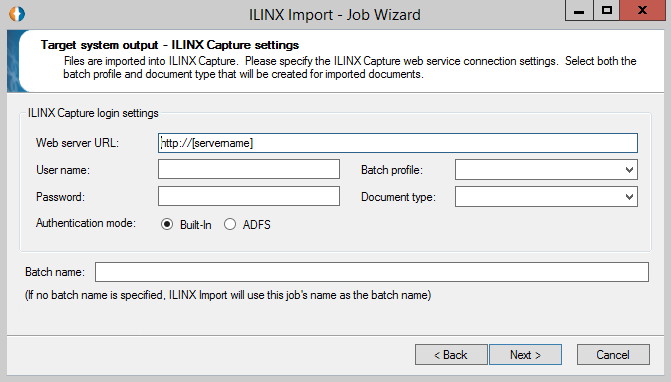
This target type allows you to import documents into a batch defined in your instance of ILINX Capture. After the standard configuration screens, the Target system output – ILINX Content Store settings page will prompt you for your ILINX credentials.
Screen Elements
The elements for this screen are:
> Web server URL – This required field is used to define the ILINX Capture profile that ILINX Import will connect to. The web server URL is necessary for proper ILINX Capture profile log in, batch profile specifications, etc.
> User name – This field is used to enter the appropriate ILINX Capture user name for log in.
> Password – This field is used to enter the applicable password to your ILINX Capture user name in the field above.
> Batch profile – This field offers a drop-down list of the batch profiles available to import the document(s) to.
Note: A valid web server URL must be in place to select a batch profile.
> Document type – Specify the ILINX Capture batch profile’s doctype that you are importing. If multiple doctypes are required, they can be specified in the URL params.
> Authentication mode: Select Built-In or ADFS as the authentication mode for ILINX Import to connect with ILINX Capture.
> Batch name – This field is used to name the batch of documents that will be imported. If no name is given, the job name will become that batch name upon completion.
Once you have finished configuring your options on this page, click Next. Configure the Auto Import screen as specified under the ILINX Import Source Systems settings of this document.
When you have configured these options to your satisfaction, click Next. The subsequent screen is the Job settings summary page. Verify your settings, then click Finish.
ILINX Content Store
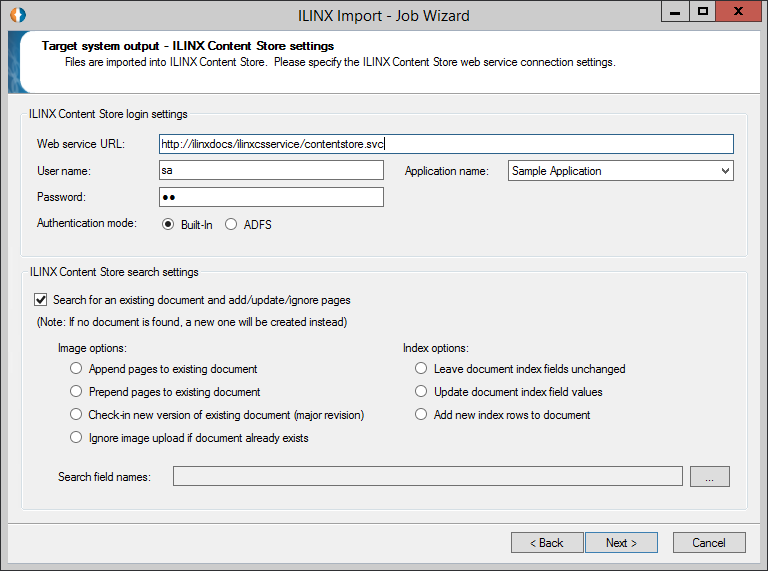
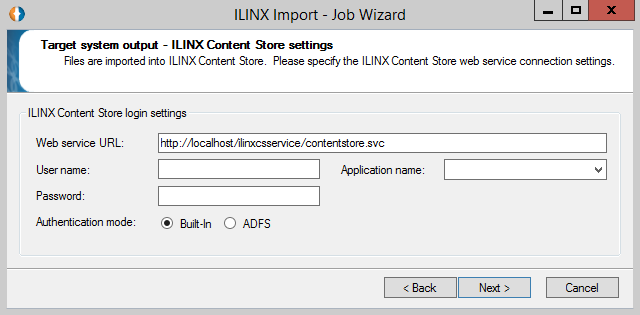
This option allows you to target your instance of ILINX Content Store and import documents from your selected source into a batch of your choosing. The first configuration screen is the Target system output – ILINX Content Store settings.
Screen Elements
The elements for this screen are:
ILINX Content Store login settings:
> Web server URL – This required field is used to define the ILINX Content Store profile that ILINX Import will connect to. The web server URL is necessary for proper ILINX Content Store profile log in, batch profile specifications, etc.
> User name – This field is used to enter the appropriate ILINX Content Store user name for log in.
> Password – This field is used to enter the applicable password to your ILINX Content Store user name in the field above.
> Application name – This field offers a drop-down list of the applications available to import the document(s) to.
Note: A valid web server URL must be in place to select a batch profile.
> Authentication mode: Select Built-In or ADFS as the authentication mode for ILINX Import to connect with ILINX Capture.
ILINX Content Store search settings:
> Search for an existing document and add/update/ignore pages – Enable this check box to enable the Image options and Index options.
– Image options – Select how the image is going to be imported into ILINX Content Store if an existing document is found. Options include:
» Append pages to existing document – If an existing document is found, the image will be attached at the end of the document.
» Prepend ages to existing document – If and existing document is found, the image will be attached to the beginning of the document.
» Check-in new version of existing document (major revision) – The image will be uploaded as a new version of the existing document maintaining previous versions.
» Ignore image upload if document already exists – Will not upload the image is one already exists with the current values.
– Index options – Select how the index values are going to be imported into ILINX Content Store. Options include:
» Leave document index fields unchanged – When imported, index values will remain the same as found in ILINX Content Store.
» Update document index field values – Index values will be updated with the new values from the source system.
» Add new index rows to document – New index rows will be added to the database with the index values that will be pointed to the document image.
> Search field names – To edit search settings, click the ellipses next to Search field names. The resulting dialog allows you to choose your search criteria based on the value of one or more index fields. If the chosen field’s value matches the incoming source field value that you mapped it to, the page(s) will be appended/prepended to that document.
Note: You must ensure that you have mapped the source index field to a target index field if you use it as a search field. Otherwise, there will be no value to search for. In this case, and in the case that no document is found matching the value provided, a new document will be created.
Once you have finished configuring your options on this page, click Next. Configure the Auto Import screen as specified under the ILINX Import Source Systems settings of this document.
When you have configured these options to your satisfaction, click Next. The subsequent screen is the Job settings summary page. Verify your settings, then click Finish.
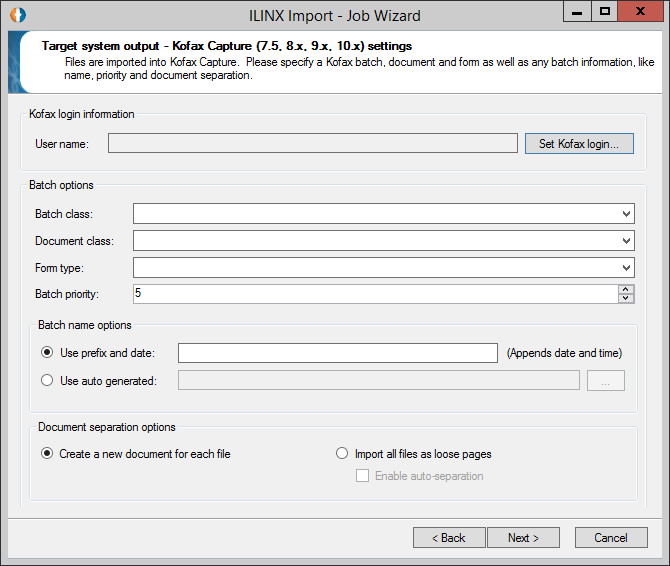
Kofax Capture
Choose this target system to use your Kofax Capture system as your import target system. After configuring your source system settings, the Kofax Capture settings screen will prompt you for your Kofax login information. Click the Set Kofax login button to log in. Click OK to return to the configuration page:
After logging in, this page gives you the following configuration options:
> Batch options: Here you will specify the settings regarding the batch you’ve chosen to import your files into. You will need to choose the following options from the drop-down menus:
– Batch class: Choose which existing Kofax batch class into which you will import your files from your source system.
– Document class: Choose the Kofax document class within your chosen batch class where the documents will be placed.
– Form type: Choose the Kofax form type.
– Batch priority: Sets the priority with which this batch will be processed, relative to other Kofax batches.
– Batch name options:
» Use prefix and date: Enter a prefix to the file. This will automatically append the date to the end as well.
» Use auto generated: Uses system fields to generate the batch name.
– Document separation options: If you don’t want all files imported into a single document, use these settings to configure the import:
» Create a new document for each file: Choose this option if you want to create a separate Kofax document from each file you import.
» Import all files as loose pages: Choosing this option causes all files to be imported as loose pages.
» Enable auto-separation: Enables separation of pages automatically.
Once you have finished configuring your options on this page, click Next. Configure the Auto Import screen as specified under the ILINX Import Source Systems settings of this document.
When you have configured these options to your satisfaction, click Next. The subsequent screen is the Job settings summary page. Verify your settings, then click Finish.
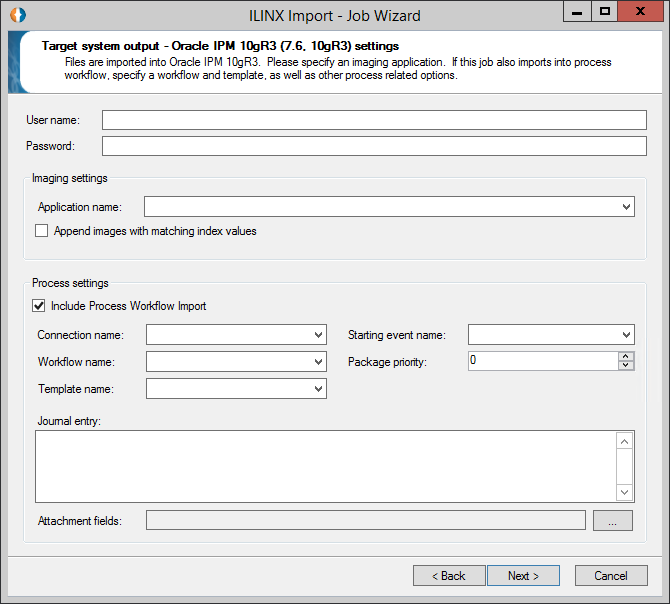
Oracle IPM 10g
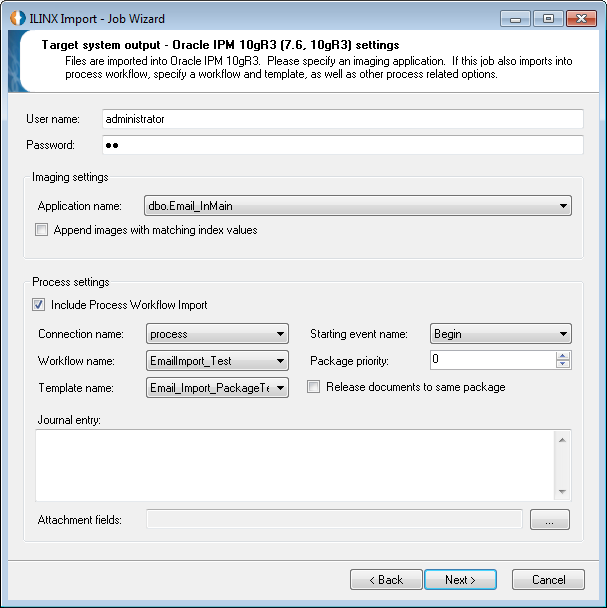
Choose this option if you wish to use Oracle IPM 10g as your target system. After configuring your source system, you will be presented with the following configuration options unique to this target system:
After logging in, this page gives you the following configuration options:
> Imaging settings: Here you will specify the settings regarding the batch you’ve chosen to import your files.
– Application name: Select your Oracle IPM 10g application into which you will import your documents.
– Append images with matching index values: Check this box if you wish to append separate images that have the same index values into a single image when imported.
> Process settings:
– Include Process Workflow Import: Check this box to automatically create a workflow package for each inbound document.
– Connection name: ODBC datasource name for the Oracle IPM process database.
– Workflow name: Select the desired Oracle IPM Process workflow into which you will send the imported documents.
– Template name: Select the desired Oracle IPM Process workflow package template.
– Starting event name: Select your desired process start event within the workflow.
– Package priority: (Optional) Set the initial priority for the new package.
– Journal entry: (Optional) Set any text you want added to the new package as a journal entry.
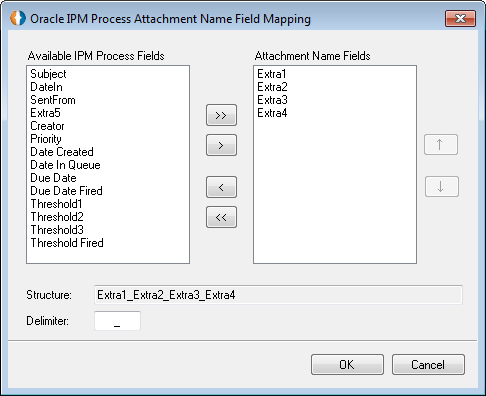
– Attachment fields: Click the button to build an attachment name from existing package fields. This button opens the Oracle IPM Process Attachment Field Names dialog where you can configure the options.
Once you have finished configuring your options on this page, click Next. Configure the Auto Import screen as specified under the ILINX Import Source Systems settings of this document.
When you have configured these options to your satisfaction, click Next. The subsequent screen is the Job settings summary page. Verify your settings, then click Finish.
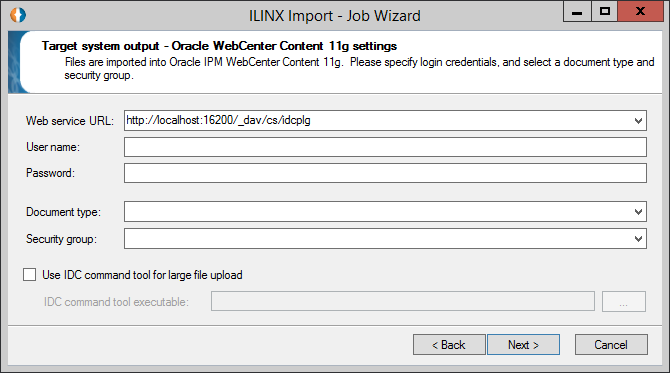
Oracle WebCenter Content
Select this option to import documents into your Oracle WebCenter Content system. After configuring your source settings, you will be presented with the Oracle WebCenter Content 11g settings dialog:
After providing your web service URl and logging in, this page gives you the following configuration options:
> Document type: Choose from the drop-down menu which document type you wish to create with the imported files.
> Security group: Select which security setting you want for the new document(s).
> Use IDC command tool for large file upload: Check this box to use an IDC command tool executable with your large batch of documents to be imported.
> IDC command tool executable: Browse out to the path for your command tool executable you wish to use with your job.
The following screen allows you to map your source fields to your target Oracle IPM 10g fields. Use the drop-down menus to configure the mapping. For more information on the configuration options listed on this page, refer to the Import Source System description for the source you have selected. When you are satisfied, click Next.
The subsequent screen is the Job settings summary page. Verify your settings, then click Finish.
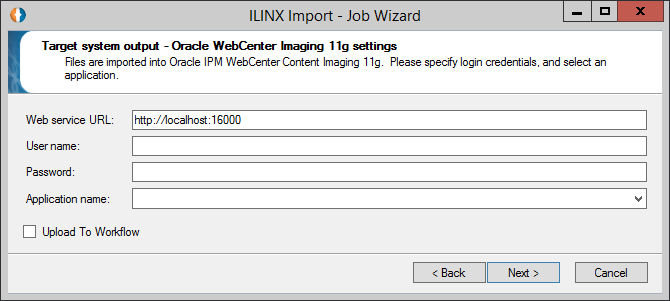
Oracle WebCenter Imaging
Select this option to import documents into your Oracle WebCenter Imaging system. After configuring your source settings, you will be presented with the Oracle WebCenter Imaging 11g settings dialog:
After providing your web service URl and logging in, this page gives you the following configuration options:
> Application name: Choose from the drop-down menu which application you wish to use with the imported files.
> Upload to Workflow: Check this box if you wish to place the imported documents into the workflow.
The following screen allows you to map your source fields to your target Oracle IPM 10g fields. Use the drop-down menus to configure the mapping. For more information on the configuration options listed on this page, refer to the Source System description for the source you have selected. When you are satisfied, click Next.
The subsequent screen is the Job settings summary page. Verify your settings, then click Finish.
For configuration regarding this target system, please contact ImageSource Technical Support.
IBM FileNet P8
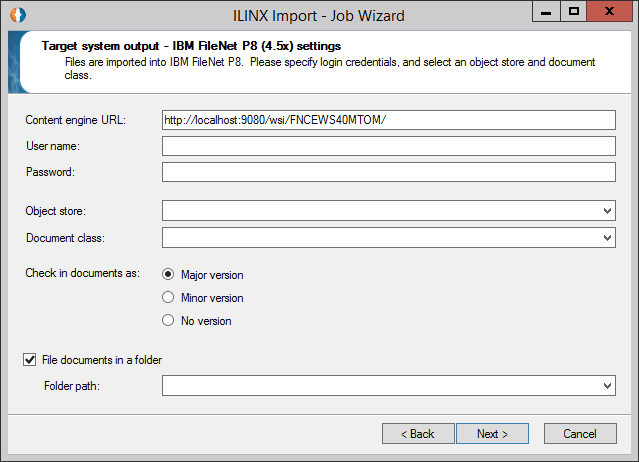
Select this option to import documents into your IBM FileNet P8 system. After configuring your source settings, you will be presented with the IBM FileNet P8 settings dialog:
After providing your content engine URL and logging in, this page gives you the following configuration options:
> Object store: Choose the object store where your document class resides.
> Document class: Choose the class of document.
> Check in documents as: Select the version option that describes the changes made to the document (if applicable). Choose from:
– Major version (increments version number by 1)
– Minor version (increments version number by .1)
– No version
> File documents in a folder: Check this box to choose a folder into which documents will be placed.
> Folder path: The file location documents will be sent to.
Custom Import Process
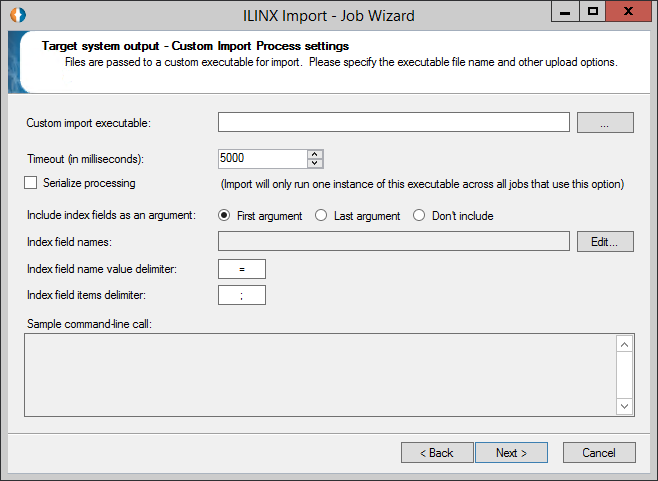
Selecting this option will allow you to enter a specific executable which will import documents using a command line to import a path to each discoverable file. After configuring your source settings, you will be presented with the Custom Import Process settings dialog:
After providing the custom executable program, this screen gives you the following configuration options:
> Timeout (in milliseconds): Change the timeout settings to indicate when Import should terminate the exe and move the file to the error folder.
> Serialize processing: Choose this option to force Import to run only one instance of the custom executable across all enabled jobs.
> Include index fields as an argument: Choose option First argument, Last argument, or Don’t include. Selecting First or Last will enable the following options:
– Index filed names: Specify the field names that should be included as part of the arguments passed to the custom executable. You will map the values for these arguments in the next page of the job wizard.
– Index field name value delimiter: Specify the delimiter used in between index field name and their values.
– Index field items delimiter: Specify the delimiter used between index field/value pairs.
– Sample command-line call: This field displays the command-line call using the specified configurations above.
If the custom executable program exits with a ‘0’ (success), Import will move the file into the specified Success folder. If the custom executable program returns a non-zero number, Import will move the file into the specified Error folder.
Job Creation Examples
Two examples of common scenarios are provided below to walk you through the creation of various types of jobs. The first example, File System to ILINX Content Store, demonstrates the option to poll a file folder for documents to import to ILINX Content Store. In the example, this is done by formatting the documents’ filenames with delimited index values, but you can also choose to pull index values from a delimited index file or XML file instead. The second example, Email to Oracle IPM, details the creation of a job that polls an email folder for emails containing keywords. These are picked up and pushed to an Oracle IPM system, with or without the attachments.
These examples can be mixed and matched with any other source or target systems. For more information about the source and target options, see the section on the Creating a New Job.
File System to ILINX Content Store
With this job configuration, you can take files from your file system and import them directly into your application in ILINX Content Store. To configure this job:
Step 1: From the ILINX Import main dialog, click New. This will open the job creation wizard. Give your new job a name.
Step 2: From this dialog, under Import documents from selected source, choose File System. Under Release imported documents to target system, select ILINX Content Store. If you wish to use scheduling, auditing, or notifications, configure these now. Click Next.
Step 3: You will now be directed to the File management settings dialog. On the following screen, you have the options to Retain successfully imported files, select Polling, Success, and Error folders, and change the default Temp working folder, if you wish. Once you have configured these settings, click Next.
Step 4: The following dialog is the File filter and preprocess settings dialog. Here you will configure your criteria for a file in your polling folder to be picked up by this job, as well as preprocessing options. In addition to the configuration options outlined in the section File Filter and Preprocess Setting Dialog, you have the following configuration option:
> File search filter – Enter the type of filter to determine what files will be read by ILINX Import. Here are some examples:
– Leave the filter as a wildcard filter if any type of file should be imported.
– If directly importing images to the target system, and only TIFF files should be imported, change the filter to be *.tif*.
– If the auto import type has been set to delimited text, change the filter to be *.txt* (or the appropriate metadata text file extension).
– If files will be extracted from a zip file, change the filter to be *.zip*
Once you have configured this option and the remaining options, click Next.
Step 5: In the Target system output – ILINX Content Store settings, enter your login information for ILINX Content Store. When you click on the Application name drop-down, your credentials will be validated. Select the desired application from the list, and then click Next.
Step 6: In the Auto import – File System settings dialog, you can choose the mapping of your document metadata values from your filename to ILINX Content Store. Since this example is using the File System option, the metadata for your files will be taken from the filename of the image, so you will be required to provide a sample filename and a delimiter. The delimiter is used to parse the input file and map values to the target system fields.
Step 7: Click the Parse sample information to populate the drop-down menus under Index. Then select the indexes you wish to map to your ILINX Content Store document index fields. Once you are finished, click Next.
Step 8: The next screen allows you to review all settings. You can complete the job configuration by clicking Finish, or you can return to previous screens to make changes by clicking the Back button.
Email to Oracle IPM
This configuration will allow you to poll an email inbox for emails containing specified keywords and push them and their attachments to your Oracle IPM system.
To configure the job:
Step 1: From the ILINX Import main dialog, click New. This will open the job creation wizard. Give your new job a name.
Step 2: From this dialog, under Import documents from selected source, choose Email. Under Release imported documents to target system, select Oracle IPM. If you wish to use scheduling, auditing, or notifications, configure these now. Then click Next.
Step 3: On the following screen, you have the options to Retain successfully imported files, select an Error and Success folder, and change the default Temp working folder, if you wish. Once you have configured these settings, click Next.
Step 4: The following screen is the File filter and preprocess settings Here you can specify your preprocessing options for the documents you want to import. For more information on these settings, see the File Filter and Preprocess Settings Dialog section. Once you are satisfied with your configurations, click Next.
Step 5: The next screen is unique to the Oracle IPM system.
Here you will find configuration items for your target system. These items include:
> User name – Enter your user name here.
> Password – Enter your user password here.
> Imaging settings
– Application name – Select an application name from the drop-down list.
– Append images with the matching index values – Checking this box appends any images that have matching index values to a single document.
> Process settings: Checking the Include process workflow import box enables access to the process settings.
– Connection name – Select the connection name from the drop down list.
– Workflow name – Select the workflow name from the drop down list.
– Template name – Select the template name from the drop down list.
– Starting event name – Select the starting event name from the drop down list.
– Package priority – Select the package priority from the drop down list.
– Journal entry – Add journal entries or notes for this job here.
– Attachment fields – Clicking on the attachment field’s button launches the Oracle IPM Process attachment field names configuration box, allowing mapping of available field names with attachment field names and choosing a delimiter (see screenshot below).
Step 6: The following page is the Auto import – Email settings dialog.
Here you can configure your email import options. These options are:
> Incoming mail server – Clicking on the edit email settings button launches the ILINX Import configure incoming email settings (see example below Import Settings section).
> Import settings
– Include email body – Checking this box includes the email body in the import. You can also specify if you want to preserve the email body as an email or convert it to a PDF of TIFF file for inclusion.
– Embed attachments in email body – Checking this box embeds email attachments within the email body as they are imported, storing both together.
– Include email attachments – Checking this box includes email attachments with the email when imported as separate entities within the same document.
– Add attachments as separate documents – Checking this box adds email attachments as separate documents during the import process.
– Field mapping – Map between Oracle IPM fields and email fields using the drop-down lists. The values in the email fields will be stored in the Oracle document fields you have mapped them to.
> Edit email settings – Clicking on the test email settings button checks proper configuration to mail host.
This screen appears upon clicking Edit Email Settings. The elements for this screen are:
> Mail protocol – Select the desired mail protocol from the drop down list.
> IP / host name – Input your IP host name here.
> User name – Input your user name here.
> Password – Input your password here.
> Port number – Displays the port number for the mail server (can be changed by typing in a different port number if needed).
> Watch mailbox name – Displays the watch mailbox name (can be changed by typing in a different watch mailbox name if needed).
> Move emails to archive and error mailboxes after import – Check this box to enable input of the following mailboxes:
– Archive mailbox name – Enter your archive mailbox name if you want to archive to an archive mailbox.
– Error mailbox name – Enter your error mailbox name if you want to archive to an error mailbox.
Note: If Archive mailbox name is not used, emails will be deleted after import.
Step 7: After configuring your email settings, click Next. The following screen allows you to review all settings. You can complete the job configuration by clicking Finish, or you can return to previous screens to make changes by clicking the Back button.
Other Settings
Annotations & Comments
ILINX Import has the ability to import document annotations or comments along with the documents themselves. When ILINX Import finds files with the same name (but different file extensions) as the file it has located for import, it will automatically pick it up along with the original file:
> Annotation file: This file has the same name as the file for import, but has an extension of .bin. These annotations must be in ILINX format to be imported into an ILINX product.
Note: If you want to convert Oracle IPM 10g annotation files to ILINX format, you can use the ILINX Import Annotation Preprocessor command-line utility. Contact ILINX support for more information.
> Comment file: This file has the same name as the file for import, but has an extension of .dsc. The format for each comment in this file is:
CreatedBy | CreatedOn | Comment Text
sa | 12/23/2014 4:26:54 PM | message 1
Application Programming Interface
The application programming interface (API) requires that ILINX Import is on a machine that has Microsoft IIS installed.
The license file must in the following path:
\Install path\ImageSource\ILINX Import\WebService\Bin
After a successful install, navigate to https://localhost/ILINXImportService/ILINXImport.asmx to see the web service API. This link is only available to be executed on the server where ILINX Import is installed.
The following will display, with links to the available operations:
Note: All code examples assume the following declarations within the class:
//Variable to hold filebytes read from the filename
Byte[] fileBytes;

//Creates client for interaction with Import
ILINXImportSoapClient myclient = new ILINXImportSoapClient();
CreateUploadSessionRequest
Parameters:
> String ActivationID – The web activation ID that is uniquely generated for each job.
Note: This information is also available under the Job Settings Summary window accessed by pressing the View… button.
> String jobName – The name of the job you created in ILINX Import that you wish to run.
> Guid sessionID – Unique ID for each session run.
> String createdByUserName – User ID used to create the request for the session.
> DateTime dateCreated – Date request is created.
> DateTime expirationDate – Date request is removed.
> String urlParams –
Return type: Void
IsUploadSessionForNonUrlParams Complete
Parameters:
> String ActivationID – The web activation ID that is uniquely generated for each job.
Note: This information is also available under the Job Settings Summary window accessed by pressing the View… button.
> String jobName – The name of the job you created in ILINX Import that you wish to run.
> Guid sessionID – Unique ID for each session run.
Return type: bool IsUploadSessionForNonUrlParamsCompleteResult
RetrieveUploadSessionRequest
Parameters:
> String ActivationID – The web activation ID that is uniquely generated for each job
Note: This information is also available under the Job Settings Summary window accessed by pressing the View… button.
> String jobName – The name of the job you created in ILINX Import that you wish to run
> Guid sessionID – Unique ID for each session run.
Return type: String RetrieveUploadSessionRequestResult
RunImport
Parameters:
> String ActivationID – The web activation ID that is uniquely generated for each job
Note: This information is also available under the Job Settings Summary window accessed by pressing the View… button.
> String jobName – The name of the job you created in ILINX Import that you wish to run
Return type: Void
RunImportWithFile
Parameters:
> String ActivationID – The web activation ID that is uniquely generated for each job
Note: This information is also available under the Job Settings Summary window accessed by pressing the View… button.
> String jobName – The name of the job you created in ILINX Import that you wish to run.
> String fileName – The path to the file you wish to import.
> Byte[] fileBytes – The selected file bytes held in a byte array.
Return type: Void
Code Example:
public void RunImportWithFile(string webActID, string jobName, string fileName)
{
    //Reads bytes from specified file for passage to Import
    fileBytes = File.ReadAllBytes(fileName);

    try
    {
        //Runs import with webActivationID, jobName, and uploaded file
        myclient.RunImportWithFile(webActID, jobName, fileName, fileBytes);
        myclient.Close();
        MessageBox.Show("Run Import executed successfully.");
    }
    catch
    {
        //Throws error if operation fails
        MessageBox.Show("Error: Operation aborted.");
        myclient.Abort();
        throw;
    }
}
UpdateDocumentIndexValues
Note: This functionality only works with Oracle systems.
Parameters:
> String ActivationID – The web activation ID that is uniquely generated for each job.
Note: This information is also available under the Job Settings Summary window accessed by pressing the View button.
> String jobName – The name of the job you created in ILINX Import that you wish to run
> String searchFieldNameValues – Allows you to search for a particular document using a specified value of a certain index field
Example syntax: fieldname1=value1;fieldname2=value2
> String updateIndexValues – Refers to the index field you wish to modify and the value you wish to assign to it
Example syntax: fieldname1=value1;fieldname2=value2
> bool shouldUpdateSingleDocOnly – If more than one document with this value is found, you can choose to update only one or all.
Return type: int UpdateDocumentIndexValuesResult
UpdateUploadSessionRequest
Parameters:
> String ActivationID – The web activation ID that is uniquely generated for each job.
Note: This information is also available under the Job Settings Summary window accessed by pressing the View… button.
> String jobName – The name of the job you created in ILINX Import that you wish to run.
> Guid sessionID – Unique ID for each session run.
> String createdByUserName – User ID used to create the request for the session.
> DateTime dateCreated – Date request is created.
> DateTime expirationDate – Date request is removed.
> String urlParams –
Return type: Void
UploadFileToPollingDirectory
Parameters:
> String ActivationID – The web activation ID that is uniquely generated for each job.
Note: This information is also available under the Job Settings Summary window accessed by pressing the View button.
> String jobName – The name of the job you created in ILINX Import that you wish to run.
> String fileName – The path to the file you wish to import.
> Byte[] fileBytes – The selected file bytes held in a byte array.
Return type: Void
UploadFileToTargetSystem
Note: This method returns a Batch ID or Confirmation Code of type String to confirm that the file was imported into the target system successfully.
Parameters:
> String ActivationID – The web activation ID that is uniquely generated for each job.
Note: This information is also available under the Job Settings Summary window accessed by pressing the View button.
> String jobName – The name of the job you created in ILINX Import that you wish to run.
> Byte[] fileBytes – The selected file bytes held in a byte array.
> String FileExtension – The extension of the file you wish to upload.
> String indexFieldNameValues – Refers to metadata you wish to associate with the doc after upload to the target system.
Example syntax: fieldname1=value1;fieldname2=value2
Note: If using ILINX Capture, you must specify whether this field is a batch- or document-level field. Example: document/fieldname1=value1;batch/fieldname2=value2
Return type: string UploadFileToTargetSystemResult
Code Example:
public string UpdateFileToTargetSystem(string webActID, string jobName, string fileName, string fileExtension, string indexValues)
{
    //Reads bytes from specified file for passage to Import
    byte[] fileBytes = File.ReadAllBytes(fileName);

    try
    {
        //Uploads file to target system along with specified metadata
        //Also returns a string confirmation
        string returnvalue = myclient.UploadFileToTargetSystem(webActID, jobName, fileName, fileExtension, indexValues);
        myclient.Close();

        //Displays return value to confirm successful import
        MessageBox.Show(returnvalue);
        MessageBox.Show("Update executed successfully.");
    }
    catch
    {
        //Throws error if operation fails
        MessageBox.Show("Error: Operation aborted.");
        myclient.Abort();
        throw;
    }
}
Capture Session Request Management
You can implement a stored procedure that, when executed, will delete URL registrations older than a specified date. Execution of this stored procedure can then be controlled by a SQL Server Agent job: once the stored procedures are created within the ILINX Capture database, you can create the SQL Server Agent job to call it as desired. Below are the two stored procedures for your convenience:
This stored procedure is for deleting URL Request rows older than X number of days.
CREATE PROCEDURE DeleteXdaysFromDate
@daysToDelete int
AS
BEGIN
SET NOCOUNT ON;
DECLARE @dateToDelete datetime
SET @dateToDelete = DATEADD(DAY, (@daysToDelete * -1), GETDATE())
DELETE FROM [dbo].[CaptureSessionComplete]
FROM [dbo].[CaptureSessionComplete] a
INNER JOIN [dbo].[CaptureSessionRequest] b
ON a.[SessionID] = b.[SessionID]
WHERE b.[DateCreated] <= @dateToDelete
DELETE FROM [dbo].[CaptureSessionRequest]
WHERE [DateCreated] <= @dateToDelete
END
GO
This stored procedure is for deleting URL Request rows older than a specific date:
CREATE PROCEDURE DeleteOlderThanDate @date DATETIME
AS
BEGIN
SET NOCOUNT ON;
DECLARE @dateToDelete DATETIME
SET @dateToDelete = @date
DELETE
FROM [dbo].[CaptureSessionComplete]
FROM [dbo].[CaptureSessionComplete] a
INNER JOIN [dbo].[CaptureSessionRequest] b ON a.[SessionID] = b.[SessionID]
WHERE b.[DateCreated] <= @dateToDelete
DELETE
FROM [dbo].[CaptureSessionRequest]
WHERE [DateCreated] <= @dateToDelete
END
GO
