Contents
Have another version? ILINX version 8.5, ILINX version 8.0, Older versions are included only in the installation package.
About
This document describes how to install, configure, and run the ILINX Import Document Upload tool. The ILINX Import full installation is required.
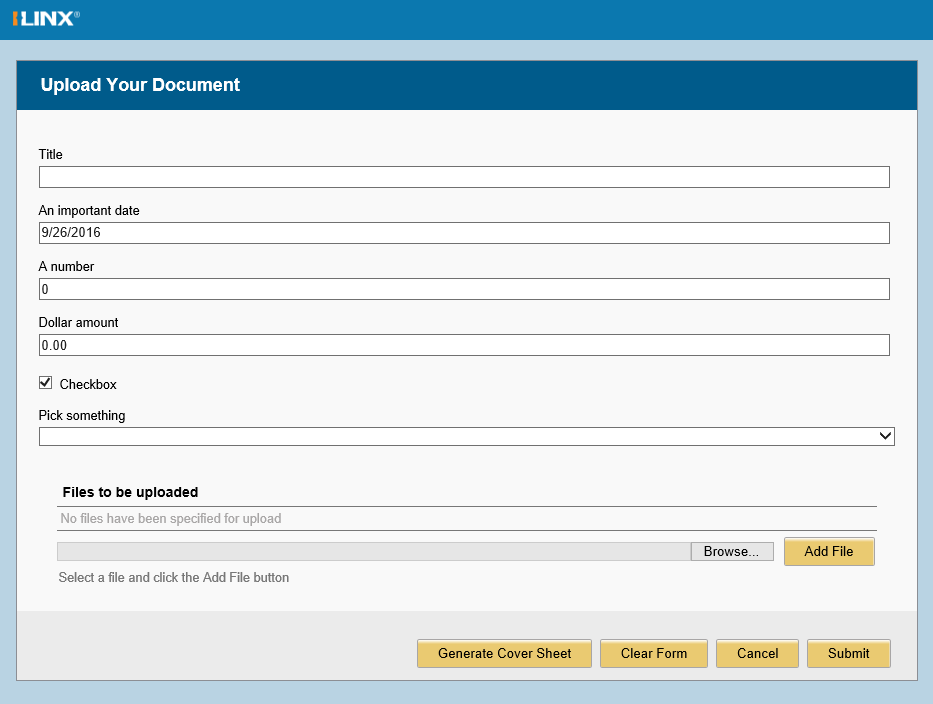
The ILINX Document Upload Tool is a web application that allows customers and/or employees to upload one or more documents directly into an ILINX Capture workflow, even from outside the organization’s network. Users access the upload tool via a web URL that can be integrated into an existing website or application or can be delivered in an email. The URL parameters control which document types are being requested from the recipient. The document metadata to be collected with the uploaded content is determined by configurations defined within ILINX Capture.
System Requirements
Supported Installation Configurations
For general information on supported and recommended hardware, OS, web browsers, databases, etc. for ILINX products, please refer to the ILINX Support Matrix.
Operational Considerations & Limitations
Please note that there are many factors that affect the ILINX Import’s operational performance. One major factor is the size of the file being processed.
Generally, all individual file conversions should be limited to a maximum total file size of 250MB. There are many variables that could affect this limit, such as shared machine resources (i.e., memory) and processors. It is possible you may experience problems with slightly smaller file sizes, while it is also possible that ILINX Import could process larger file sizes, all depending on the environment.
In addition, converting documents to PDF format could result in very large files and presents an additional consideration. The final size of the converted PDF is dependent on the original document characteristics including; format (TIFF, PDF, Word, JPEG, etc.), number of pages, color depth, page complexity, etc.
If you expect that your processing requirements will exceed the operational guidelines described here, please consider these options:
> Test the upper limits of your conversion needs in your environment with your largest documents.
> Increase size of the server farm and or machine resources (i.e., memory, processors, etc.).
> Break large documents into multiple, smaller documents.
If you have questions, contact ImageSource Technical Support for assistance.
Job Creation Wizard
The ILINX Import user interface is where the import profiles are managed for both file system and ECM Capture targeting. It is designed to establish the correct dependencies of job configurations in the correct order and to aid in preventing user input error by validating user input on each screen.
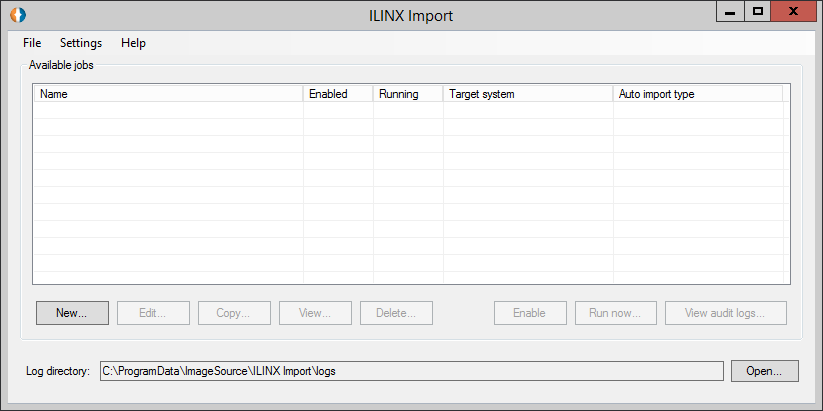
The ILINX Import job creation wizard can be launched from the Available Jobs main screen of ILINX Import and supports the functions New, Edit, Copy, View, and Delete.
Available Jobs
Screen Elements
This is the home window for ILINX Import. It provides a list of the currently configured jobs on the system, including the display of the following fields:
> Name – The job name.
> Enabled – This column shows the current availability of the job. The two available states are shown below:
– True – The job is currently available to be run by ILINX Import.
– False – The job is not currently available to be run.
> Running – This column shows the current status of the job. The following are the two states a job can be in:
– True – The job is currently running.
– False – The job is not currently running.
> Target system – Selecting the target system designates where a job will import files, whether to a file system, ILINX Capture, Kofax Capture, ILINX Content Store, or Oracle IPM repositories.
> Auto import type – The four options for import type are shown below. Each will be described later in this document.
The option buttons on this home window are:
> New – Clicking on this button will create a new job form. This option is highlighted by default if no job is selected.
> Edit – By highlighting an existing job in the available jobs window and clicking on the Edit button, the job becomes available for editing.
Note: You cannot edit a job while it is enabled
> Copy – By highlighting an existing job in the available jobs window and clicking on the Copy button, the job will be duplicated, and a new job will be created, adding – Copy to end of the original name.
> View – By highlighting an existing job in the available jobs window and clicking on the View button, the job settings summary will display.
> Delete – By highlighting an existing job in the available jobs window and clicking on the Delete button, the selected job will be deleted.
Note: You cannot delete a job while it is enabled
> Enable/Disable – By highlighting an existing job in the available jobs window and clicking Enable, the selected job will start. If the selected job is currently running, this button will display as Disable. Selecting Disable will stop a job from being available to run, allowing you to edit or delete it.
> Run Now – If the job highlighted has been configured to use a schedule this button is enabled. Clicking Run now will run the job outside of the configured schedule.
> View audit logs – When tracking is enabled, the audit logs button provides convenient access to the audit logs.
Menu Options include:
> File > Exit which includes a keyboard shortcut.
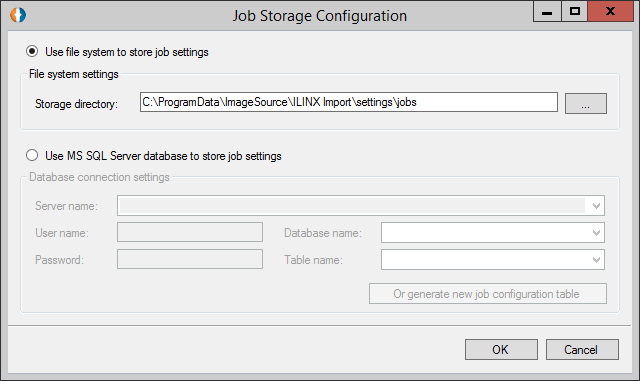
> In the Settings drop-down menu, it is possible to configure job storage for all ILINX Import jobs. Below are the job storage options for ILINX Import. The storage directory can be designated to a native location on your machine or can be routed to a Microsoft SQL server database.
> Help > About opens the about screen which provides the version number, copyrights, and available Resources.
Creating a New Job
When you click the New button, the Job Information dialog will appear, and the wizard will guide you through the creation of your job. This screen allows you to pick the source from which you will import documents and the target system that they will be imported into.
Note: Due to the nature of this application and its intended user base, this web application does not require the user of the application to log in with a username and password
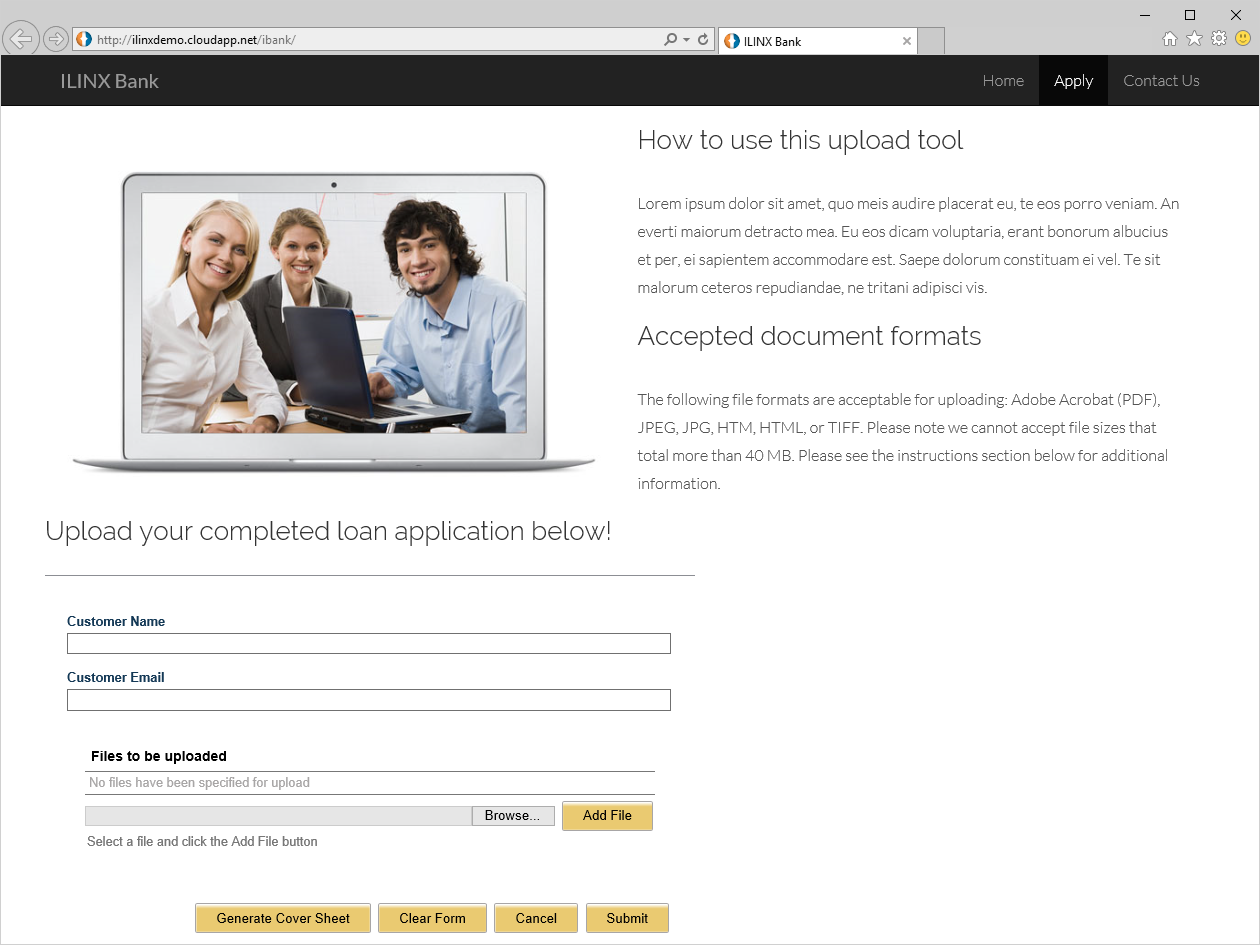
The ILINX Document Upload Tool is delivered as part of the ILINX Import application. The tool leverages that product’s job configuration and execution framework to generate the user interface and process the inbound content. The interface itself is built in HTML5 and can be branded for any customer to match their corporate colors, fonts, graphics, etc. The screen image below shows a mock website with the ILINX Document Upload Tool integrated into its pages:
In the above example, an iFrame is embedded into the hosting website, and the source URL is pointed to the ILINX Document Upload Tool. The ILINX Document Upload Tool style sheet has been adjusted to match the look and feel of the host website. The URL used in the above example directs the ILINX Document Upload Tool to solicit a specific Capture document type, a “Loan Application” in this example.
The URL to the ILINX Document Upload Tool can also be constructed in such a way as to solicit the upload of multiple document types, allowing the end user to select which document they will upload. The screenshot below shows a mock website that embeds the ILINX Document Upload Tool using this multiple document mode.
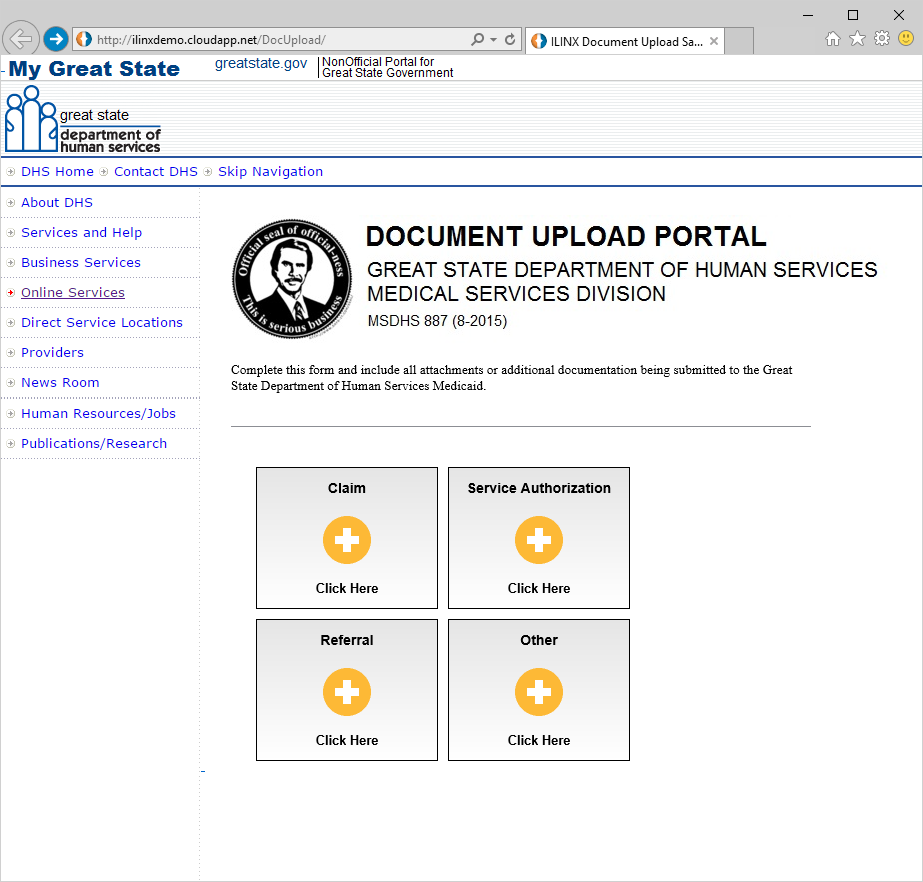
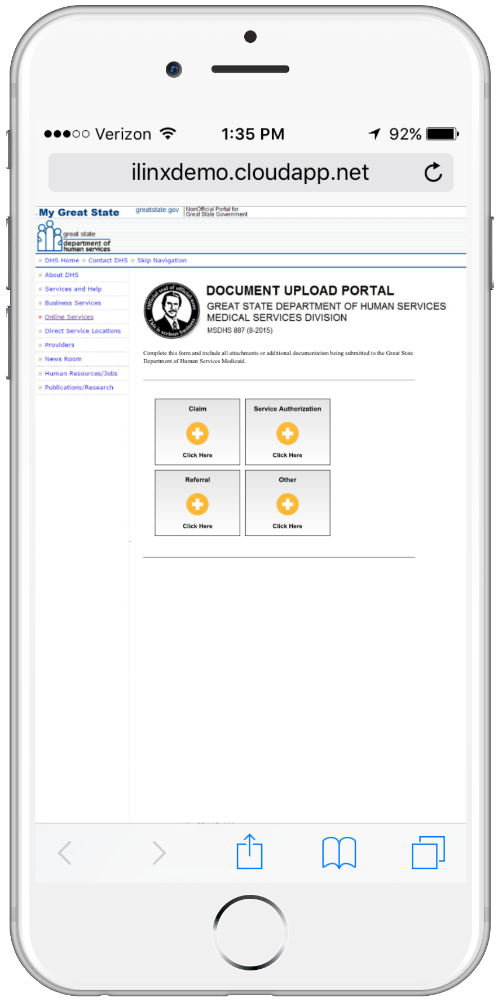 In the example above, the ILINX Document Upload Tool job has been configured to expose four ILINX Capture document types as available upload options. The ILINX Document Upload Tool is web responsive, meaning it can adjust its presentation depending upon the form factor of the device. The screenshot to the left shows a sample web site on a mobile phone.
The URL into the ILINX Document Upload Tool can be formulated and used directly, or customers can leverage the ILINX Import SetUploadSessionRequest API call to register URL parameters with the system. The API returns a unique ID that can be used to formulate the ILINX Document Upload Tool URL to obfuscate all information in the URL. The URL parameters are:
> JobName: the name of the ILINX Import job to drive the upload tool.
> ActivationID: ID for the ILINX Import job.
> SessionID (if URL has been registered): ID for the other query string parameters that will drive the upload tool. This ID is returned by the ILINX Import API call to register URL parameters.
> DocTypes: one or more document types that are being requested.
> FieldX=value: list of the named value pairs that will be the defaults for the appropriate document field values in the upload interface.
Below is an example URL wherein the desired upload tool parameters have been included directly into the URL:
https://<MYSERVER>/ILINXImportDocUpload/Upload.aspx?JobName=TestUpload&ActivationID=60e02512-cb42-4949-bd8e-f0806942ed88&DocTypes=Application&Name=John
Below is an example where the upload tool parameters have been registered through the API, and the unique registration ID is used in place of the actual parameters. Note, the resulting user experience is identical to the example above:
https://<MYSERVER>/ILINXImportDocUpload/Upload.aspx?JobName=TestUpload&ActivationID=60e02512-cb42-4949-bd8e-f0806942ed88&SessionID=e0642de6-c827-4417-9cbe-10b5d6e8f923
Whether you’re using a URL with embedded parameters or you leverage the API to register your URL parameters, these parameters will direct the ILINX Document Upload Tool to request one or more documents from the recipient.
Note: Please refer to the product documentation for additional details on the URL format and parameters, as well as the ILINX API for registering URL parameters.
Configuration
To access the Document Upload Tool for ILINX Import, create a new import and select the Document Upload Tool import source on the Job Information page.
Screen Elements
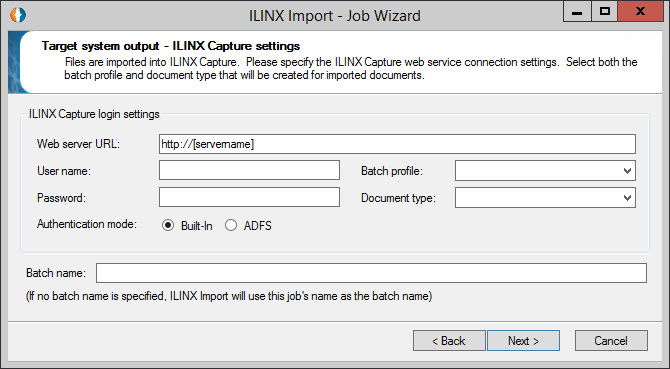
The elements for this screen are:
> Web server URL – This required field is used to define the ILINX Capture profile that ILINX Import will connect to. The web server URL is necessary for proper ILINX Capture profile login, batch profile specifications, etc.
> User name – This field is used to enter the appropriate ILINX Capture user name for login.
> Password – This field is used to enter the applicable password to your ILINX Capture user name in the field above.
> Batch profile – This field offers a drop-down list of the batch profiles available to import the document(s) to.
Note: A valid web server URL must be in place to select a batch profile
> Document type – Specify the ILINX Capture batch profile’s doctype that you are importing. If multiple doctypes are required, they can be specified in the URL params.
> Authentication mode: Select Built-In or ADFS as the authentication mode for ILINX Import to connect with ILINX Capture.
> Batch name – This field is used to name the batch of documents that will be imported. If no name is given, the job name will become that batch name upon completion.
With the proper job information entered, you can configure the final setting for your document upload.
Screen Elements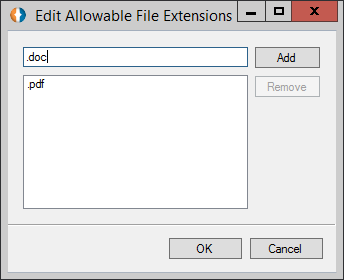
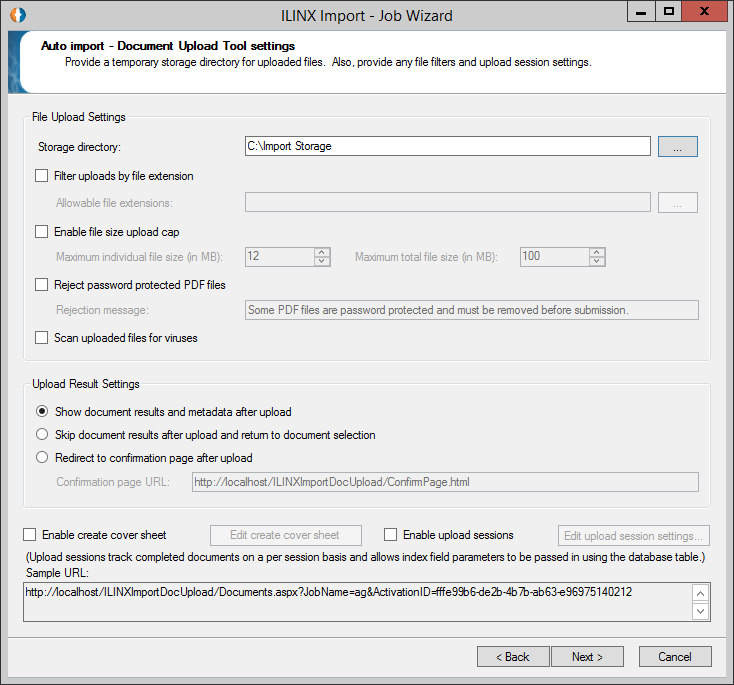
The elements for this screen are:
> File Upload Settings:
– Storage Directory – This required field is used to define where the document will be stored in your system.
– Filter uploads by file extension – This field allows admins to define rules regarding which file formats (determined by file extension) are allowed and which ones are not. File extensions in this list are allowed in the upload tool, while files with extensions that are not in the list are rejected. You can add any number and/or type of file extension to the list.
– Enable file size upload cap – This field is used to set parameters concerning the size of individual (as well as multiple) documents for the upload.
– Reject password protected PDF files – Allows an administrator the option to allow/disallow password protected PDFs from being put into the system. This setting lives inside the configuration file and is applicable for all jobs:
» ShouldRejectPasswordProtectPdfFiles – default to false
» ShouldRejectPasswordProtectPdfFilesErrorMsg – default to current message
– Scan uploaded files for viruses – This option can use any antivirus software that has command-line versions. To override the default virus scanning tool, add the three keys indicated below with the appropriate configuration values for the desired antivirus software to the ImportWindowsService.exe.config file. This file is located in the ILINX Import Program Files folder. The example below should be added for Windows Defender antivirus software:
<add key=”VirusScanProc” value=”C:\Program Files\Windows Defender\MpCmdRun.exe”/>
<add key=”VirusScanArgs” value=”-scan -scantype 3 -file {0}”/>
<add key=”VirusScanSuccessMsg” value=”found no threats”/>
Note: If this option is enabled, all scanning occurs prior all other processing through ILINX Import. If any of the documents submitted by the user during a single upload are flagged as containing a virus, the submission should be completely canceled and an error presented in the Document Upload tool UI
> Upload Results Settings:
– Show document results and metadata after upload – Select this option to display a default success page once the user has successfully uploaded a document.
– Skip document results after upload and return to document selection – Select this option when you do not want to display a success screen for users after uploading a document.
– Redirect to confirmation page after upload – Select this option to direct the user to a custom page once a document is successfully uploaded. Enter a custom URL in the Confirmation page URL field.
> Enable create cover sheet – Allows the creation of a cover sheet to precede the uploaded document(s). To create a cover sheet, select a .tiff file from your system. A barcode is generated for the spreadsheet and can be moved and adjusted by changing the X and Y coordinate values.
> Enable upload sessions – Allows the tracking of completed documents on a per-session basis. This allows the job to accept values for index fields for its upload destination via the database table.
Note: When checking the Enable upload sessions option for ILINX Import, the system will create the necessary database tables if they do not exist; otherwise, they will reuse the existing upload session tables
> Sample URL – Displays a sample URL for you to review based on the settings you have selected on this screen.
Custom Theme
You can choose to load the Document Upload Tool with a custom theme. You can find a sample theme by navigating to [Install Location] \ILINX Import\WebApp\App_Themes\Blank. You can modify the style.css file located here to suit your desired theme.
To use the theme, append “theme=<ThemeName>” to the end of your URL, where ThemeName is the name of the folder in App_Themes that contains the style.css file.
Architecture
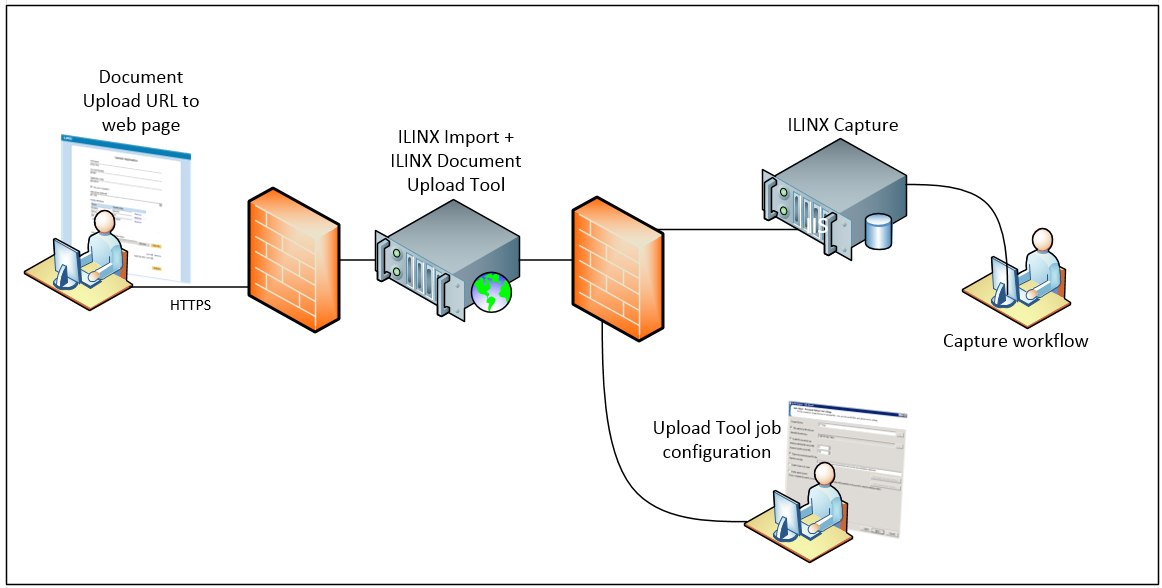
The diagram below shows the basic architecture of the ILINX Document Upload Tool and an example deployment. The sequence of the entire example process is as follows:
1. An ILINX administrative user defines an ILINX Capture Batch Profile with one or more document types, each with a unique set of index fields, and a batch workflow.
2. An ILINX administrative user defines an ILINX Import job that is of the type “Document Upload Tool”. The admin selects the newly created capture Batch Profile and a default document type. The admin also configures options for: allowable document types, maximum upload sizes, etc.
3. The URL into this new ILINX Import Document Upload Tool job is formulated by a line of business system, ILINX Capture workflow, custom automated utility, etc. The URL is included in an automated emailed to the appropriate customer.
4. The customer clicks on the URL embedded in the email, and the default web browser opens the ILINX Document Upload Tool which displays the upload interface and index field collection interface as defined in the specified ILINX Import job configuration.
5. The customer provides appropriate index information and attaches the requested documents. The customer then selects the “Submit” button which delivers all of the information and content back to the ILINX Import web application.
6. ILINX Import uses the customer supplied information and content to create the appropriate ILINX Capture batch and submits the new batch into the capture workflow.
7. An internal ILINX Capture user sees the new workflow batch and processes it based on the appropriate business requirements.
The ILINX Document Upload Tool also supports session tracking using a Globally Unique Identifier (GUID). In order to utilize session tracking, a GUID is embedded into the ILINX Document Upload Tool URL which is typically provided to the user or customer via email. When the user accesses the ILINX Document Upload Tool using a URL with session tracking enabled, the system will track and reflect which documents have already been uploaded and which ones have not. For detailed information on this capability, please refer to the ILINX Document Upload Tool product documentation.
Target System
ILINX Capture
This target type allows you to import documents into a batch defined in your instance of ILINX Capture. After the standard configuration screens, the Target system output – ILINX Content Store settings page will prompt you for your ILINX credentials.
Screen Elements
The elements for this screen are:
> Web server URL – This required field is used to define the ILINX Capture profile that ILINX Import will connect to. The web server URL is necessary for proper ILINX Capture profile login, batch profile specifications, etc.
> User name – This field is used to enter the appropriate ILINX Capture user name for login.
> Password – This field is used to enter the applicable password to your ILINX Capture user name in the field above.
> Batch profile – This field offers a drop-down list of the batch profiles available to import the document(s) to.
Note: A valid web server URL must be in place to select a batch profile
> Document type – Specify the ILINX Capture batch profile’s doctype that you are importing. If multiple doctypes are required, they can be specified in the URL params.
> Authentication mode: Select Built-In or ADFS as the authentication mode for ILINX Import to connect with ILINX Capture.
> Batch name – This field is used to name the batch of documents that will be imported. If no name is given, the job name will become that batch name upon completion.
Once you have finished configuring your options on this page, click Next. Configure the Auto Import screen as specified under the ILINX Import Source Systems settings of this document.
When you have configured these options to your satisfaction, click Next. The subsequent screen is the Job settings summary page. Verify your settings, then click Finish.
