Contents
Have another version? ILINX version 9.5, ILINX version 9.1, ILINX version 9.0, ILINX version 8.6, ILINX version 8.5, and ILINX version 8.0, Older versions are included only in the installation package.
About
Utilizing a lean, user-friendly, highly adaptable interface, ILINX Content Store provides a controlled document storage and management application. Scan, store, search for, and share all of your business content.
ILINX Content Store empowers anyone in your organization to securely capture and access information right at their desktop or from anywhere, using a web browser. Likewise, ILINX Content Store can be efficiently managed from a central location, including deployment, administration, updates, and upgrades.
This guide contains information and instructions on the features, tools, and options of ILINX Content Store available to the user.
Note: This guide assumes that the installation of the ILINX Content Store product has taken place. For complete installation documentation, please see the ILINX Installation Guide.
Accessing
Step 1: Have your Administrator provide you with a URL for logging into ILINX Content Store.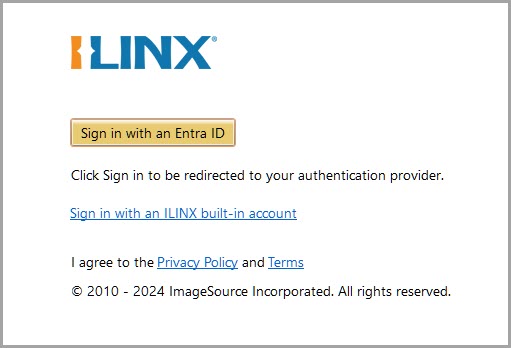
Step 2: From an internet browser window, enter the ILINX Content Store URL as provided by your Administrator.
Note: The URL is not case-sensitive; Microsoft Internet Explorer is the only web browser that supports the XAML Browser applications used by ILINX
Step 3: Click the Sign in with an ILINX built-in account account button to open the Sign in to ILINX menu. If your Server has Entra ID enabled, click on the Sign in with an Entra ID button to log in with an Entra ID.
Step 4: Enter your User name and Password provided by the Administrator.
Note: The username is not case-sensitive; the password is case-sensitive
Step 5: Click on the Login button. Check the Remember me checkbox if you want the system to remember your login credentials for the next login.
Once logged in, the Search tab will be opened.
Sample Application
As part of the out-of-the-box installation, an application named Sample Application is automatically created. This standard application can be used for testing and learning purposes and can be deleted at any time. Applications are defined in the Key Terms section below.
Key Terms
This section is used to define the key terms that are used within ILINX Content Store and will be important to understand when utilizing this product:
- Application – A repository in ILINX Content Store to manage and store documents. These are created by Administrators of the system and can be modified (within limitations) as necessary.
- Documents – Collections of pages and index values stored inside of an Application. They are entered into ILINX Content Store through scanning or file import.
- Pages – The name of files once they have been inserted into a document or the Application as a loose page.
- Advanced Search – An alternative search option in the Search tab that allows the user to create criteria to search for documents within a selected application, which can then be saved.
- Index Fields – Sets of data that Administrators create within each application where users can assign values to the documents that are captured into the application.
- Annotations – Alterations to pages that are added to an image inside Capture, Content Store, or Flex to hide, focus, enhance, or protect the image.
The Capture Tab
The Capture tab contains the mechanisms by which ILINX Content Store obtains documents. There are three options for capturing documents: Scan or File import.
If you are scanning, select the Scan option to find any attached TWAIN or WIA-supported scanners. This includes any scanner with a Kofax VRS installation. You may also choose to generate searchable PDF files when scanning. This option is available in the Set scanner settings dialog when the administrator is creating an application. The PDF –> Image Only, and PDF –> Searchable options on the scanner settings dialogue will determine the type of file created.
With the File import option, you can import any documents stored on your file system into ILINX Content Store.
When you have the capture tab selected, a history section will appear at the bottom of the display. This history is based on the user session and will be lost upon logout. You can also see instructions on How to submit documents on the display screen above the history. The steps below explain how to capture a document in the Capture tab of ILINX Content Store:
Note: The maximum recommended batch size is 500MB
Step 1: Capture: Drag-and-drop from the desktop into the left panel or right-click on the file cabinet.
Step 2: New doc: Select one or more items to organize.
Step 3: Index: Enter keywords to make the item searchable.
Step 4: Submit.

Capture Tab Panels
Capture Panel
- This navigation panel commences capture and organizes/indexes the batch of documents.
- Actions are displayed by right-clicking on the file cabinet, document, or page icon, or by selecting an icon and using a keyboard shortcut.
- Collapse and expand this panel by double-clicking on or dragging the slider bar on its right-hand side.
Display Panel
- Displays images of acquired documents.
- You can select what image it displays by clicking an icon in the capture panel of the document or by scrolling in the display window.
Document Context Menu
- Right-click on the image to display this menu.
- The menu contains options for viewing/manipulating the imported document. Further information is explained in the Annotation Options section.
How to Capture Documents
ILINX Content Store captures documents directly to an application, so once submitted from the Capture tab, the documents and pages are stored in the application. You can capture these documents using one or more of the three options: Scan or File import.
Within the Capture Panel, you can organize your captured pages into combined documents or as loose pages. This means that when you access these documents in the future, the documents you combined will display together. In this case, each document that you selected is then called a page, and the combination of the pages is called the document within ILINX Content Store. You have several options for controlling this organization.
In the Capture Panel, you will see a shortcut action button display at certain times. Use this to move quickly to options rather than having to right-click/select. Hover on the button for a Tooltip to see the option that will be displayed.
To create a document, right-click on the File Cabinet icon and hover over Scan or File import. Then select one of the following:

New doc
- All pages that you select with this option will be combined into one document within the designated application.
New single-page doc
- Each page that you select with this option remains an individual document, one per page, within the designated application.
Unclassified doc
- All pages that you select with this option will display as loose pages (they will not be assigned to an application) and will be organized/classified into an application post-capture.
Note: You will not be able to submit loose pages. All loose pages in the capture instance will need to be added to a document
Scan to file
Note: See more on this option in the Other Topics section of this manual
 The Capture Panel
This section will show the descriptions of the icons presented in the Capture Panel.
File Cabinet icon
- This icon brings up a list of created documents in the Capture instance (right-click on the icon to see options).
Document icon
- This icon is the representation of the document that will exist within the application (identified with position number in the capture instance, number of pages, dpi of the image, and file size).
Page icon
- This icon is the representation of one page of the document (add documents to a container for an organization).
Submit
- This button submits all documents into all designated Applications (unavailable until all documents with required indexes are entered, and no loose pages exist). Keep in mind that you can capture documents to multiple applications in one capture instance.
Working in the Capture Panel
- Select multiple pages or documents using Shift-click and Ctrl-click.
- Drag pages to re-arrange as necessary, or to move from loose status to a document.
- Right-click on a page icon to bring up context-sensitive options. A few of these options are described below.
- New doc with selected – The selected pages will become a new document that will be submitted to whichever application you choose.
Note: Select multiple pages to become part of this new document with Ctrl-click and Shift-click
-
- New doc(s) starting at selected – The selected page and all pages below it within its document will become a new document that will be submitted to whichever application you choose.
Using the Drag & Drop Action
When capturing electronic documents with the File import option, you can drag and drop icons to select documents. You can use this in conjunction with an existing application that has been scanned and/or imported, or you can use it exclusively as a manner of capture.
Here are a couple of important things to know about the drag & drop option:
- If there are no documents, all files dropped in the capture panel will be added as loose pages (pages outside of a document container).
- If you drop an electronic document onto a document icon, the new pages are inserted at the beginning of the existing document.
- If you drop an electronic document onto a page in the document, the new pages are inserted below the dropped-on page.
Indexing Documents
After you have created a document, you can enter some index information on the documents before you submit them. You can easily open the indexing panel by clicking the shortcut(Arrow) button. In this panel, you will see a list of fields in which you can enter information, which are created by an administrator. The fields you see are determined by the application to which the documents are assigned. Use the following tips to complete your indexing process.
- Navigation buttons displayed at the bottom of the indexing screen.
- Required index fields will display with a red box highlight until you enter a value, as well as a permanent red asterisk.
- If the index field name is underlined, it is the key value associated with a database lookup.
- A drop-down button appears where a field value has an associated Picklist.
- Checking the Pin value checkbox will copy the entered value, until unchecked, to subsequent documents in the capture instance.
- Click the yellow arrow button to return to Thumbnails.
- Optionally, you can take advantage of selecting multiple documents to enter or modify their indexes simultaneously.
- Select at least two documents using Ctrl-click.
- Select the Index document option and select/modify appropriately.
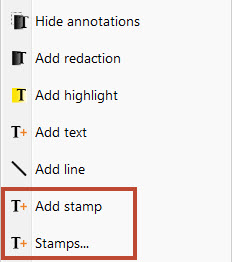
Annotation Options
Right-clicking on an open file in the Document Display Panel will open up the available annotation options. The annotation options available (including redaction options) are dependent on the permissions given to end-users by administrators. These options are available with the Search tab as well. All the options listed below are available if the end-user was given permission to all annotation options:
- Print – This option allows you to print the selected document.
- Download – This option will download the document onto your local machine.
- Email as attachment – This option allows you to send an email with the document attached to a recipient. Selecting this option will always open Microsoft Outlook to send the email.
- Hide all annotations – This option will hide all annotations that have been applied to the document within the capture instance.
- Hide only redactions – This option will hide only the redactions that have been applied to the document within the capture instance.
- Add redaction – This option will add a redaction to the selected document page, which will cover up any selected sections of the page with a burned-in black box.
- Add highlight – This option will highlight a selected section of the document page. The highlight color can be changed once created.
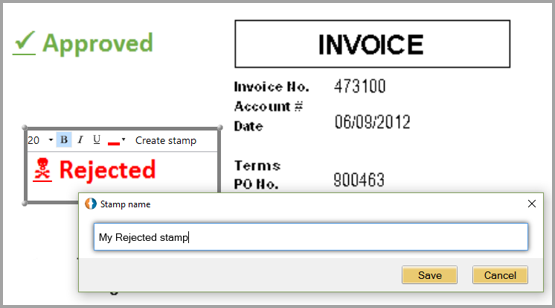
- Add text – This option adds text to the document page. When creating the text, you can edit the font size, font color, and create a stamp for the created text.
- Add line – This option lets you create a line to the document, where the line can change size, thickness, and can be made into an arrow.
- Add stamp – This option allows you to stamp important information to the document. You can stamp on the current date, datetime, or the created user’s username.
- Rotate right – This option will rotate the selected document 90 degrees to the right.
- Rotate left – This option will rotate the selected document 90 degrees to the left.
- Zoom in – This option will zoom the document view in more and more depending on how much it is clicked.
- Zoom out – This option will zoom the document view out more and more depending on how much it is clicked.
- Fit height – This option will adjust the view of the document by the height of the document.
- Fit width – This option will adjust the view of the document by the width of the document.
- Invert – This option will invert the colors of the document.
The Search Tab
The Search tab retrieves and displays documents stored within ILINX Content Store. This tab is the default entry point for all users. The appearance of the interface and the default settings for different panels will be determined by the configuration settings established by the administrator. The following panels exist for the Search tab:
Search Tab Navigation Panel
- Displays all Applications and Views that the current user has permission to see as well as Favorites, Saved Searches, and Checked out
Global Search
- Global search to search across all Applications.
Save Query
- Saves the completed advanced search parameters.
Advanced Search
- Search for documents according to index fields and their values within the selected application.
Results Table
- If searching multiple Applications, each Application will be segregated in the display.

- All Applications and Views will be displayed in the Navigation Panel in alphabetical order.
- From the list, select the Application or View to search. The set of index fields will be available and displayed when the Advanced Search pane is expanded.
- Only one Application or View can be selected at a time.
- To run an unabated search, ensure no values are entered in the advanced search fields, and double-click on the name.
- Ability to collapse/expand this pane by clicking on and dragging the separation bar.
Global Search
- This search field is used to search across all Applications. The text entered will search all index fields and will return any documents found with that value in any index field. This search assumes a “contains” operator.
- Leaving this field empty and clicking on the Run Search button will run an unabated search of all Applications.
- The number of documents returned is dependent on settings configured by the Administrator. The most recently modified documents, using the Last Modified Date value, will be returned first.
- This search option is available from all tabs within ILINX. When selected to run a search, and if not currently in the Search tab, the Search tab will automatically open, and any results will be displayed.
Save Query
 This option allows you to save a set of Advanced search parameters to make frequently accessing the same documents more convenient.
- To add a new favorite, click the Save Query button.
- Enter a name for the favorite search.
Note: The favorite search cannot be saved without a name entered into the Name index field
- Favorites can be saved for both Application Search parameters and View Search parameters.
Advanced Search
- The Advanced Search allows you to use index field values like keywords for finding documents within a specific Application.
Depending on the data type of the index field being used to search, different operators will be available.
|
INDEX DATATYPE
|
OPERATORS
|
|---|---|
| Text | =, No equal, Starts with, Ends with, Contains (default), Not contain |
| Number | = (default), Not equal, >, >=, <, <=, In between |
| Decimal | = (default), Not equal, >, >=, <, <=, In between |
| Date | = (default), Not equal, >, >=, <, <=, In between Note: Because dates may include time values, users must use a data range (In between) |
| Checkbox | = (default), Not equal |
| Picklist | = (default), No equal, Starts with, Ends with, Contains |
- To include additional search conditions, click on the Click here to add a new condition link.
- Added conditions can relate to the Application’s index fields, or they can relate to system values. System values (designated by brackets [ ]) include who created the document, the date the document was entered into the repository, and the document’s checkout status. The results table will then contain additional columns displaying this information.
Note: You do not need to enter search values for these conditions for the columns to display in the results table
-
- You can also utilize a full-text search condition that allows you to search within the text of the documents.
- Administrators will have to add this condition to ILINX Content Store.
- To remove an added condition, right-click on any part of the condition line and select Remove this condition.
- Any added condition is only available for the life of the current window.
- You can also utilize a full-text search condition that allows you to search within the text of the documents.
- To run an unabated search of a particular Application, double-click on the Application’s name. All documents will be returned. Be sure that all index field values are null.
- Use the Reset all search fields link to return the Advanced Search to default settings.
Results Table
The Results Table will display all documents returned based on a search, in order of the most recently modified (using the Last Modified data value). Click on any column header to sort by that column, in ascending or descending order.
- If more rows meet the search criteria, the See all allowable results link will display.
- You can re-arrange the columns by dragging a column to an alternate position. This personalization will remain in place until the user signs out.
- Double-click on any row to display the document.
- With one or more document boxes checked, right-click to select from the following options. The available options change depending on the type of documents selected and the user’s permission set.
- Open – This option displays each selected document in its tab.

- Open side by side – This option only appears when two documents are selected; displays the documents side by side within one tab. Index fields are viewable and editable.
- Search associated applications – If configured by an Administrator, this option will search for documents in other applications based on a specific index value.
- Print – This option prints each selected document. Only displays when selecting image files.
- Pin (toggles to Unpin) – This option takes the selected document(s) and adds them to an isolated area in the working window. These documents can be collected from various applications and will stay as a group until all the documents are unpinned, a window reset occurs, or the user logs out from the current session.
- Download – This option downloads selected documents(s) to a specified folder. The Download type options let you determine if the documents are placed in one single folder or each in its separate folder. The File name options allow you to assign a specific name for the file or use the document’s index fields for the name. Finally, you can choose the File type for your download from the following list:
- PDF – Searchable – Downloads the document as a PDF file with searchable text.
- PDF – Image only – Downloads the document as a PDF file without searchable text.
- PDF/A – Downloads the document as a PDF/A file useful for long-term archiving.
- XPS – Downloads the document in the XAML-based XPS file format.
- Open – This option displays each selected document in its tab.
Note: A tiff file with annotations will download as an XPS unless annotations are hidden
-
-
- Original – Downloads the document in the same file format it is currently in within ILINX Content Store.
-
Note: If you are downloading an image file with a transparent background, use the Original file type option. Only this option supports transparent backgrounds
-
- Email as attachment/Email as link– This option will email the selected document(s) as attachments or choose to send a link only to a recipient. If sending as an attachment, your options include Page range (all or specific pages), File name (use index fields or custom name), and File format (PDF – Searchable, PDF – Image only, PDF/A, XPS, or in original format.
Note: Any annotations on an image file may not be included if sent as an attachment
-
- Email as Flex Link – This option allows you to email the selected document(s) as an ILINX Flex link.
- Copy Link – This option copies the URL of the selected document(s) into the Windows clipboard. You can then paste the link into an email or another program.
- Update index fields – This option will modify one or more document’s index values simultaneously without opening the documents. All documents must be selected from the same Application.
- Export index data – This option creates a CSV file with the index values for selected documents, including a link to each document.
- Delete – This option deletes one or more documents and metadata from the Application. There is no undo for this action.
- Check out – This option will save the document for versioning onto your file system. This allows the user to make updates to annotations, index values, etc., and then check the document back into Content Store as a new version.
- Check out without download – This option will save the document for versioning without downloading. This allows the user to make updates to annotations, index values, etc., without having to locally save the image.
- Version history – This option opens a message window allowing users to view all versions of a document that exists.
Hotkey Shortcuts
ILINX Content Store provides users with keyboard hotkeys to perform certain commands.
|
Shortcut
|
Command
|
Description
|
|---|---|---|
| Ctrl + H | Sets focus on the results table | After a search is performed, using the hotkey will set the focus on the first document in the results table. |
| Up / Down arrow | Moves focus of document in results table | Once the results table has focus, using the up or down arrows will move the focus to locate the desired document from the table. |
| Space | Selects the document with a focus on the results table | Selecting the space bar will add a checkbox to the focused document in the results table. |
| Ctrl + Space | Opens the context menu with a focus on the results table | Selecting hotkey will open the context menu for the focused document in the results table. |
| Ctrl + Shift + H | Toggle the IE history panel | Changed normal Internet Explorer behavior from Ctrl + H to accommodate ILINX hotkey. |
| Alt + Enter | Toggle Index panel and Thumbnails panel | Use to toggle the display panel between the Index Fields panel and Thumbnail panel when the document is open in the viewer. |
Document Display Window
When a document is opened from the Results table, a new tab is created, and the document appears in the window display. With the focus on the opened document, you can review and modify index fields, annotate the document, and add monitor discussions.

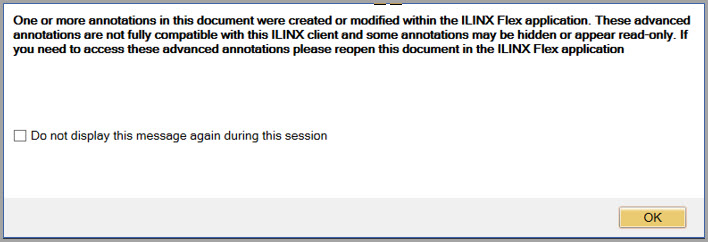
Note: If customized annotations were utilized in Flex, they may be hidden or may not be viewed properly in Content Store. If this is an issue, the message below will display when the document is opened. See Flex documentation here for a list of annotations only available in Flex
Document Tabs
- Each opened document will reside in a new tab. Multiple tabs can be opened at any time.
- The title in the document tab is a combination of the first four letters of the Applications.
- Clicking the up or down arrow beside the title in the tab will move to the previous or next document in your search results.
- If no index field values have been entered, the number corresponding to the row the document is displayed within the Results table will be appended to the tab name.
- When an index field is modified, or an annotation modification occurs, the tab name will immediately have an asterisk (*) appended to it. Once saved, the asterisk is removed.
- Right-clicking on a document tab displays:

- Save – This will be available if this document tab has had any modifications.
- Close tab – Select this to close the current tab only. Alternatively, clicking on the tab’s “X” will close the tab.
- Close other tabs – Select this to close all currently opened document tabs except the current tab. This only closes document-displaying tabs.
- Close all tabs – Select this to close all currently opened document tabs. This only closes document-displaying tabs.
- A request to save a document after modification can happen in the following ways:
- The user clicks on the “X” to close a tab.
- Multiple documents are open, and many have had some type of modification. The user right-clicks on one of the document tabs.
- The user right-clicks on the tab of a modified document and selects the Close Tab option.
- The user clicks on Sign out. A message box will appear with modified document names.
- If a document has been modified but not saved, and the browser session is closed, there will be no prompt to save, and any changes will be discarded.
Index Fields
- When a field is modified, the Save button will become active. Once Save is selected, the index fields will be updated, and the document will remain in the window display.
- If metadata is removed from a required field, a red box will display around that field, and the Save button will be inactive.
Thumbnails
- When you click the yellow arrow in the index fields panel, you will see the document and page thumbnails in place of the index fields.
- This panel of thumbnails is similar to the capture panel you use when capturing documents. You can access the same set of options that you used in the capture panel by right-clicking on a page icon. With these options, you can reorder and remove pages, cut or copy pages, and paste them into other documents that you have captured into your repository.
Document Viewer
For non-image file formats (e.g., MS Office DOC, XLS, and PPT), the document will display inside of the display panel, using its native application browser plug-in. The context menu will change to maintain the same functionality as it has in the native program.
Note: In file formats where browser plug-ins are not available, the files will launch in their locally installed native program outside of the display panel
If Microsoft Office (e.g., Word, Excel) documents are not displaying within the ILINX Content Store interface and are instead opening in their native programs, ask your system administrator to apply the OfficeHotfix.reg registry file to your workstation. For more information on this registry file, see the ILINX Content Store Administrator Guide
Text-based stamp annotations may be configured.
Administrators may configure a Text-based stamp annotation by:
Step 1: Using the Viewer Content Menu, right-click and select Text annotation.
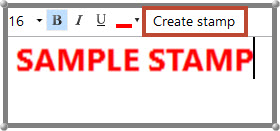 Step 2: Enter the desired text into the Text area and make the necessary formatting adjustments.
Step 3: Click the Create Stamp button to the right of the format icons.
Step 4: Enter the Text Stamp name in the window that opens. Click Save, then Cancel.
These steps will modify the context menu dynamically by adding “Add stamp” and “Stamps” to the context menu.
- End Users may select Add Stamp and highlight the area of the document to add the stamp. If more than one stamp has been saved, select the desired stamp name from the drop-down at the top of the annotation window.
- Administrators may select Stamps… to select an existing stamp and delete, it as necessary.
Common merge tags may also be added as stamps. These merge tags include:
[Current date]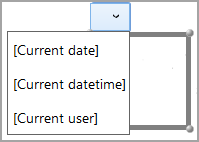
[Current datetime]
[Current user]
Comments Thread
The Comments Thread generates a discussion about each document. The Administrator sets the permission for a group to view and/or add to discussions.
- A comment entry can have up to 1000 characters per entry. A visual of the number of characters will appear next to the discussion box as the text is entered.
- The Comments area can be collapsed/expanded by the user as desired.
- Choose to sort comment entries by most recent or oldest.
- When a comment is added to a thread, the user’s name and the date entered are attached.
- Personal notes may also be added for the users to add reminders or updates only displayed for themselves.
- When comments are selected, a drop-down appears that allows users to select to view all comments, System-only comments, or User-only comments. These do not include Personal notes.
- Once saved, a comment cannot be removed, and previously entered comments cannot be modified.
Other Topics
Open doc in new window
It may be necessary to open documents in separate viewer windows. The administrator may enable this feature. If enabled, click to add a checkbox next to the Open doc in the new window and then double-click the document you wish to open. Selecting multiple documents will open a new window for each document.
Save to File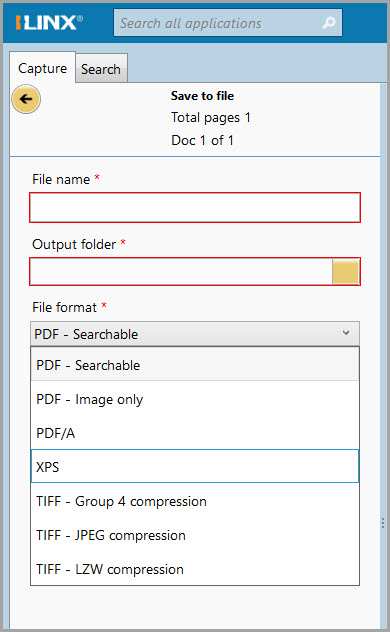
One of the options when capturing documents is to Save to file. With this, the operator can directly create an electronic document and save it to the local file system.
Step 1: From the Scan or File import option, choose Save to file.
Step 2: All captured pages are assembled into one document.
Step 3: Manipulate the document as needed.
Step 4: When ready to file, index the document. Enter the required index information.
Step 5: Give the document a name.
Step 6: Browse to an output folder.
Step 7: The document is saved in TIFF format by default. Choose to convert to XPS or a different format if desired.
Step 8: Choose to add the date and time to enter the name.
Step 9: Click on Submit to save the documents to the application.
Search Associated Applications
Documents that are added to different Applications can be given a connection, where index fields are mapped with an association. With this, a search can be run based on the index field to return a set of documents with the same value in different Applications.
As an example, let’s say one Application has a field called “Customer ID” and another Application has a field called “Vendor ID”, where both fields point to the same client. By linking these two fields, a search can be run from the source application documents for a specific value and have all documents with the same value returned from the other Application.
The Administrator creates this association, and when implemented, will display in the right-click option window from the results table.
To use this option:
Step 1: Go to the source application and right-click on a document that you want to find all associated files.
Step 2: Select the search-associated applications button.
Step 3: A panel displays above the results table with the document selected and any associated documents from the other application.
Step 4: Note that you can hide this panel, and when done, simply close it.
Using a Database Lookup

During the Capture process, or when modifying indexes, the user can utilize a database lookup to fill in index field values from a selected database. An index field is assigned as the trigger from which the lookup occurs. Information retrieved by the lookup will display in a table view, allowing the operator to select the row that will then automatically fill in selected index fields. The Administrator will set this up to activate when the Tab is pressed or when a certain number of characters is entered.
Step 1: Enter a value in the lookup field (the index field name appears underlined).
Step 2: If multiple fields are found during the lookup, each will appear in a table for selection.
Step 3: More than one field might be designated as a lookup field. In this case, values can be entered in any of the lookup fields to execute the query.
Step 4: Lookup can be used after submittal when reviewing/modifying a document’s index fields.
Creating an Addressable Search
There are opportunities to provide shortcut links to documents within ILINX. A link to a document can be created and shared by the right-click option of Email a link. This creates a link to that document, using the Application name and the document object identifier (GUID).
A link can also be created to automate returning a result set from a pre-determined search. This allows the creation of a type of addressable search, where a user is “handed” a set of documents without having to enter any search criteria. These links can be used by ILINX Integrate as well as other third-party software.
There are two types of addressable search links: Global and Application-specific.
Global Search Link
This link will create a dynamic shortcut to currently stored documents meeting one value. This value will be entered into the global search field. To create a global search link, use the following structure, where the bold values are determined in-house:
https://chosen URL/ILINXCS/?mode=globalsearch&q=search value
As an example, if you wish to provide a link to allow someone to easily find all documents in the system with a value in any index field of “invoice”, the link would look like this:
https://imagesourceinc.com/ILINXCS/?mode=globalsearch&q=invoice
Notes for using this option:
- When a user selects the link, it will always route first to the login screen.
- Only one “keyword” value can be included.
- After login, the index value from the link will be deposited in the Global Search field, allowing the user the ability to edit from that point.
- While the operator is entered as an equal, remember that this is a “like” operator.
- The link is not case-sensitive.
Application Specific Search Link
This link will create a dynamic shortcut to currently stored documents that meet specific criteria. Required values in the link include the name of the Application in which to search and at least one index field and value. Multiple index fields/values can be added to the link, using an ampersand (&) as a separator. To create an application search link, use the following structure, where the bold values are determined in-house:
https://chosenURL/ILINXCS/?mode=advsearch&appname=AppName&fieldname1=fieldvalue1
As an example, if you wish to provide a link to allow someone to easily find all documents in the HR Documents application for an employee named “Smith,” whose employee ID includes the number “93,” it would look like this:
https://imagesourceinc.com/ILINXCS/?mode=advsearch&appName=HR Documents&Employee Name=smith&Employee ID=93
Notes for using this option:
- When a user selects the link, it will always route first to the login screen.
- The search value(s) will be entered into the Advanced Search field(s), allowing the user easy editing from that point.
- While the operator is entered as an equal in the URL, remember that these values are placed into the Advanced Search, and the default operators are then honored.
- The link is not case-sensitive.
- Document Versioning with Check in/Check out.
- ILINX Content Store allows the user to check out documents from submitted batch data directly. The documents are saved to your hard drive, may be edited, and then resubmitted via checking the document back in from the ILINX Content Store Application directory. As documents are edited, ILINX Content Store automatically compiles version histories of each document that is successfully checked in. The checked-out document can be restored (in the event of an error or crash) and discarded if checked out (if editing is not needed, or accidentally opening the wrong document).
- This feature allows for the streamlined development of documents, as well as gives the user the ability to work on documentation without needing to be connected to the network. This allows the checked-out documents to be portable and easily accessed by the user.
Document Versioning
ILINX Content Store allows you to check out submitted documents from their applications. The documents are saved to your hard drive, may be edited, and then re-submitted via checking the document back in from the ILINX Content Store Application directory. When you check a document back, ILINX Content Store automatically compiles version histories of each document for easy reference and recovery. The checked-out document can be restored (in the event of an error or crash), and discarded (if editing is not needed, accidental opening of the wrong document, etc.).
This check-in/check-out system allows for the streamlined development of documents. Checking out a document also gives the user the ability to work on documentation without connecting to the network.
Checking Out a Document
Step 1: Search for documents using the Search tab or Advanced Search for the desired document in the correct application.

Step 2: Select the document(s) you wish to check out. (Multiple documents may be checked out at the same time)
Step 3: Right-click to open the context menu. Select Check out or Check out without download (this option will only check out the document to the user).
Step 4: Select your desired location to download the document.
The document is downloaded to the computer’s hard drive. You can access it directly from your computer without logging in to ILINX Content Store.
A new option will appear above the list of applications, titled Checked out to me. This option lists the document(s) you have checked out, with or without download.
When the Checked out to me option is selected, the full list of checked-out documents will appear in the display panel. It will show each document’s name, the date it was retrieved, a basic description of the document, and the last time the document was modified. At any time while a document is checked out, you may right-click the document to discard the checkout by selecting Discard checkout in the contextual menu.

Note: If you attempt to discard or check in a document that has already been checked out by another user, you will receive one of the following messages:


Checking In a Document
Checking in a document will save and update the edited document. Checking in a document requires access to the ILINX Content Store profile from which it was checked out.
 Step 1: Log in to the ILINX Content Store user who checked out the document.
Step 2: In the Search tab, open the Checked out to me option.
Step 3: Select the document you would like to check in; right-click to bring up the contextual menu, and then select Check-in. This opens the check-in menu, detailing the document version, as well as other fields that must be filled before submittal.
Step 4: To check in the document, use the Scan or Browse feature to locate the document you have checked out.
Step 5: Before checking the document in, you must specify the sort of changes that you made to the document: Major or Minor.
Step 6: Before checking the document in, you must also comment on the status of the document: what you changed, the state of the document, etc. If left empty, a permanent red asterisk and a red box will appear around the Comments section.
Step 7: With all fields completed, select Check in to submit the document to the ILINX Content Store application.
Step 8: At any time, you may right-click to open the contextual menu and check the Version history. This allows you to view the version of the document, the modification date and user who modified the document, and the check-in submittal comment to describe what changed.
Document History
Selecting the Version history from the context menu will open the Document history panel for the selected document. Within this window, you will see each version checked in as well as who, when, and what was modified.
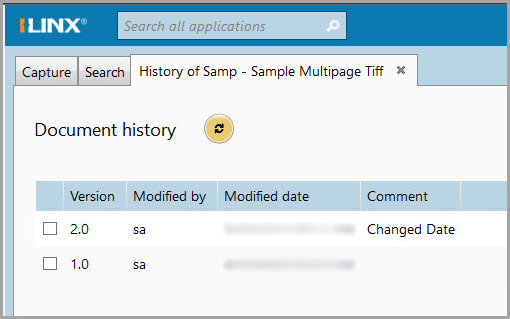
Right-clicking on a document version will open a context menu that includes the following options:
- Open – Displays each selected document in its tab.
- Open side by side – Option only appears when two documents are selected; displays the documents side by side within one tab. Index fields are viewable and editable.
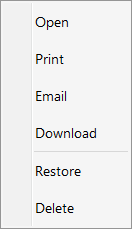
- Print – Prints each selected document. Only displays when selecting image files.
- Email – A new window opens which allows you to email the selected document(s) as attachments. Your options include Page range (all specific pages), File name (use index fields or custom name), and File format (PDF – Searchable, PDF – Image only, PDF/A, XPS, or in original format.
Note: Any annotations on an image file may not be included if sent as an attachment
- Download – Selecting this option will open a window where you can select the folder to save the document.
- Restore – This option is available in previous versions of the document while updating the version number to the next major version.
- Delete – Delete one or more documents and metadata from the Application. There is undo for this action.