Contents
Have another version? ILINX version 8.6, ILINX version 8.5, ILINX version 8.0 , Older versions are included only in the installation package.
About
The ILINX Export Document Retention Management functionality allows you to control the deletion and/or disposition of specific sets of content based on that content’s age or any other date-type metadata associated with the content. Additional criteria can also be defined using any of the document’s metadata field values giving you complete control over how retention rules identify content to be processed.
You also have a wide array of disposition options once a set of content has been identified for processing. You may choose to remove all evidence that the set of content ever existed. In some cases, you may want to retain all or part of the content’s metadata but purge the actual document, or maybe replace it with a boilerplate document describing your organization’s retention rules. You may have certain documents and metadata that you want to off-load out of ILINX Content Store to another system. And for any of these operations, you may want someone to review and approve the retention processing before it happens. All of these capabilities and more are available in the retention management functionality.
The retention management logic within ILINX Export will test each target document to make sure it is not locked by a user. If the document is locked, retention management will generate a clear/clean log entry identifying:
> The fact that the document cannot be modified by retention management because it is locked by a specified user.
> The document ID.
> The ILINX Export job name.
The retention management approval web page is secured using ILINX security (log in). In order to approve retention management operations, the user must have or be given delete privileges for the application that will be affected by the purge.
Note: It is important to remember to add a log entry to note when you log in, and after you approve the deletion.
ILINX Retention Management currently supports the following repositories:
> ILINX Content Store
> ILINX Content Store View
> Oracle IPM 10gR3 (Also version 7.6)
Note: In order to use the retention management email approval functionality, you must have the ILINX Export Public client installed on your system.
Review the ILINX Export Prerequisites for User ID and Access information required to run ILINX Retention Management jobs.
System Requirements
For general information on supported and recommended hardware, OS, web browsers, databases, etc. for ILINX products, please refer to the ILINX Support Matrix.
Operational Considerations and Limitations
Please note that there are many factors that affect the ILINX Export’s operational performance. One major factor is the size of the file being processed.
Generally, all individual file conversions should be limited to a maximum total file size of 250MB. There are many variables that could affect this limit, such as shared machine resources (i.e., memory) and processors. It is possible you may experience problems with slightly smaller file sizes, while it is also possible that ILINX Export could process larger file sizes, all depending on the environment.
In addition, converting documents to PDF format could result in very large files and presents an additional consideration. The final size of the converted PDF is dependent on the original document characteristics including; format (TIFF, PDF, Word, JPEG, etc.), number of pages, color depth, page complexity, etc.
If you expect that your processing requirements will exceed the operational guidelines described here, please consider these options:
- Test the upper limits of your conversion needs in your environment with your largest documents.
- Increase the size of the server farm and or machine resources (i.e., memory, processors, etc.).
- Break large documents into multiple, smaller documents.
If you have questions, contact ImageSource Technical Support for assistance.
Job Creation Wizard
The ILINX Export user interface is where the export job profiles are managed. It is designed to establish the correct dependencies of job configurations in the correct order and to aid in preventing user input error by validating user input on each screen.
Different jobs will have certain configurations in common, but will also have unique configurations depending on the job source. The common elements are discussed in the ILINX Export Administrators Guide. This guide will review Retention Management using ILINX Export.
Once the job profiles are created, and schedules have been assigned, this window should then be closed. It is only necessary to display during configuration and running varied jobs.
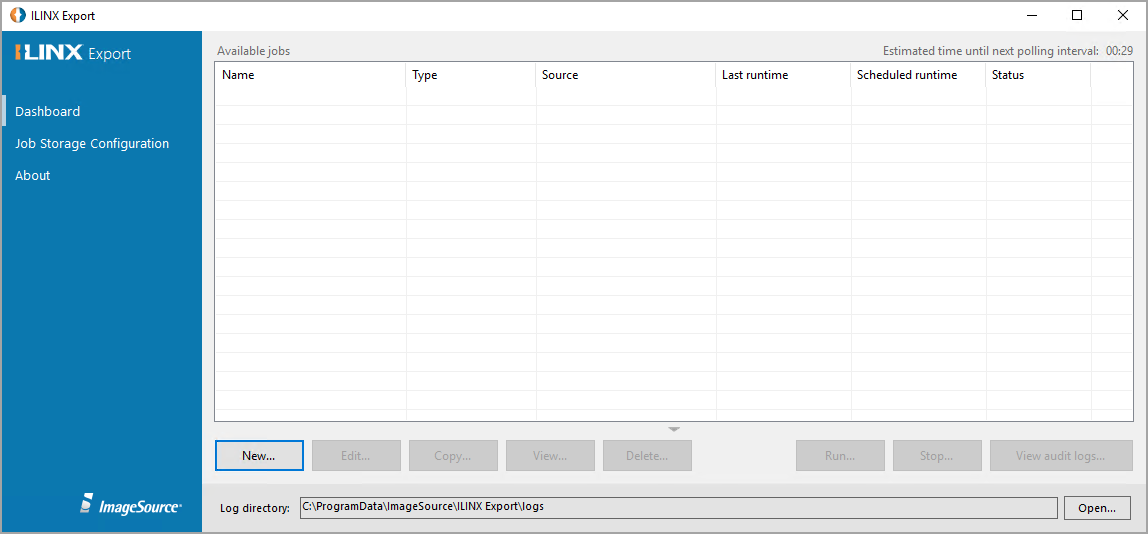
Available Jobs
Screen Elements
The elements for this screen are:
> Available jobs – This is the home window for ILINX Export. It provides a list of the currently configured jobs on the system, including the display of the following fields.
> Name – The job name.
> Type – Mode type. There are three available options:
– Varied
– Sequential
– Retention Management
> Source – The source the ILINX Export will run against. This column contains a description of the content source defined for the job: e.g. ILINX Content Store.
> Last runtime – Date the job was run by the ILINX Export windows service. This will display only when the type is sequential.
> Scheduled runtime – The next scheduled run time of the job by the service, based on the job’s scheduled settings. This will display only when the type is sequential.
> Status – The current status of the job. The following are the four states a job can be in:
– Executing – The job is currently being run by ILINX Export.
– Scheduled to Run – The job is currently not running but is scheduled to run at a later date.
– Disabled – The job is not scheduled to be run by ILINX Export.
– Stopping – The job is pending and waiting to be stopped by ILINX Export.
Option Buttons
> New – Clicking on this button will produce a new job form. This option is highlighted by default if no job is selected.
> Edit – By highlighting an existing job in the available jobs window and clicking on this button, the job becomes available for editing. This button is not enabled if no job is selected or the selected job is currently executing.
> Copy – By highlighting an existing job in the available jobs window and clicking on this button, the job will be duplicated, and a new job will be created, appending a – copy to the original name.
> View – By highlighting an existing job in the available jobs window and clicking on this button, the job settings’ summary will display. From the resulting screen, you can download a PDF of the job’s settings for easy records storage and printing using the Download button. This button is not enabled if a job is not selected or the selected job is currently executing.
> Delete – By highlighting an existing job in the available jobs window and clicking on this button, the selected job will be deleted. This button is not enabled if no job is selected.
> Run – By highlighting an existing job in the available jobs window and clicking on this button, the selected job will be run. This button is not enabled if no job is selected or the selected job is currently running, active or scheduled to run.
> Stop – By highlighting an existing job in the Available Jobs Window and clicking on this button, the selected job will be stopped. This button is not enabled if no job is selected or the selected job is currently Waiting to run or Disable.
> View audit logs – Clicking this button opens the default audit log directory.
From the available jobs (see screenshot a beginning of this section) screen, the new and edit options begin the wizard for managing an import profile which takes you to the job information screen.
Creating A New Job
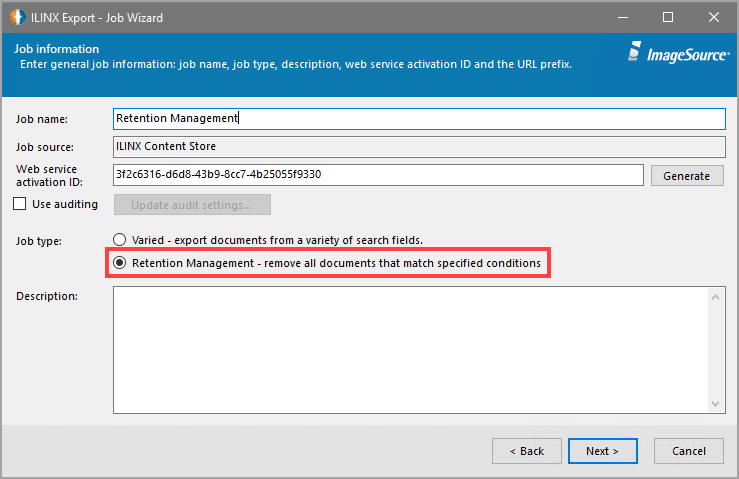
When you click the New button, the Job Information dialog will appear, and the wizard will guide you through the creation of your job. This screen allows you to pick the source from which you will export documents. You must select a supported repository as your Job Source.
When configuring the Job Wizard in ILINX Export, select Retention Management as the job type.
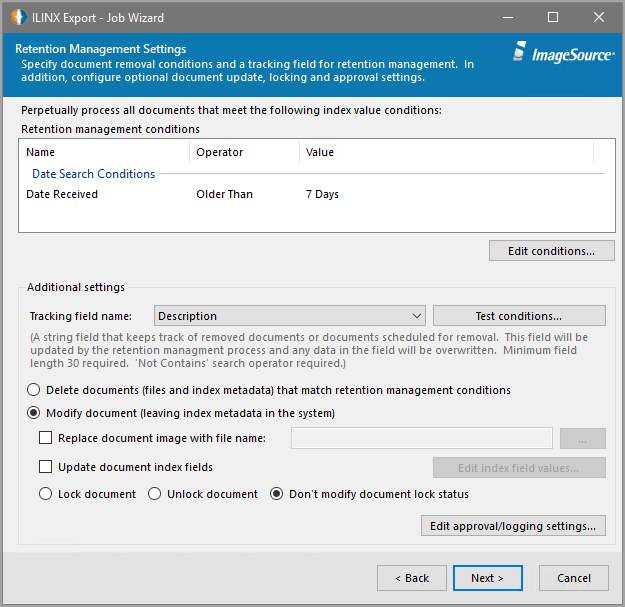
The Retention Management Setting page of the Export wizard allows you to configure the content identification criteria and processing directives to be performed on the content.
Screen Elements
The elements for this screen are:
> Retention management conditions – Displayed is a table which was configured using the Edit conditions button.
> Edit conditions – Click this button to open the Retention Management Condition window.
> Additional settings – The Additional Conditions section allows you to use Non-date-type fields to establish additional selection criteria that may not be accomplished in the previous Date conditions section. Please note that these are also determined by which backend repository you are using and selections made on previous tabs in the ILINX Export – Job Wizard.
Use case: if you have a Saved Search (in case of IPM) or Application (in case of ILINX Content Store) that exposed 3 fields (1 date and 2 string fields), the date field would be displayed under the Date conditions, and the other two fields would be under Additional conditions.
Unlike the Date conditions section, Additional condition fields can use all the possible operators supported by the backend system.
– Tracking field names – Select the name of the field name of the ILINX Content Store index field which is used to track retention. This Text field is used by the retention management process to track both removed and scheduled-to-be-removed documents. If the replace document radio button is enabled, this field is required. Possible status values that can be set by the retention management process at runtime are:
Ret Mgt – Flagged for processing
Ret Mgt – Flagged for confirmation
Ret Mgt – Processed
Note: If you have an existing job using a version LINX Export Retention Management older than version 6.1, you must edit the job XML file to note the new 6.1 status values listed above.
Important Note: Any previous data in this field will be overwritten by the retention management process, so make sure you select a field that is either blank or has information you can discard. In ILINX Content Store you can easily define a new application field specifically for this purpose.
– Test conditions – This button allows you to test your defined retention criteria against the actual target repository. This only executes a search using the currently defined criteria. This will not modify any actual documents or metadata in the repository.
Note: Documents that are currently locked within ILINX Content Store will not appear in the test results.
– Delete documents – Selecting this option will delete all content and metadata that match the retention management conditions configured above. Delete both documents and index metadata. By using this option, no trace of the document or metadata will be left in the system. When the destruction approval is given by the user, the following information is recorded in the ILINX log file:
» Date of approval.
» Authenticated username ⇒ Turn on IIS authentication to both protect the page and to see the username.
» Signature text entered by user (exists on form today).
» Number of files that will be purged ⇒ The final number will get written to the log after the process is done.
» ICS application of the purged files.
– Modify document – Optionally you may select to keep the change the content and/or metadata depending on the conditions selected.
» Replace document image with file name – Select this check box then using the browse button, select a TIFF image template to replace the stored file image identifying it has been deleted. This option will delete the original documents and replace them with a static document. The static document would likely have some information about your retention policies and why the document is no longer available (see Replacement file name below). If selected, this option allows you to enter or browse to the path to the actual file that will be used to replace purged documents within ICS/IPM if the option above is selected.
» Lock document – Also you can choose to lock the image and content to ensure the content nor metadata may be modified. Use this option to lock the content identified by the search criteria. The ILINX Content Store user account that was specified at the beginning of the Export wizard will be used to perform the document lock operations. Note, this feature is available only when using the ILINX Content Store.
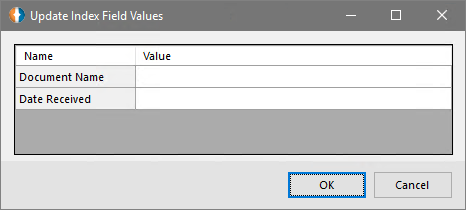
» Update document index fields – Select this check box then click the Edit settings button to open the Update Index Field Values screen. Use this option to update one or more index fields as part of the removal process, by using the Edit settings… button, which is only enabled if the Modify Document radio button is selected and the Update document index fields checkbox is checked. For example, you can update the document index field with the word Removed to let the user know this particular document has been removed by the retention management process. You can also enter a space character to blank the field value.
• If the document meets the criteria configured to update index fields but is linked to an ILINX Capture Batch Profile using the “Linked Application” feature and is currently in workflow, the update will be ignored until the ICS_IsInWorkflow flag is set to false in the database.
Note: You can add [Current Date] in place of regular text or date, and the current date will be inserted when updating the index field values. This is configured in the Update Index Field Values dialog of the Export job configuration UI. This allows you to store the date that the document was purged from the system into one of the document’s field values.
» Lock document / Unlock document / Don’t modify document lock status – Select on of these options to allow users to lock, unlock, or retain locked status as the document is being processed for retention.
» Edit approval/logging settings – Select this button will open the Retention Management – Approval/Logging Settings.
Edit Conditions
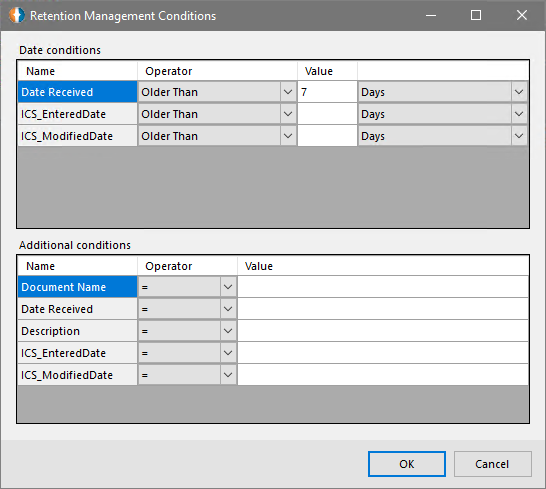
Clicking on the Edit conditions button will open the Retention Management Conditions window which allows you to enter the specific criteria in which to retain content based on the index values.
Date Conditions
Note: Criteria in both Date conditions and Additional conditions sections are joined by “and,” not “or.” This allows you to narrow the query further using a combination of Name fields and Operators selected.
> Name – The Date fields in this section are determined by which backend document repository you are using and the document “Application” that was selected earlier in the ILINX Export – Job Wizard. When defining retention rules for an ILINX Content Store repository system field names will begin with ICS_. User-defined fields will appear as they do in ILINX Content Store.
> Operator – The list of available Operators in this section is determined by which backend repository you selected on previous tabs in the ILINX Export – Job Wizard.
Note: Date fields can only have the following possible operators: equal to, not equal to, less than, less than or equal to, greater than, greater than or equal to, In Between (only Oracle IPM 10g or ILINX Content Store currently supported).
> Value – Type in the number, and select the desired units (Days, Weeks, Months or Years) from the drop-down list.
Note: The user has defined “Date conditions” criteria that, when executed, will identify all documents where the “Invoice Date” value is older than seven years.
Additional Conditions
The Additional Conditions section allows you to use Non-date-type fields to establish additional selection criteria that may not be accomplished in the previous Date conditions section. Please note that these are also determined by which backend repository you are using and selections made on previous tabs in the ILINX Export – Job Wizard.
Use case: if you have a Saved Search (in case of IPM) or Application (in case of ILINX Content Store) that exposed 3 fields (1 date and 2 string fields), the date field would be displayed under the Date conditions, and the other two fields would be under Additional conditions.
Unlike the Date conditions section, Additional condition fields can use all the possible operators supported by the backend system.
Edit Approval/Logging Settings… button
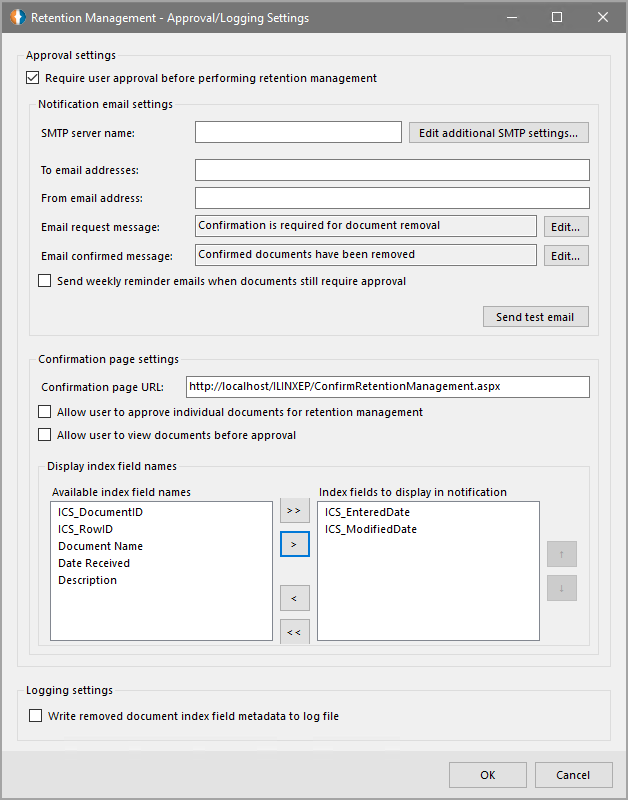
> Approval settings: This section contains configuration options for you to set up email notifications for deletion confirmation.
– Require user approval before performing retention management: With this option selected, the retention management process will not delete any document unless the user approves the deletion.
– Notification email settings: This section contains configuration options for you to set up email notifications for deletion confirmation.
» SMTP server name: Enter the email server for your organization.
» Edit additional SMTP settings: This button will open a window to enter additional security settings including the Port, SSL Encryption and credentials.
» To / From email address: Enter email addresses for those to notify for approval and from an email address that will be used to notify.
» Email messages: Using the Edit… button, modify the message as desired for the email notifications for both the request message and confirmed message.
» Send weekly reminder…: Selecting this checkbox will send reminder emails each week using the configured notification settings.
» Send test email: This option is very important. After filling in the email information, use it to validate your settings.
Important Note: It is strongly recommended that you send a test email before continuing with your configuration. If you do not test your connection, the email notification system will fail, and all the documents flagged for approval will remain flagged indefinitely, and will not be deleted.
The email system is configured to continue trying to send the email for five minutes before giving up and throwing an error. This, ideally, will mitigate a minor network outage.
– Confirmation page settings: This section contains configuration options for the confirmation details.
» Configuration page URL: Replace “localhost” with the name of your server where your instance of ILINX Export resides.
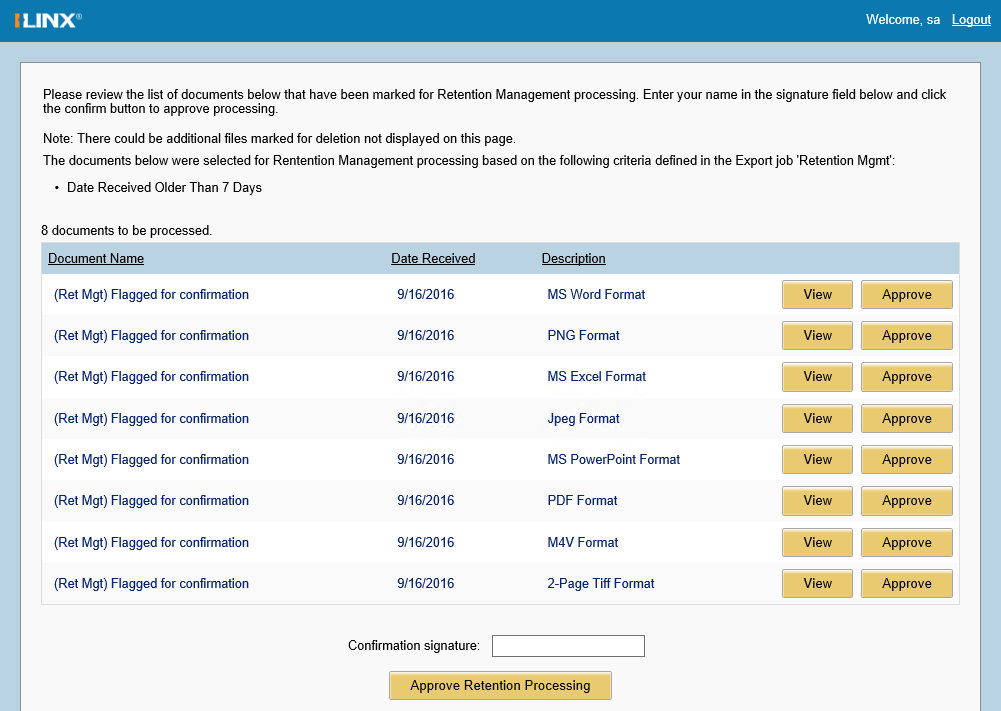
» Allow user to approve individual documents – Selecting this checkbox will display an Approve button in the Retention Processing window. When the button is selected, the associated document will be approved to continue the Retention Management processing.
» Allow user to view documents before approval – Selecting this checkbox will display a View button in the Retention Processing window. When the user clicks this button, the document will be displayed for the user to review.
» Display index field names: Choose from the list on the left which index fields you wish to display to the person who will be approving these documents for deletion. They will be displayed like so:
> Logging settings: Selecting this checkbox will write to the log files when documents are approved for removal and include the index information.
The user will review the documents, type his or her name in the Confirmation signature box, and click Confirm Records Removal.
Important Note: The notification email will contain processing options for all outstanding documents currently flagged for processing. This is to ensure that, in the event that one or more previous emails are lost, the user will still be able to perform actions on any and all documents currently flagged for processing.
> Logging settings – This option also provides a checkbox configure the system to write out all deleted document metadata fields to the system log file.
Advanced Configuration Options
Add the keys below to the ILINX Export Public web.config file default location at
C:\Program Files (x86)\ImageSource\ILINX Export\PubWebApp\web.config
|
KEY
|
VALUE
|
DESCRIPTION
|
|---|---|---|
| key=”WebServiceUrl” | Update localhost with server name | Service used to call Retention jobs |
| key=”tempFileStorageLocation” | local folder with permissions | Update local UNC location to ensure permissions are granted for ILINX Export to access for temporary working folder |
| key=”showFirstXColumnsInResults” | numeric value | Default value is 10. |
| key=”sortSearchResultsByFirstColumn” | true/false | Default value false. Sorts first column in returned results in order. |
| key=”enableUserSorting” | true/false | Default value true. Allows users to sort by clicking column title. |
| key=”autoLaunchSingleResult” | true/false | Default value true. Automatically opens the first document result when opening approval page. |
| key=”convertTiffToPdf” | true/false | Default value true. If documents are Tiff, leaving true will automatically convert to pdf format. |
