Contents
Have another version? ILINX version 8.5, ILINX version 8.0, Older versions are included only in the installation package.
About
ILINX Flex, a key component of the ILINX ECM Platform, enables you to easily capture accurate information from a desktop, laptop, tablet or smartphone.
This guide contains information on how to configure the ILINX Flex, Administrator tools and options.
Note: This guide assumes that installation of the ILINX Capture Platform and the ILINX Web Platform products have taken place. For complete installation documentation, please see the ILINX Installation Guide
Configuring
See the ILINX Installation Guide for installation information and configurations. ILINX Flex utilizes configurations from ILINX Content Store, ILINX Capture, and ILINX eForms. Each of these products may be configured to be used in ILINX Flex according to the license assigned.
Accessing
In addition to the primary ILINX Content Store client application, you can also access the product’s end user capabilities from the ILINX Flex client application. The simplicity of this client application makes it perfectly suited for ad-hoc or casual users.
The ILINX Flex client application delivers many of the same capabilities as the primary client including:
> Global and advanced searching
> Full document management operations
> Document operations such as viewing, emailing, printing, and downloading.
To access the ILINX Flex client application, perform the following steps:
Note: This client application supports a wide variety of web browsers running on either Windows or Mac, including Mozilla Firefox, Google Chrome, and Microsoft Internet Explorer
Step 1: From an Internet browser window, enter the ILINX Flex client URL.
https://[ServerName]/ILINXFlex
The URL is not case-sensitive
Step 2: Enter a valid user name and password.
The Username is not case-sensitive
The Password is case-sensitive
Step 3: Click on the Sign in button.
Step 4: Once logged in, you will see a navigation panel on the left. The items listed in the navigation panel are dependent on the licensing, configurations, and permissions the user has.
Content
Application Names
The first item in the navigation panel is Application names that have been created within the ILINX Content Store server. All configurations and permissions are made in ILINX Content Store. Also in the list is the ‘Checked out to me’ option.

From the ILINX Flex client, you can perform a global search, advanced search, or simply browse through the Applications list. When you click on an Application, an initial set of documents within the Application are displayed.
Note: Applications cannot be created from within the ILINX Flex client, this function can only be performed using ILINX Content Store
Adding a New Document
ILINX Flex allows you to upload new documents into an Application directly. In order to accomplish this, follow the steps below:
Step 1: Select an Application to add the new document to
Step 2: Click the New button at the top right corner of the ILINX Flex Application page.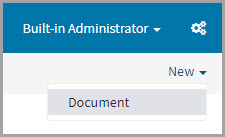
Step 3: When the drop-down menu appears, select Document.
Step 4: In the New Document window, select the file you would like to upload.
Step 5: Enter the appropriate index field information.
Step 6: Click the OK button to add the new document.
Using Global Search
The global search feature is used to search for documents across all Applications. The text entered will search all index fields and will return any document found with that value in any index field based on the permissions of the user. This search assumes a “contains” operator.
Leaving this field empty and clicking on the Run Search (magnifying glass) button will run an unabated search of all Applications the user has permissions to. Furthermore, the number of documents returned is dependent on settings configured by the Administrator. The most recently modified documents, using the Last Modified Date value, will be returned first.
Using Advanced Search
Advanced search gives the user an opportunity to enter index field values for searching within a specific Application. To include additional search conditions, click on the Click here to add new condition button. To remove an added condition, right-click on any part of the condition line and select Remove this condition. Any added condition is only available for the life of the current window.
System values are designated in the drop-down list by surrounding brackets [ ]. To run an unabated search of a particular Application, double-click on the Application’s name; be sure that all index field values are null. An initial set of documents will be returned. You may also use the Reset all search fields link to return the Advanced Search to default settings.

Interacting with Documents
ILINX Flex gives the user a number of document management options. You can access these options by right-clicking on a document in the results list.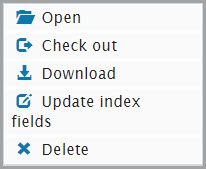
> Open – Allows you to open the document to view. This option does not check out or permanently edit the content, but allows the document to be opened. If the ILINX Content Store system has been configured with the optional document rendering module, the selected document will be presented in a new browser tab. If the system is not configured with the document rendering module, the user will be prompted to launch or download the selected document.
> Check out – Using the same checkout functionality used in ILINX Content Store, checkout allows the document in the application to be checked out for updating or editing. At any time, you can right-click a checked out document from the ILINX Flex Application page and discard the checkout. This will revert the document to its original state before being checked out.
> Download – Allows you to download a document to the desired location. This can be useful for traveling needs where you do not have access to either the ILINX Content Store server or to the internet.
> Update Index Fields – This feature allows you to modify the index field values for one or more documents.
> Delete – This option permanently deletes the document from the Application.
Comments Thread
When viewing a document, a Comments thread generates a discussion pertaining to the document. The administrator sets the permission for a group to view and/or add to discussions.
> A comment entry can have up to 1,000 characters per entry. A visual of the number of characters will appear next to the discussion box as the text is entered.
> The Comments area can be collapsed/expanded by the user as desired.
> Choose to sort comment entries by most recent or oldest.
> When a comment is added to a thread, the user’s name and the date entered are attached.
> Once saved, a comment cannot be removed, and previously entered comments cannot be modified.
Document Versioning
ILINX Content Store Flex allows you to directly check out documents from applications from your ILINX Content Store host server. The documents are saved to your hard drive, where they can be edited, and then checked back into ILINX Content Store. Previous versions of a given document can be restored (prompted to the current version), and document checkouts can be discarded (if editing is not needed, accidental opening of the wrong document, etc.).
This check in/check out system allows for streamlined development of documents. Checking out a document also gives the user the ability to work on documentation without connecting to the network.
Checking Out a Document
Step 1: Search for the desired document in the correct application.
Step 2: Select the document(s) you wish to check out. Multiple documents may be checked out at the same time.
Step 3: Right-click to open the context menu. Select Checkout.
Step 4: Select your desired location to download the document.
> The document is downloaded to the computer hard-drive. It can be accessed directly from your computer without logging in to ILINX Content Store or ILINX Content Store Flex.
Checking In a Document
Checking in a document will save the edited document as a new version.
Step 1: Log in to the ILINX Flex profile that checked out the document.
Step 2: Expand the Application names option in the navigation panel and select Checked out to me
Step 3: Select the document line you would like to check in; right-click to bring up the context menu, then select Check in. The check-in window will open to complete the check-in.
Step 4: Select the file to upload and check-in.
Step 5: Specify the sort of changes you made to the document: Major or Minor.
Step 6: You must make a comment concerning the status of the document; what you changed, the state of the document, etc. If left empty, a permanent red asterisk and red box will appear around the Comment section.
Step 7: With all fields completed, select “Submit” to check in the document.
Another option in the context menu is Discard check out – This option will disregard any changes that may have been made and removes the check out.
Views
Selecting the Views navigation option will expand a list of Views that have been configured in ILINX Content Store that the logged in user has permissions to. Features in the Views option match what is available in the Application names section.
eForms
The next navigation option available in the ILINX Flex client is eForms. Selecting eForms displays the list of forms that have been configured in ILINX Capture eForms and permissions have been assigned to the logged in user. No configurations can be made within the ILINX Flex client. Once a completed form is submitted, it will continue processing through ILINX Capture workflow.
Note: When configuring an Oracle database lookup for eForms, both Oracle 32-bit and 64-bit drivers must be installed on the eForms server in two separate folders. Also, verify that the Oracle driver installer is added to the Oracle bin folder in the system PATH environment variable

Note: The ILINX Flex client will prompt the user to stay or leave the current page if data has been entered and the user chooses to close or change the page. This configuration is made within the ILINX eForms properties
Workflow
Assigned Views
Note: Only Views that have eForms associated within ILINX Capture will be displayed

The next option available in the ILINX Flex client is Assigned views. When this option is selected, a list of ILINX Capture Views that have been configured and permissions assigned is available in the center panel. Selecting a batch will display the form in the rightmost document viewing panel.
Dashboards
Introduced in ILINX 8.6 is ILINX Analytics. ILINX Analytics Dashboards are configured in the ILINX Capture Platform Admin tab. Multiple Dashboards may be configured and accessed within ILINX Flex based on permissions assigned to the logged-in user. Select the Refresh button to reload the widget with fresh information. Select the Download button to save a copy of the desired dashboard. Refer to the ILINX Analytics guide for additional information and configurations.

URL Settings Flex
Using the URL Tools
You can invoke content searches and display the results within the ILINX Flex Client using basic URL structure. These URLs can be invoked by many line-of-business systems, such as Salesforce.com and Oracle PeopleSoft, to deliver contextual content to the user without leaving the line-of-business system. This is achieved by formulating and launching a Flex client URL with the desired ILINX Content Store application and search criteria, usually extracted from the line-of-business system.
To create a basic URL:
Step 1: Start with this template URL:
https://[ServerName]/ilinxflex/main/advancesearch/[ApplicationName]?mode=advsearch&[IndexFieldName]=[IndexFieldValue]
Step 2: Fill in the values in bold with the values you wish to use for your search criteria.
> MyServerName: The name of your server on which ILINX Content Store resides.
> ApplicationName: The name of the application you wish to search against. Any spaces in the name must be denoted as ‘%20’.
> IndexFieldName: This is the name of the document index field you are searching. You can add as many index fields to your search as you wish, connecting them with previous index field searches with an ampersand (&).
> IndexFieldValue: This is the value of the index field you specified above for which you want to search.
Step 3: To test your URL, paste it into your browser. Below is an example using the default Sample Application:
https://[ServerName]/ilinxflex/main/advancesearch/Sample%20Application?mode=advsearch&Document%20Name=ILINX%20Logo
Additional Parameters
Below is a list of parameters that may also be used to create unique URLs to open documents
|
PARAMETER
|
VALUES
|
DESCRIPTION
|
|---|---|---|
| appname | [Application Name] | Name of the Application the document is stored in. |
| docid | [unique docid] | The GUID docid stored in the database for the desired document. |
| username | [username] | The Username of the user or service that has access to the document. |
| password | [password] | The encrypted password that matches the username. |
| ShowOnlySearchResults | True False |
True = Returns only the results of the search entered in the URL. This includes the Global search as well as the New menu. False = Displays tabs, global searches, etc. along with returning search results. |
| expandindexpanel | 1 0 |
1 = Expands index panel 0 = Hides index panel |
| minview | 1 0 |
1 = Hides all except the document, annotations, and comment functionality. 0 = Default setting that opens in Flex Viewer. |
Permissions
All permissions for ILINX Flex are inherited based on the administrative permission configurations within ILINX Capture, ILINX Content Store, and ILINX eForms. For configuration details, please refer to the Administrators guide for the desired product.
ILINX Capture Administrators Guide Permissions
ILINX Content Store Administrators Guide Permissions
ILINX eForms Permissions
Other Options
User Interface Configuration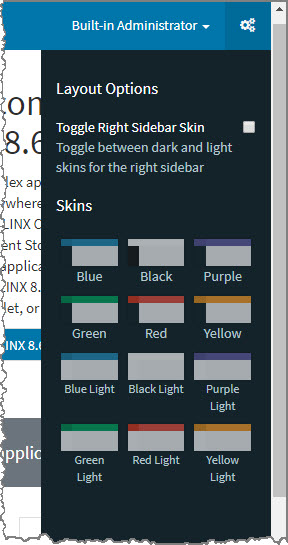
Within the ILINX Flex client, users can change the user interface skin as desired. This option is located in the upper right of the screen by selecting the gears icon. Open the screen and choose the desired color combination. Also, the user has the ability to toggle the Layout Options sidebar between light or dark skins.
Administrators can hide or show this option through a system-wide setting in the ILINX Flex webconfig as well as choose the desired skin layout.
Step 1: In your system’s installation folders, navigate to Program Files\ImageSource\ILINX Web Platform\.
Step 2: Open the web.config XML file.
Step 3: Configure the keys as desired:
> <add key=”HideConfigurationPanel” value=”false”/> – Default is False.
> <add key=”DefaultSkinName” value=”skin-blue”/>
Other possible skin values:
– skin-blue
– skin-black
– skin-purple
– skin-green
– skin-red
– skin-yellow
– skin-blue-light
– skin-black-light
– skin-purple-light
– skin-green-light
– skin-red-light
– skin-yellow-light
Step 4: After saving, the default user interface will now display the settings configured.
Custom Forgotten Password Page
If you have created a custom page for your users to access if they have forgotten their login password, you can link directly to the page on the ILINX Content Store login screen.
Step 1: In your system’s installation folders, navigate to Program Files\ImageSource\ILINX Web Platform\.
Step 2: Open the web.config XML file.
Step 3: Configure the custom URL by adding the ForgotPasswordLink node in the XML file.
> For example: <add key=”ForgotPasswordLink” value=”https://myserver/myforgotpasswordpage.htm” />
Step 4: The login screen will now display a Forgot your password? button that links to your designated URL.
Global Search Visibility
The Global search functionality may be configured to be hidden or visible to users within the client interface. This option is configured “False” by default. To configure the Global Search to be hidden:
Step 1: Open the ILINX Content Store database.
Step 2: Modify the ‘ICS_AppSettings’ table.
Step 3: Set the ‘GlobalSearchIsNotVisible’ key to “True”.
Step 4: Save the changes.
Step 5: The clients must be restarted to view the changes made.
Public Mode
ILINX Flex provides a “public” mode for the Flex client, not just the SDK. When a user accesses the Flex client they can see a list of ILINX Content Store and ILINX Capture Views that are available to the ILINX public user. While using the public mode within ILINX Flex, the interface will not display the username or have the ability to ‘Change password’, ‘Sign out’, or other configuration options.
Implementation
Step 1: In your system’s installation folders, navigate to Program Files\ImageSource\ILINX Web Platform\.
Step 2: Open the web.config XML file.
Step 3: Configure the custom URL by adding the publicUser nodes in the XML file. Add Nodes:
<add key=”publicUserName” value=”<ILINX Username>” />
<add key=”publicUserPassword” value=”<Password>” />
Step 4: ILINX Flex can now be accessed in ‘Public Mode’.