Contents
About
With ILINX Release, you can deliver data from capture software to enterprise content management software with numerous options.
ILINX Release provides a function-rich tool that takes images generated through capture applications and injects them into ECM systems with full auditing and logging capabilities.
This proven and easy-to-configure technology is scalable to serve individual business units or the whole enterprise.
This document describes how to install, configure, and run the ILINX Release application.
Getting Started
Local Network Access for Release to File System
It is a recommended best practice to create a dedicated user account for your ILINX Release service to run on. The type of account, either domain or local, should be dictated by your corporate security guidelines. This account will allow you to grant read and write privileges to the service so that it can deliver metadata and/or content to the file system and maintain a working directory.
System Requirements
For general information on supported and recommended hardware, OS, web browsers, databases etc. for ILINX products, please see the document titled “ILINX Support Matrix.”
Other Software Considerations
The following software may need to be installed on a system where ILINX Release is installed.
> Kofax Capture (v7.5 or higher) windows client.
Note: This software is required if ILINX Release will be targeting a Kofax Capture system.
> Microsoft Internet Information Server (IIS) v6 or v7.
Note: This software is optional and is only required if you choose to use the application programming interface.
> WSE 3.0 (see link below): This tool is only required if you are planning on releasing to an Oracle 11g system.
https://www.microsoft.com/en-us/download/details.aspx?id=14089
> Default Installation Path.
C:\Program Files (x86)\ImageSource\ILINX Release
> Non-configurable options.
– Install type = per machine
– IIS virtual folder = ILINXRelease
– Start menu = ImageSource | ILINX Release | ILINX Release
Installation
Step 1: Open the Installer zip file and double-click msi to begin the installation.
Step 2: Respond to the wizard appropriately to finish the installation.
Step 3: After ILINX Release is installed, place the license.dat file in the install folder.
Step 4: Modify the account that is running the ILINX Release service, if necessary.
Configuration
This IXM releases files from your batch into a specified external destination. It also provides a unique identifier for this transaction back to the workflow for validation or tracking purposes.
Note: The ILINX Release server component is required to use this IXM.
GetBatchInfo/SetBatchInfo: These are not required. If your system administrator does not provide a batch variable to this activity, the IXM will retrieve and use the current batch instance from the database.
Parameters
|
Name
|
Type
|
Description
|
|---|---|---|
| Batch | BatchInstance | (Optional) If you do not provide a batch variable to this activity, the IXM will retrieve and use the current batch instance from the database. |
| Configure | N/A | Displays the Release configuration screen. See below for more information. |
| DisplayName | string | Enter a name to identify this Release IXM in your workflow. |
| Result | BatchInstance | The BatchInstance object that holds your batch as modified by the Release IXM. Place your batch variable here if you passed it as a parameter into the Batch field described above. |
IXM Configuration
The ILINX Release user interface allows configuration between capture source and target storage systems. The wizard-driven interface will guide you through each screen of the configuration process, validating all input and notifying you of any errors before moving on to the next step.
This interface is contained within the workflow designer of the ILINX Capture product. You can configure ILINX Release jobs for specific batch profiles within those batch profiles’ respective workflows. To access the job creation interface, perform the following steps:
Step 1: Place a Release IXM in the workflow.
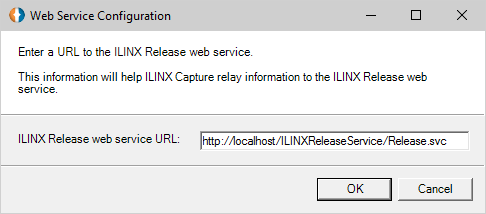
Step 2: Click the configure ![]() button next to the Configure box. This will open a dialog in which you connect to the ILINX Release web service.
button next to the Configure box. This will open a dialog in which you connect to the ILINX Release web service.
Step 3: Replace “localhost” with the custom URL of your ILINX Release system in the resulting dialog box. Click OK.
Job information
The job information screen allows you to pick the source from which you will release documents and the target system that they will be released into. This screen drives all release jobs and once you select your source and target system a dynamic wizard guides you through each setup screen of the process.
While configuring a job profile, entered values will be validated when the Next button is selected. If a value does not pass validation, an exclamation character will appear next to the offending entry. Hovering over the exclamation character provides a description of the validation error.
For the purposes of this guide we will walk you through an example of configuring a source and target system: specifically, ILINX Capture to ILINX Content Store.
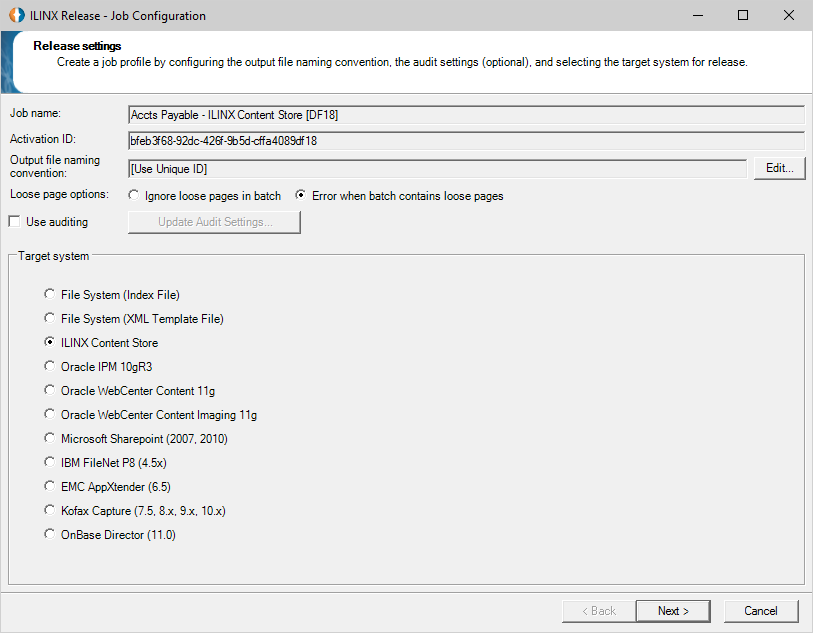
Release settings
Screen Elements
Note: The explanations in this section assume you have chosen ILINX Content Store as your target application.
The elements for this screen are:
> Job name – Enter a name for the job here.
> Activation ID – This ID is system-generated for communication between ILINX Capture and the target system.
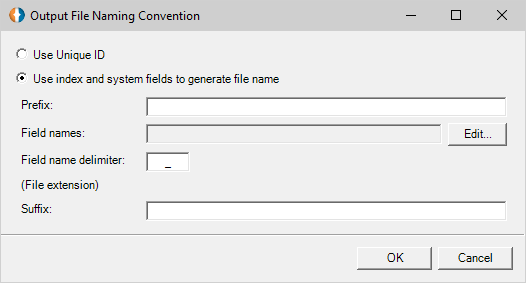
> Output file naming convention – Clicking the Edit button next to this box opens the Output File Naming Convention Here you have the following options:
– Use Unique ID – Generates a random GUID for each file.
– Use index and system fields to generate file name – Selecting this option will enable the following fields:
» Prefix: (Optional) Choose a prefix for the file name.
» Field names: Clicking the Edit button opens a dialog that allows you to choose fields you want to include in the file names given to the documents when they are release.
» Field name delimiter: Enter a character you wish to use to delimit the fields in the file name.
» Suffix: (Optional) Enter a file extension other than the current extension of the released files.
> Loose page options – Select the options to specify how loose pages are going to be handled when executing the Release IXM. These two options are:
– Ignore loose pages in batch – This option will release the images to the Target system and not requiring them to be in a document.
– Error when batch contains loose pages – This option will send the batch to the Error queue if it contains loose pages.
> Use auditing – Checking this box enables database auditing and activates the Update audit settings button.
> Update audit settings – Clicking on this button opens the configure audit database screen (see the next section) where you can configure the database auditing settings.
> Source system – This is the system from which the files are being released (ILINX Capture).
> Target system – This is the system where the files will go. The options for import type are shown below. Each will be described later in this document.
– File System (Index File)
– File System (XML Template File)
– ILINX Content Store
– Oracle 10gR3
– Oracle WebCenter Content 11g
– Oracle WebCenter Content Imaging 11g
– Microsoft SharePoint (2007, 2010) (No Longer Supported)
– IBM FileNet P8 (4.5x)
– EMC AppXtender (6.5) (No Longer Supported)
– Kofax Capture (7.5, 8.x, 9.x, 10.x)
– OnBase Director (11.0)
– Hotfix #4 – Box Enterprise
Database auditing
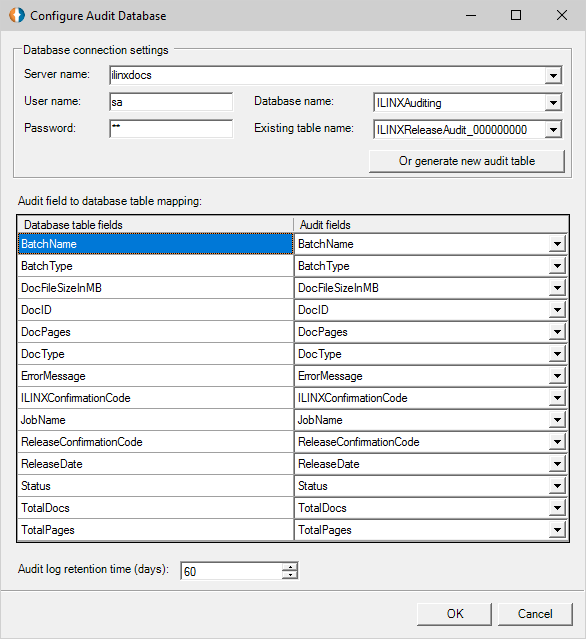
You can use the auditing feature of ILINX Release to monitor the activity within your database. From the Release settings screen of the job wizard, check the Use auditing checkbox. Click the Update audit settings button to open a configuration window.
Screen Elements
The elements for this screen are:
> Database connection settings
– Server name – Enter the name of your database’s server.
– User name – Enter the user name of your server login.
– Password – Enter the password of your server login.
– Database name – Select the database you want to audit from this drop-down list.
– Existing table name – Select the database’s table for auditing from this drop-down list.
– Or generate new audit table – Click this button to create a new table in your database for auditing.
> Audit field to database table mapping – Use the drop-down lists to assign what information you want to audit about each of the table’s fields.
> Audit log retention time (days) – Determine how many days ILINX Export should keep the audit log.
Note: You can configure database auditing on a job-by-job basis, or globally across all of your jobs.
Source to target settings
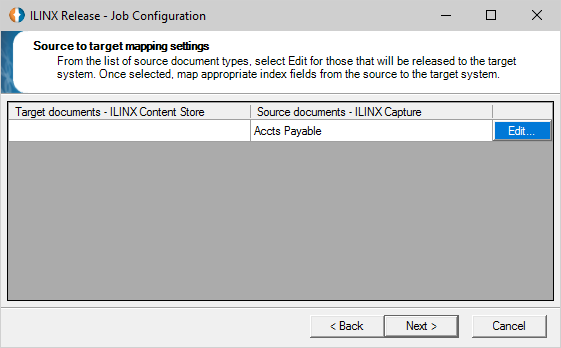
The following screen will prompt you for the location of your Release service (simply replace localhost with the name of your server), plus your username and password. Click Next to proceed after filling these fields in. The next dialog is your Source to target mapping settings.
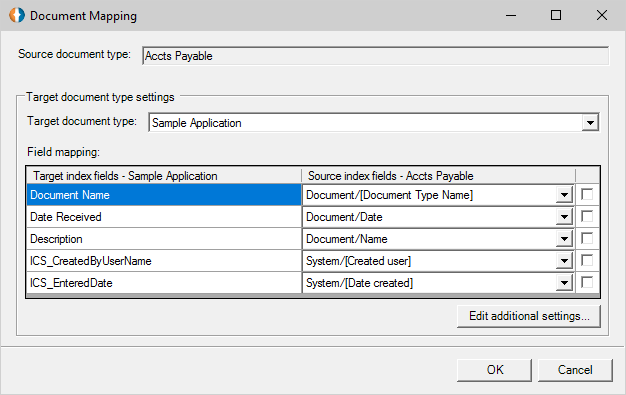
From this screen, click Edit to set up your source to target settings. This will open the following dialog:
Screen Elements
The elements of this screen will vary depending on what target system type you selected. For this example, the target system is ILINX Content Store and the source system is ILINX Capture.
> Target document type – Here you can select your target ILINX Content Store application name.
> Field mapping – Depending on your chosen target system, this panel will allow you to map your source index fields to your target index fields. Additionally, the interface will automatically map index fields that have matching names. For example, if you have a target index field named “Social Security Number” and a source index field also named “Social Security Number,” the interface will map those fields to each other. This function is case-sensitive.
Note: SQL Server limits the length of fields based on their datatypes. Review the ILINX Capture Administrators Guide for limit details.
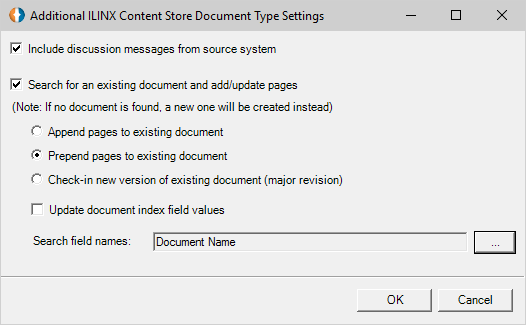
> Edit additional settings… – If your target system is ILINX Content Store, you can set additional settings by clicking this button. This will open the following dialog:
Here you have the option to:
> Include discussion messages from source system – If you have discussion messages attached to your ILINX Capture documents, these will be transferred to ILINX Content Store.
> Search for an existing document and add pages – You can either append pages or prepend pages to the existing document, depending on your preference. To edit search settings, click the ellipses next to Search field names. The resulting dialog allows you to choose your search criteria based on the value of one or more index fields. If the chosen field’s value matches the incoming source field value that you mapped it to, the page(s) will be appended/prepended to that document.
Note: You must ensure that you have mapped the source index field to a target index field if you use it as a search field. Otherwise, there will be no value to search for. In this case, and in the case that no document is found matching the value provided, a new document will be created.
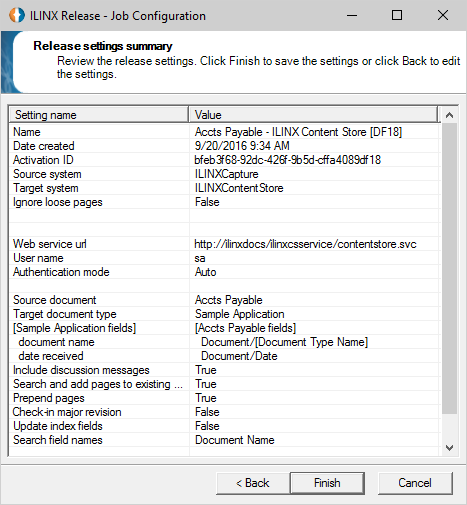
Release settings summary
This screen displays a review of all settings. The settings are divided into two columns:
> Setting name – Provides a list of all configuration setting names
> Value – Provides a list of all configuration values assigned to the job setting name
Click Finish to complete the configuration. Return to the previous screen by clicking Back.
Getting the Best Performance
Please note that there are many factors that affect the ILINX Release’s operational performance. One major factor is the size of the file being processed.
Generally, all individual file conversions should be limited to a maximum total file size of 250MB. There are many variables that could affect this limit, such as shared machine resources (i.e., memory) and processors. It is possible you may experience problems with slightly smaller file sizes, while it is also possible that ILINX Release could process larger file sizes, all depending on the environment.
If you expect that your processing requirements will exceed the operational guidelines described here, please consider these options:
> Test the upper limits of your conversion needs in your environment with your largest documents.
> Increase size of server farm and or machine resources (i.e., memory, processors, etc.).
> Break large documents into multiple, smaller documents.
Contact ImageSource Technical Support for assistance.
