Contents
- Product Contents
- Getting Started
- Job Creation Wizard
- Job Sources
- Job Type
- Oracle IPM 10gR3
- Oracle IPM 10gR3 Database
- Oracle IPM XML Transfer
- Oracle WebCenter 11g
- Event Tracker
- OLE DB Data Transfer
- ILINX Content Store
- ILINX Content Store View
- ILINX Content Store XML
- ImageSource Filer
- EMC AppXtender (6.5) (No Longer Supported)
- EMC AppXtender Database (No Longer Supported)
- IBM FileNet Image Service 3x
- Job Type
- General Configurations
- Programming Interfaces
- Other topics
- Field Naming for Saved Searches and Database Tables
- Validation
- File Conversion Process
- The File Transfer Process (Replication)
- Temporary Working Folder
- Storage Options Upon Export
- Export a Single Document with Multiple Fields
- Log files
- ILINX Export Service
- ILINX Export Web Service
- ILINX Export Command Line
- Polling Time
- Troubleshooting
About
ILINX Export enables data and documents to be extracted from ECM repositories on demand, for migration and for managed exports at both the UI and API level. Multiple programmable interfaces, from GUIs to portals, can be used to intuitively export in a variety of configurations and formats. ILINX Export enables disclosure, public access*, controlled access, compliance and the compiling of select information for streamlining business processes.
This document describes how to install, configure, and run the ILINX Export application.
* Public Access option – the administrator can configure the system to provide documents to a public facing web page, where consumers can search for, view and or download documents related to a specific application or job. This is provided with ILINX Export and is available as a separate MSI file with the word “Public” in the title, when downloading the software from the ImageSource download center (example: ILINX Export Public v4.4.418.11344.zip).
Product Contents
ILINX Export is available either by download from the ImageSource, Inc., download site, or if requested on CD. The URL below is the site address for the ILINX download: https://downloads.ilinxcapture.com
A login and password is required to access this site. If you do not know your login and password, please contact your account representative.
Once logged in, select View Downloadable Files for the ILINX Export product. You will see each of the following files available for download:
> ILINX Export [version number].msi – This is the installer file for the product.
> ILINX Export Public [version number].msi – This contains the web services and web interfaces for Export.
> ILINX Installation Guide.pdf – This is the Installation Guide for ILINX products.
> ILINX Support Matrix.pdf – This document lists the system requirements for each ILINX product.
> license.dat – This is the license key for the product.
Getting Started
User IDs and Access
Local Network
It is a recommended best practice to create a dedicated user account for your ILINX Export service to run on. The type of account, either domain or local, should be dictated by your corporate security guidelines. This account will allow you to grant read and write privileges to the service so that it can deliver metadata and/or content to the file system and maintain a working directory.
The user account will need to have full administrative rights to the following:
> Windows server where ILINX Export is installed.
> File/capture system(s) that are being used for document and index metadata file input.
Remote FTP
Using ILINX Export to replicate document content to remote FTP servers will require you to set up an account on the remote FTP servers for use with ILINX Export. It is recommended that this be a dedicated user ID utilized only by ILINX Export. This user account will need to have write and delete permissions to the file systems that content is being replicated to via the FTP transfer process.
System Requirements
For general information on supported and recommended hardware, OS, web browsers, databases etc. for ILINX products, please see document titled: “ILINX Support Matrix”.
Operational Considerations and Limitations
Please note that there are many factors that affect the ILINX Export’s operational performance. One major factor is the size of the file being processed.
Generally, all individual file conversions should be limited to a maximum total file size of 250MB. There are many variables that could affect this limit, such as shared machine resources (i.e., memory) and processors. It is possible you may experience problems with slightly smaller file sizes, while it is also possible that ILINX Export could process larger file sizes, all depending on the environment.
In addition, converting documents to PDF format could result in very large files and presents an additional consideration. The final size of the converted PDF is dependent on the original document characteristics including; format (TIFF, PDF, Word, JPEG, etc.), number of pages, color depth, page complexity, etc.
If you expect that your processing requirements will exceed the operational guidelines described here, please consider these options:
> Test the upper limits of your conversion needs in your environment with your largest documents.
> Increase size of server farm and or machine resources (i.e., memory, processors, etc.).
> Break large documents into multiple, smaller documents.
If you have questions, contact ImageSource Technical Support for assistance.
Required Software
The following software must be installed on the system where ILINX Export is installed. These are required components for Export.
> If you are extracting from Oracle IPM 10g, ILINX Export requires the installation of the IPM windows client.
> The ILINX Export Public module requires IIS v6 or higher.
> If you are extracting from Oracle Web Center 11g, you need the WSE 3.0 tools. See the link below for more information: https://www.microsoft.com/en-us/download/details.aspx?id=14089
Installation
Default Path
C:\Program Files\ImageSource\ILINX Export
Note: When installing Export on 64 bit machines, the default installation path will be found in the appropriated file:
C:\Program Files (x86)\ImageSource\ILINX Export
Service Information
ILINX Export has two services that provide core functionality for the product:
> ILINX Export service – Core service for ILINX Export which enables administrative users to create, edit, start, stop and delete export jobs.
> ILINX Export Web service – This service provides the programming interface that can be called from another application.
How to Install
ILINX Export
Step 1: Double-click the ILINX Export MSI file to begin the installation.
Step 2: Respond to the wizard appropriately to complete the installation.
Step 3: After ILINX Export is installed, place the license.dat file in the install folder as applicable:
> Required path
\install path\ImageSource\ILINX Export
> To Use the API use the following path
\install path\ImageSource\ILINX Export\WebService\bin
Step 4: Modify the account that is running the ILINX Export service, if necessary.
ILINX Export Public
Step 1: Double-click the ILINX Export Public MSI file to begin the installation.
Step 2: Respond to the wizard appropriately to complete the installation.
Post-Installation
After installing ILINX Export, some configuration changes need to be made within Windows IIS.
The default IIS_IUSR account must be changed to use a local administrative user account.
> In Microsoft IIS administration, configure the setting to allow for anonymous logins.
> If ILINX Export is installed on a Windows IIS server that hosts other applications, you should configure a separate application pool for ILINX Export to prevent a potential failure or corruption of memory in the event of other applications crashing.
Job Creation Wizard
The ILINX Export user interface is where the export job profiles are managed. It is designed to establish the correct dependencies of job configurations in the correct order and to aid in preventing user input error by validating user input on each screen.
Different jobs will have certain configurations in common, but will also have unique configurations depending on the job source. The common elements are discussed in this section, and in the following section, ILINX Export Job Sources, the differing configuration elements are discussed.
Once the job profiles are created and schedules have been assigned, this window should then be closed. It is only necessary to display during configuration and running varied jobs.
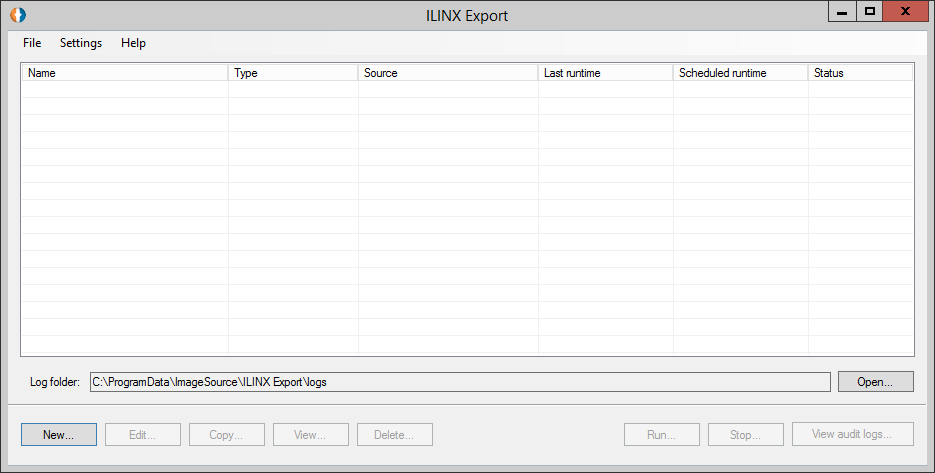
Available Jobs
Screen Elements
The elements for this screen are:
> Available jobs – This is the home window for ILINX Export. It provides a list of the currently configured jobs on the system, including the display of the following fields.
> Name – The job name.
> Type – Mode type. There are two available options:
– Varied
– Sequential
– Retention Management
> Source – The source the ILINX Export will run against. This column contains a description of the content source defined for the job: e.g. ILINX Content Store.
> Last runtime – Date the job was run by the ILINX Export windows service. This will display only when the type is sequential.
> Scheduled runtime – The next scheduled run time of the job by the service, based on the job’s scheduled settings. This will display only when the type is sequential.
> Status – The current status of the job. The following are the four states a job can be in:
– Executing – The job is currently being run by ILINX Export.
– Scheduled to Run – The job is currently not running but is scheduled to run at a later date.
– Disabled – The job is not scheduled to be run by ILINX Export.
– Stopping – The job is pending and waiting to be stopped by ILINX Export.
Option Buttons
> New – Clicking on this button will produce a new job form. This option is highlighted by default if no job is selected.
> Edit – By highlighting an existing job in the available jobs window and clicking on this button, the job becomes available for editing. This button is not enabled if no job is selected or the selected job is currently executing.
> Copy – By highlighting an existing job in the available jobs window and clicking on this button, the job will be duplicated and a new job will be created, appending a – copy to the original name.
> View – By highlighting an existing job in the available jobs window and clicking on this button, the job settings’ summary will display. From the resulting screen, you can download a PDF of the job’s settings for easy records storage and printing using the Download button. This button is not enabled if a job is not selected or the selected job is currently executing.
> Delete – By highlighting an existing job in the available jobs window and clicking on this button, the selected job will be deleted. This button is not enabled if no job is selected.
> Run – By highlighting an existing job in the available jobs window and clicking on this button, the selected job will be run. This button is not enabled if no job is selected or the selected job is currently running, active or scheduled to run.
> Stop – By highlighting an existing job in the Available Jobs Window and clicking on this button, the selected job will be stopped. This button is not enabled if no job is selected or the selected job is currently Waiting to run or Disable.
> View audit logs – Clicking this button opens the default audit log directory.
From the available jobs (see screenshot a beginning of this section) screen, the new and edit options begin the wizard for managing an import profile which takes you to the job information screen.
Job Source
Screen Elements
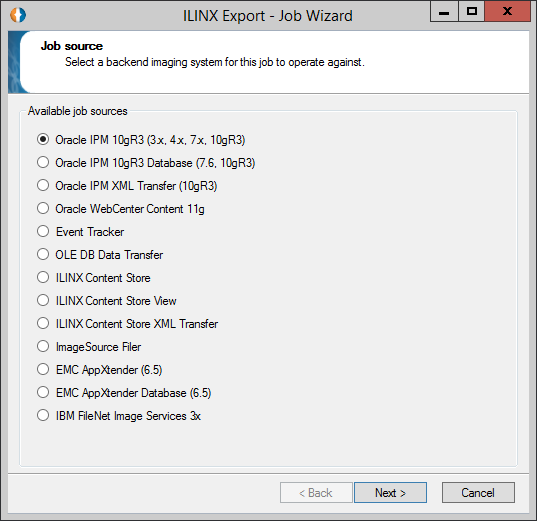
The screen options for this information window change depending on the source type chosen. Each of the possibilities is described below. Depending on your selection, your configurations will vary. The details of these variations are discussed in the ILINX Export Job Sources section. This section will cover all the elements common to all job sources and will refer you to the aforementioned section wherever appropriate.
Available job sources – ILINX Export can export from any of the following sources:
> Oracle IPM 10gR3 (3.x, 4.x, 7.x, 10gR3)
Note: Processing export through Oracle IPM is slower than direct from database, but allows for export of many document format types i.e. native, PDF etc.
> Oracle IPM 10gR3 database (7.6, 10gR3)
Note: Processing directly from the database is faster for large extraction jobs, but is limited to TIFF and IPM universal formats only. COLD content cannot be extracted using the direct database mechanism.
> Oracle IPM XML Transfer (10gR3)
> Oracle WebCenter Content 11g
> Event Tracker
> OLE DB Data Transfer
> ILINX Content Store
> ILINX Content Store View
> ILINX Content Store XML Transfer
> ImageSource Filer
> EMC AppXtender (6.5) (No Longer Supported)
> EMC AppXtender Database (6.5) (No Longer Supported)
> IBM FileNet Image Services 3x
Important Note: If you are configuring an ILINX Export job for IBM FileNet Image Services, ILINX Export must be running as a user with access to the IDM Desktop Program.
Job Information
Screen Elements
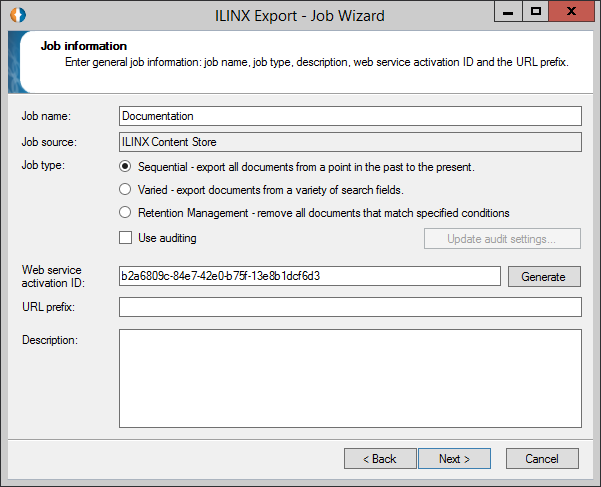
This screen allows you to enter configuration information based on the job source you selected. This screen will differ across job sources, but only slightly in relation to the Job type.
The elements for this screen are:
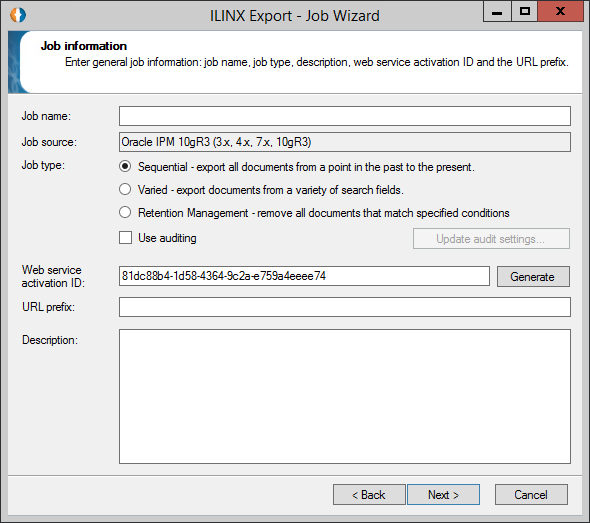
> Job name – This required field is used to specify a unique name for a new job configuration or display the name of an existing job in edit mode.
> Job source – This informational-only field displays the source that was chosen from the previous screen.
> Job type – An ILINX Export job can export using one of three methods. Some of these methods may not be available depending on the job source type you selected.
– Sequential – A sequential job type is automated and will allow the entire Oracle IPM database, ImageSource Filer database, or EMC AppXtender database (No Longer Supported), starting at a specific point.
– Varied – A varied job type will allow a profile to be configured. When run, a search screen will be presented for the user to enter values to search on. This job type is not invoked automatically, and is not available for all job sources.
– Retention Management – This mode provides simple Boolean functions enabling you to specify document removal conditions, a tracking field for retention management and configuration for optional document update and notification settings. This mode is only available for Oracle IPM and ILINX Content Store job sources.
Note: For more information on the Retention Management job type, see the ILINX Export Retention Management Guide.
> Use auditing – Checking this box will enable database auditing. Click the Update audit settings button to configure specific settings for the audit. (For more information on this feature, go to the Other topics)
> Web service activation ID – This field is needed to provide a key at the programming layer. An ID is automatically generated when the wizard begins. This is used only in the application programming mode.
> URL prefix – This field allows you to enter a hardcoded URL prefix that will be used for retrieving the documents online from other systems. The remainder of the URL will be dynamically generated using the File output and file transfer settings. This field is only required when using sequential mode, except if the source is Twitter.
> Description – This is a free-form text description box allowing you to enter in information unique to this job configuration that could be helpful in remembering why the job was created. This field value is used only for display purposes and is optional.
The following table outlines which job sources can use each job type:
|
Source
|
Sequential
|
Varied
|
Retention Management
|
|---|---|---|---|
| Oracle IPM 10gR3 | Yes | Yes | Yes |
| Oracle IPM 10gR3 Database | Yes | No | No |
| Oracle IPM XML Transfer | Yes | No | No |
| Oracle WebCenter Content | Yes | Yes | No |
| Event Tracker | Yes | No | No |
| OLE DB Data Transfer | Yes | No | No |
| ILINX Content Store | Yes | Yes | Yes |
| ILINX Content Store View | Yes | Yes | Yes |
| ILINX Content Store XML Transfer | Yes | No | No |
| ImageSource Filer | Yes | Yes | No |
| EMC AppXtender (No Longer Supported) | No | Yes | No |
| EMC AppXtender Database (No Longer Supported) | Yes | No | No |
| IBM FileNet Image Services 3x | Yes | No | No |
Database Auditing
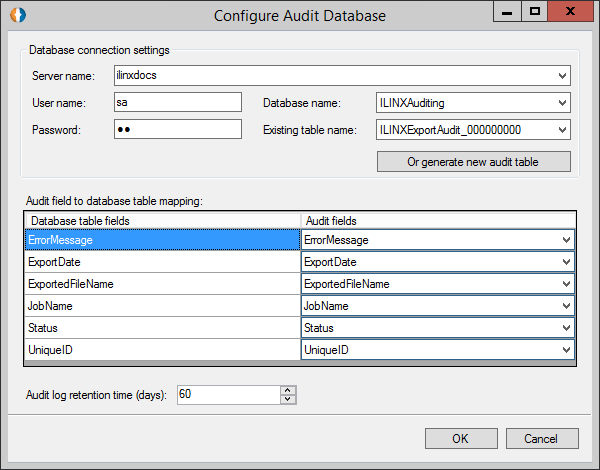
You can use the auditing feature of ILINX Export to monitor the activity within your database. From the Job information screen of the job wizard, check the Use auditing checkbox. Click the Update audit settings button to open a configuration window.
Note: You can configure database auditing on a job-by-job basis, or globally across all of your jobs.
Screen Elements
The elements for this screen are:
> Database connection settings
– Server name – Enter the name of your database’s server.
– User name – Enter the user name of your server login.
– Password – Enter the password of your server login.
– Database name – Select the database you want to audit from this drop-down list.
– Existing table name – Select the database’s table for auditing from this drop-down list.
– Or generate new audit table – Click this button to create a new table in your database for auditing.
> Audit field to database table mapping – Use the drop-down lists to assign what information you want to audit about each of the table’s fields.
> Audit log retention time (days) – Determine how many days ILINX Export should keep the audit log.
Job Sources
The sections below describe the job configurations unique to each job source. The majority of configuration options are the same across job sources, but each job has its own unique screen(s) for its configuration. Following the unique configurations, standard configuration pages are straight-forward and will not be discussed in detail.
Job Type
The ILINX Export Job Source Oracle IPM 10gR3 directly to the IPM interface (SDK) and makes calls to pull out the documents. This job source allows you to export documents from older versions of IPM.
Sequential Mode
This mode allows the export of documents stored in Oracle IPM from any time period in the past. Entering two RecIDs as criteria in your search will bring back all documents stored between the two RecIDs chosen.
Configure the tool to automatically query the Oracle IPM database by selecting the days of the week and a time for the tool run. ILINX Export will run the search in the background at the time specified and return search results and corresponding documents based on the RecIDs.
Within Oracle IPM, a saved search must be configured for an ILINX Export job to run. The ILINX Export job will leverage the Oracle IPM saved search to produce a result set of documents and associated index metadata to be exported. Searches are built using the standard Oracle IPM search builder tool.
Note: This setup allows ILINX Export to process “chunks” of Oracle IPM documents. Oracle IPM has a limit of 10,000 rows for all searches, so applications containing more than 10,000 documents must be processed in chunks.
All conventional rules for building searches within Oracle IPM apply with the following exceptions:
> The search must contain two instances of the RecIDs field – One will be used for the starting RecIDs. The search should be constructed with the first instance being “RecID1 >=” and the second instance being “RecID2 <”.
> Labels – The search form users prompt should have the labels RecID1 and RecID2, respectively.
> Field output – The fields you wish to output should be configured in the search results. There should be enough output fields included in the results to constitute a unique document search in order to facilitate the fetch process, which is designed to return only one document at a time.
> Security on the search – The security tool is used within the Oracle IPM windows client to grant rights for the saved search that was just created (and any underlying applications) only to the user ID used by ILINX Export, allowing the search to be seen only by the tool, not the greater Oracle IPM user community.
Varied Mode
This mode allows you to set search parameters for a one-time search. The job profile will establish a baseline configuration. Once these configurations are made the search can be executed. This job can be run again at a later date, using the base profile with new search values supplied.
Retention Management
This mode allows you to define robust search criteria to identify specific content and rules for processing that content (see guide ILINX Export Retention Management for further details).
Oracle IPM 10gR3
Screen Elements
The elements for this screen are:
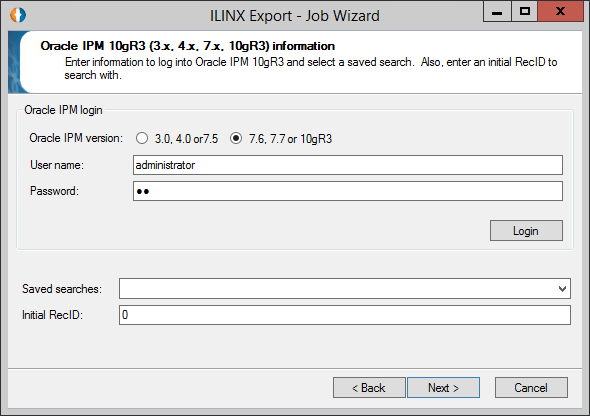
> Oracle IPM login
– Oracle IPM version – Select the IPM version you are exporting records from.
– User name – Enter Oracle user name.
– Password – Enter Oracle password.
– Login – Select the button to validate the login credentials to continue configurations.
> Save searches – Select from the drop down list the Saved Search that is configured in the Oracle IPM system.
> Initial RecIDs – This field requires you to input a RecIDs from Oracle IPM to establish a beginning point for reference in the saved search. You will solicit this beginning value from within the Oracle IPM application manually. This field is only required if you are creating a sequential job.
– This value is used for the following two purposes:
» Record where the export should begin.
» Record where the export left off in any previous run.
Note: All saved searches for ILINX Export to work must have a (RecID1 >=) and (RecID2 <) field available to the system as input values. These are required fields.
The subsequent pages provide only simple configuration options. After clicking Next through the series, you will be shown a Settings summary page. Confirm the information is correct, then click Finish.
Oracle IPM 10gR3 Database
Screen Elements
The elements for this screen are:
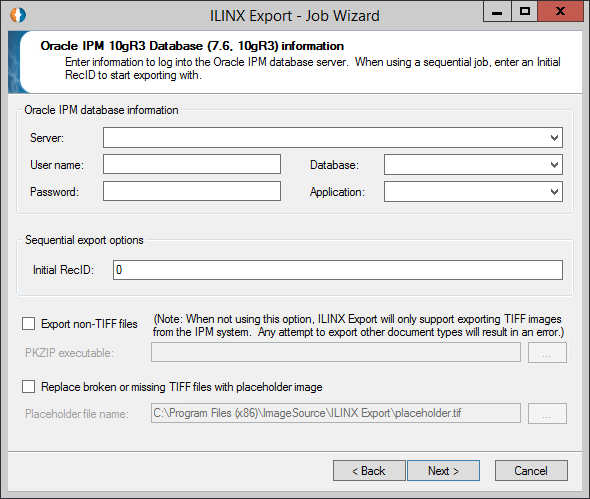
> Oracle IPM database information
– Server – Select the Server name where your database resides from the dropdown list available.
– User name / Password – Enter your database User name and Password in the corresponding fields.
– Database – Click the dropdown menu to validate your credentials and populate the list with your available databases.
– Application – Choose the Application you wish to export from.
> Sequential export options
– Initial RecID – Optionally you may enter the Initial RecID as a starting point to export.
> Export non-TIFF files – This option requires you to purchase a PKZip license separately and installed on the ILINX Export server. The required software is PKZip Server for Windows – Enterprise Edition which is available here: https://www.pkware.com/store/pkzip/server/windows.
– PKZIP executable – Using the browse (…) button will open an explorer window to select the location of the executable.
> Replace broken or missing TIFF files with placeholder image – If you check this option, files that are found to be corrupt during export will still be exported.
– Placeholder file name – The offending page will be replaced by the image you specify here.
Note: All saved searches must have a (RecID1 >=) and (RecID2 <) field available to the system as input values. These are required fields.
The subsequent pages provide only simple configuration options. After clicking Next through the series, you will be shown a Settings summary page. Confirm the information is correct, then click Finish.
Oracle IPM XML Transfer
Screen Elements
The elements for this screen are:
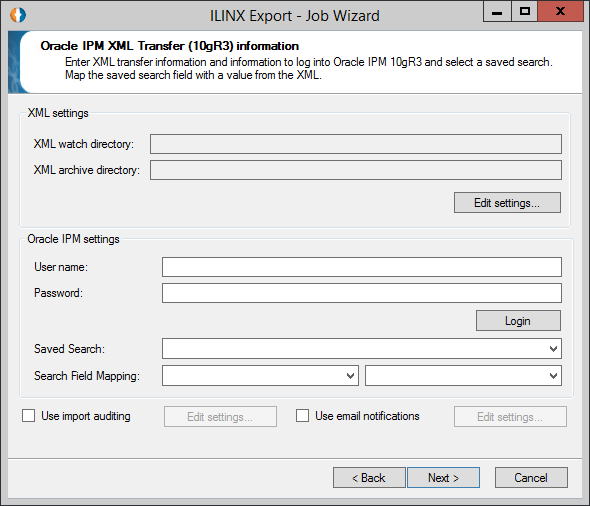
> XML settings
– XML watch directory – This field is read-only and displays the information entered from the Edit settings button.
– XML watch directory – This field is read-only and displays the information entered from the Edit settings button.
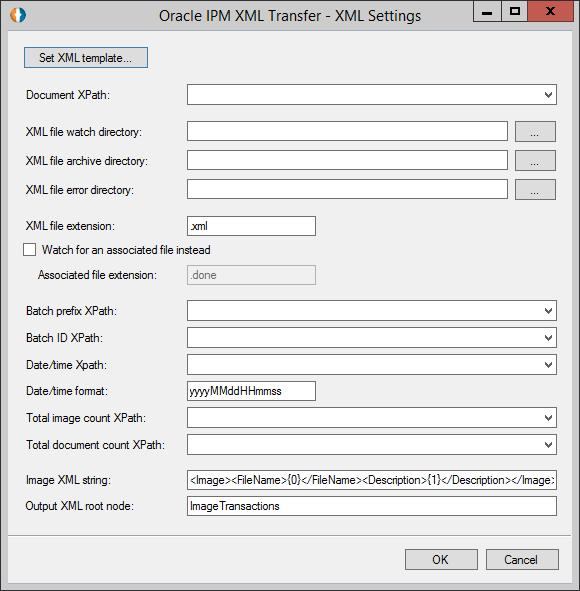
– Edit settings – Clicking this button will open the Oracle IPM XML Transfer – XML Settings screen. Set the XML template and all additional settings based on the data being exported using the Loaded XML template.
> Oracle IPM Settings
– User name – Enter Oracle user name.
– Password – Enter Oracle password.
– Login – Select the button to validate the login credentials to continue configurations.
– Save searches – Select from the dropdown list the Saved Search that is configured in the Oracle IPM system.
– Search Field Mapping – Select from the dropdown list the saved searches that have been created specifically for exporting index values and content.
> Use import auditing – Check this option and click the Edit settings button to open the Configure Audit Database Enter the database connection settings like the overall job database settings screen.
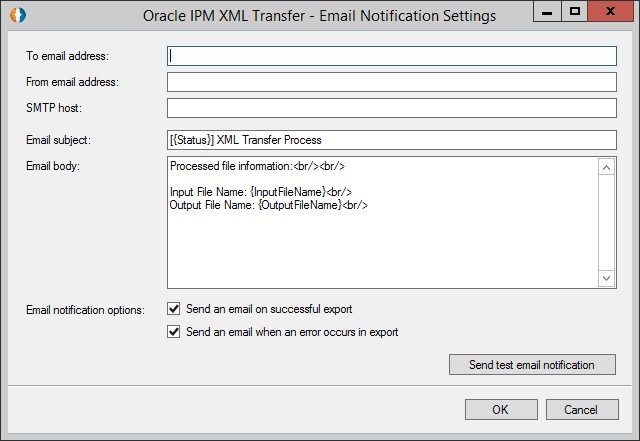
> Use email notification – Check this option and click the Edit settings button to open the Oracle IPM XML Transfer – Email Notification Settings Enter the appropriate information and sent a test email notification to ensure all settings are correct.
The subsequent pages provide only simple configuration options. After clicking Next through the series, you will be shown a Settings summary page. Confirm the information is correct, then click Finish.
Oracle WebCenter 11g
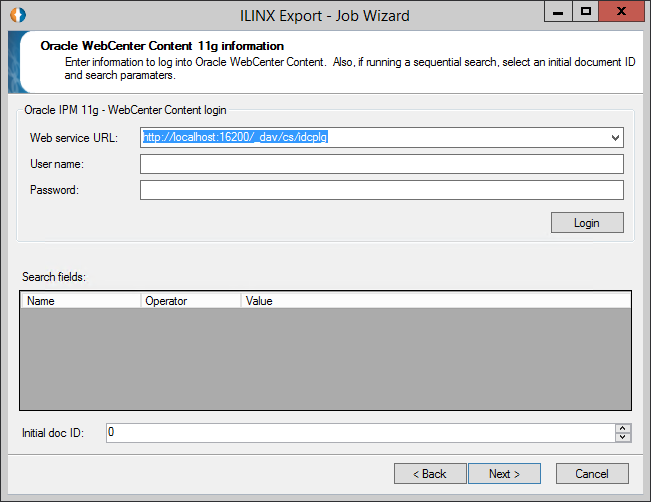
To configure ILINX Export to extract content from your Oracle WebCenter Content 11g system, create a new job of this type, then click Next.
Screen Elements
The elements for this screen are:
> Oracle IPM 11g – WebCenter Content login
– Web service URL – Enter the URL Oracle WebCenter Content system.
– User name / Password – Enter your database User name and Password in the corresponding fields.
– Search fields – The panel will automatically populate with Name and Operator fields. Use the drop-down menus in the Value field to map your search fields.
– Initial doc ID – Optionally you may enter the Initial doc ID as a starting point to export.
The subsequent pages provide only simple configuration options. After clicking Next through the series, you will be shown a Settings summary page. Confirm the information is correct, then click Finish.
Event Tracker
The Event Tracker uses an OLE DB source to export each database row to be generated in a single pdf file. The interface provided a Basic tab configuration and an Advanced tab configuration.
Basic:
Screen Elements
The elements for the Basic tab is:
> Connection string – Enter the database connection string that will be used to generate the pdf being exported. The format for this connection string is given as a default in the dialog:
Provider=SQLOLEDB.1;Data Source=localhost;Initial Catalog=[db];User ID=[user];Password=[pwd]
> Table/View name – Select the table or view from the dropdown list populated once the Connection string is validated.
> Tracking field name – Select the field from the dropdown list where the tracking will be logged while exporting data. This may be an integer or data fields.
> Initial tracking value – Optionally you may enter the Initial value as a starting point to export.
> PDF Generation Settings – Once the Table/View name is selected, the list fields will populate in the Available fields Select the fields you want to add to the PDF file and use the arrows to move them to the Output fields box. Move the fields up and down as desired to order the values in the file.
> Title Text – Add text that you want to have just under the Logo at the top of the page being exported.
> Header text – Add text that you want to have at the top of the table data being exported.
> Footer text – Add text that you want to have at the bottom of each page being exported.
> Logo file name – Using the browse button, select the loco picture file that will be used at the top of the file above the header.
> Generate Test PDF – Clicking this button will open the windows file dialog so you can select the location to save the generated text pdf. See the sample pdf below:
In the Advanced mode allows the Administrator to construct and define/designate a ‘primary’ SQL statement. Columns returned from this SQL statement will be available for use in subsequent SQL statements specifically for use in WHERE clauses. Columns from this primary search may be referenced by a keyword identifier in subsequent SQL statements for example: WHERE mycolumn = <<‘primary column name’>>. Multiple subsequent SQL statements may be added. Within the SQL statements created, Administrators may use TOP syntax to minimize the size of each PDF generated.
Advanced:
Screen Elements
The elements for the Advanced tab is:
> Edit… button – Selecting this button will open the Edit Advanced Event Tracker Primary Item screen to allow for additional configurations.
> Add… button – This button is enabled once the Primary item configurations are made. It allows for additional SQL configurations from other tables as desired.
All other elements on this tab match the Basic tab elements.
Advanced Primary Item (non-date time value):
Screen Elements
The elements for the Advanced tab is:
> Primary connection string – Enter the database connection string that will be used to generate the pdf being exported. The format for this connection string is given as a default in the dialog:
Provider=SQLOLEDB.1;Data Source=localhost;Initial Catalog=[db];User ID=[user];Password=[pwd]
> Is tracking field a data time value – Enabling this checkbox expands the screen to include additional configuration screens. See Date Time Tracking Field section below.
> Primary SQL command: – In this window enter the SQL commands to extract the desired data from the database.
> Parse button – Once the SQL command is complete, selecting the Parse button will update the remaining fields in this window.
> Tracking field name – Select the unique identifier field that will be used to track the records as each are exported into a PDF.
> Initial tracking value – Based on the Tracking field selected, enter the initial value that will be used to track the export data so they may not be duplicated.
> Field names – This field displays a list of field names that are in the table and therefore will be displayed as part of the PDF export file.
Advanced Primary Item Date Time Tracking Field selected:
Screen Elements
The additional elements for the Advanced tab when the Is tracking field a data time value is selected are:
> Primary SQL command – In this window enter the SQL commands to extract the desired data from the database.
> Parse button – Once the SQL command is complete, selecting the Parse button will update the remaining fields in this window.
> Tracking field name – Select the Date field that will be used to track the data being exported.
> Initial tracking value – Based on the Tracking field selected, enter the initial starting date/time when the event export should begin on.
> Timespan Increment (In seconds): – Enter the number of seconds that the job should wait until the next even export is to run.
> Date search threshold – This threshold identifies that number of records that are to be exported to a single PDF report.
> Use custom SQL command to search for the next available tracking date value – Enable this checkbox to activate the Next available tracking date value box.
> Next available tracking date value SQL command – Enter the SQL command that should be used to retrieve the next available record to be exported to the PDF report.
> Field names – This field displays a list of field names that are in the table and therefore will be displayed as part of the PDF export file.
Advanced Secondary Item:
Clicking the Add… button on the main Advanced tab will open subsequent windows similar to this.
Screen Elements
The elements for the Advanced tab Secondary Item is:
> Primary SQL command – In this window is displayed the SQL commands from the Primary SQL command to extract the desired data from the database.
> Use the primary connection string – Enable this checkbox to make the use the same connections credential to the database that was entered in the Primary SQL command.
> Secondary connection string – If the Use the primary connection string is not enabled, this field will be available to modify a new connection string to a new data source and table for additional data to be exported to the event PDF report.
> Secondary SQL command – In this window enter the second SQL commands to extract the desired data from the database in combination with the Primary SQL command.
> Parse button – Once the SQL command is complete, selecting the Parse button will update the remaining fields in this window.
> PDF row delimiter – A delimiter definition value that defines the behavior when multiple PDF rows are returned for a value and how to output those values on the Event Tracker PDF.
> Index row delimiter – A delimiter definition value that defines the behavior when multiple Index rows are returned for a value and how to output those values on the Event Tracker PDF.
> Foreign key field mapping – Selecting the Parse button will populate this field where you can map the appropriate fields to be included as part of the Event Tracker PDF report.
Clicking OK will close out of this screen and save the settings before moving forward in other configurations.
The subsequent pages provide only simple configuration options. After clicking Next through the series, you will be shown a Settings summary page. Confirm the information is correct, then click Finish.
OLE DB Data Transfer
This job source allows you to control the transfer of database information from a source OLE DB system to a target OLE DB system. To configure this job, select OLE DB Data Transfer as your job source, then click Next. Give your job a name, then click Next.
Screen Elements
The elements for this screen are:
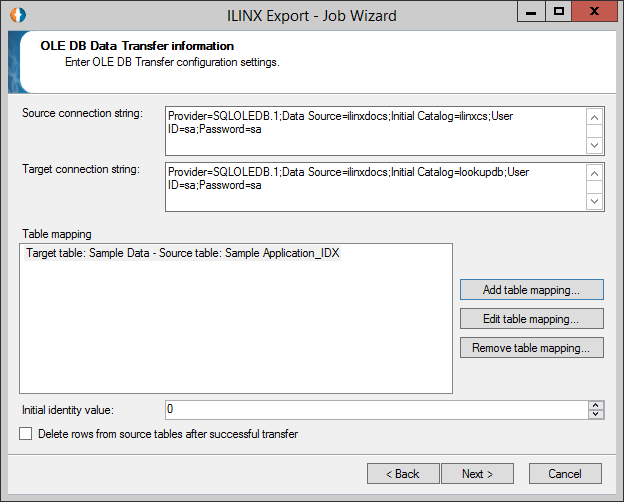
> OLE DB Data Transfer Information
– Source connection string – This is a connection string for the database from which you wish to transfer documents. The format for this connection string is given as a default in the dialog:
Provider=SQLOLEDB.1;Data Source=localhost;Initial Catalog=[db];User ID=[user];Password=[pwd]
– Target connection string – This is a connection string for the database to which you wish to transfer documents. The format for this connection string is the same as the source connection string.
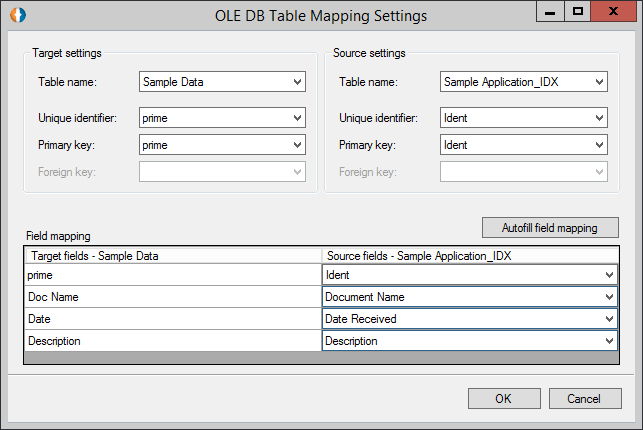
– Add table mapping – Click this button to test your connection to both databases and open the OLE DB Table Mapping Settings
– Edit table mapping – Click this button open the OLE DB Table Mapping Settings window and make any updates as needed.
» Target Settings – Select the Table name, Unique identifier, and Primary key/Foreign key of the database you want export the data to.
» Source Settings – Select the Table name, Unique identifier, and Primary key/Foreign key of the database you want export the data from.
» Autofill field mapping – Click this button to automatically map any fields from the Source fields table based on the names in the Target fields Select any missing fields using the dropdown lists as required.
– Remove table mapping – Click this button to remove the selected mapping from the Table mapping
– Initial identity value – Optionally you may enter the Initial identity value as a starting point to export.
– Delete rows from source table after successful transfer – Select this checkbox to delete any rows from the source table as they are being transferred.
The subsequent pages provide only simple configuration options. After clicking Next through the series, you will be shown a Settings summary page. Confirm the information is correct, then click Finish.
ILINX Content Store
Screen Elements
The elements for this screen are:
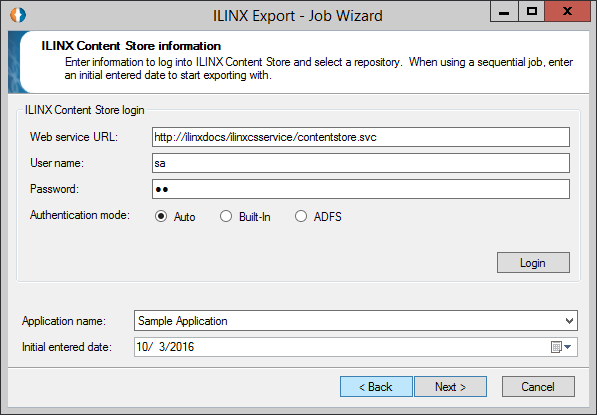
> ILINX Content Store login
– Web service URL – Replace localhost with your ILINX Content Store system’s custom URL.
– User name – Enter the user name of a system account for access to the application.
– Password – Enter the password of the same system account for access to the application.
– Authentication mode – Select the mode you want ILINX Export to use to login to ILINX Content Store. Auto will try both modes to see which is better for each job connection. Built-In will use a built in authentication that has been manually entered into ILINX Content Store. ADFS will use an account that has been configured in your Active Directory system.
– Login – Click this button when you have entered the proper URL and login information.
> Application name – Select the application to which you want to apply the ILINX Export job from this drop-down list.
> Initial entered date – Enter the date by either typing it in or using the date picker option to the desired date to start exporting from.
The subsequent pages provide only simple configuration options. After clicking Next through the series, you will be shown a Settings summary page. Confirm the information is correct, then click Finish.
ILINX Content Store View
Screen Elements
The elements for this screen are:
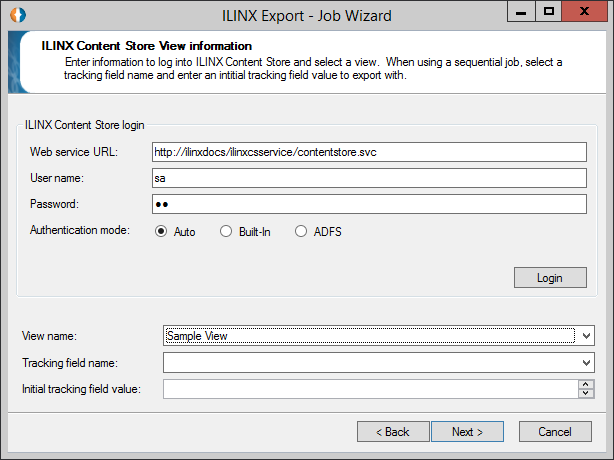
> ILINX Content Store login
– Web service URL – Replace localhost with your ILINX Content Store system’s custom URL.
– User name – Enter the user name of a system account for access to the application.
– Password – Enter the password of the same system account for access to the application.
– Authentication mode – Select the mode you want ILINX Export to use to login to ILINX Content Store. Auto will try both modes to see which is better for each job connection. Built-In will use a built in authentication that has been manually entered into ILINX Content Store. ADFS will use an account that has been configured in your Active Directory system.
– Login – Click this button when you have entered the proper URL and login information.
> View name – Select the View that is created in ILINX Content Store that you want the ILINX Export job from the dropdown list.
> Tracking field name – Select the field name that will be used to track the export. This may be an integer or date.
> Initial tracking field value – Enter the tracking value to start exporting from.
The subsequent pages provide only simple configuration options. After clicking Next through the series, you will be shown a Settings summary page. Confirm the information is correct, then click Finish.
ILINX Content Store XML
Screen Elements
The elements for this screen are:
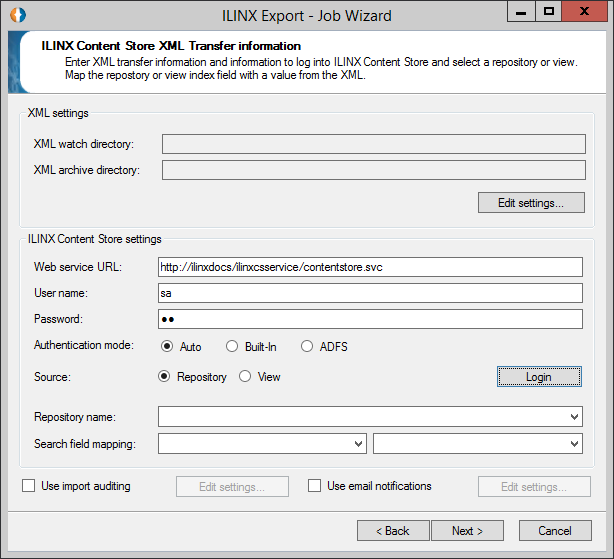
> XML settings
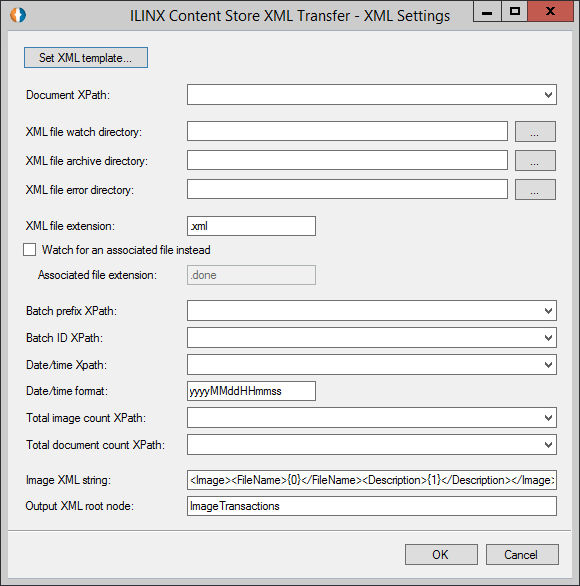
– XML watch directory – This field is read-only and displays the information entered from the Edit settings
– XML watch directory – This field is read-only and displays the information entered from the Edit settings
– Edit settings – Clicking this button will open the ILINX Content Store XML Transfer – XML Settings screen displayed below. Set the XML template and all additional settings based on the data being exported using the Loaded XML template.
> ILINX Content Store Settings
– Web service URL – Replace localhost with your ILINX Content Store system’s custom URL.
– User name – Enter the user name of a system account for access to the application.
– Password – Enter the password of the same system account for access to the application.
– Authentication mode – Select the mode you want ILINX Export to use to login to ILINX Content Store. Auto will try both modes to see which is better for each job connection. Built-In will use a built in authentication that has been manually entered into ILINX Content Store. ADFS will use an account that has been configured in your Active Directory system.
– Source – Select Repository or View based on the source location of the content to export. Clicking View will change the next dropdown to View name and the dropdown boxes to the configured ILINX Content Store Views.
– Login – Click this button when you have entered the proper URL and login information.
– Repository/View name – Select from the dropdown list the name that is configured in the ILINX Content Store system that you are going to export content from.
– Search Field Mapping – Select from the dropdown list the saved searches that have been created specifically for exporting index values and content.
> Use import auditing – Check this option and click the Edit settings button to open the Configure Audit Database Enter the database connection settings like the overall job database settings screen.
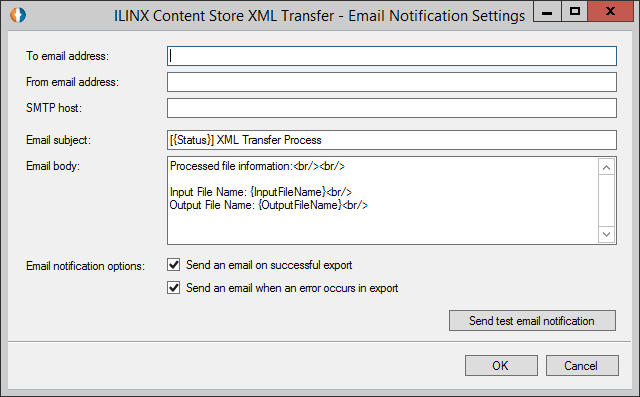
> Use email notification – Check this option and click the Edit settings button to open the ILINX Content Store XML Transfer – Email Notification Settings screen. Enter the appropriate information and sent a test email notification to ensure all settings are correct.
The subsequent pages provide only simple configuration options. After clicking Next through the series, you will be shown a Settings summary page. Confirm the information is correct, then click Finish.
ImageSource Filer
Screen Elements
The elements for this screen are:
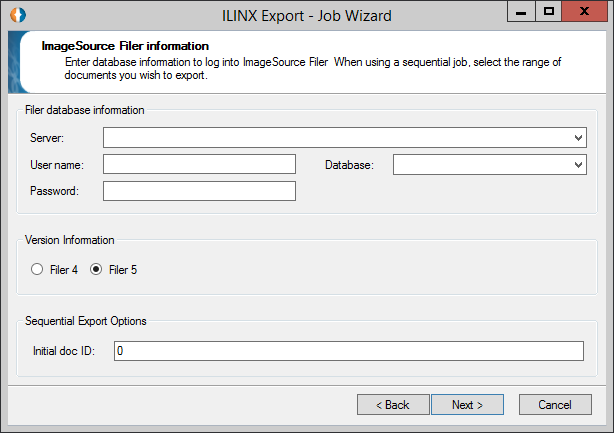
> Filer database information
– Server – Enter the name of the server the database resides on.
– User name – Enter the user name of a system account for access to the application.
– Password – Enter the password of the same system account for access to the application.
– Database – Use the dropdown menu to validate your credentials and populate the list. Choose the desired database.
– Version Information – Select the version of ImageSource File you have installed to export from.
– Initial doc ID – Optionally you may enter the Initial doc ID as a starting point to export.
The subsequent pages provide only simple configuration options. After clicking Next through the series, you will be shown a Settings summary page. Confirm the information is correct, then click Finish.
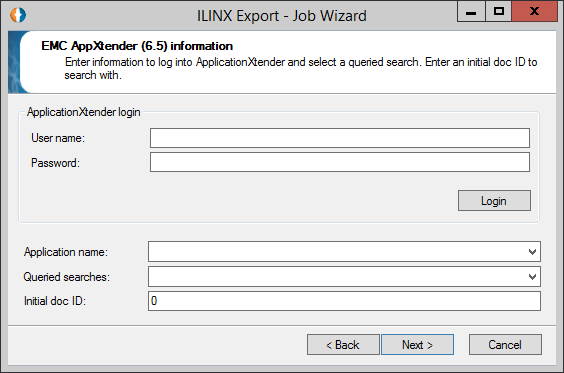
EMC AppXtender (6.5) (No Longer Supported)
Note: You will need to install PKZIP to uncompress IPM universal documents.
You can use this option to export documents from your EMC AppXtender source. Choose App Xtender from the Job Sources page, then click Next.
Screen Elements
The elements for this screen are:
> ApplicationXtender login
– User name – Enter the user name of a system account for access to the application.
– Password – Enter the password of the same system account for access to the application.
– Login – Click this button to validate you have entered the correct login information.
– Application name – Use the dropdown list that is populate the list once the login is validated. Choose the desired Application.
– Queried searches – Select the search from the dropdown list that is populated based on the Application selected.
– Initial doc ID – Optionally you may enter the Initial doc ID as a starting point to export.
The subsequent pages provide only simple configuration options. After clicking Next through the series, you will be shown a Settings summary page. Confirm the information is correct, then click Finish.
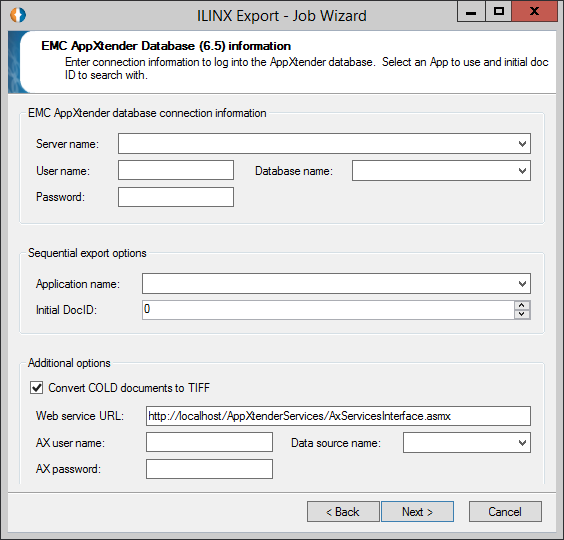
EMC AppXtender Database (No Longer Supported)
Use this option to export documents from your AppXtender database.
Screen Elements
The elements for this screen are:
> ECM AppXtender database connection information
– Server – Select the name of the server the database resides on.
– User name – Enter the user name to connect to the server.
– Password – Enter the password to connect to the server.
– Database – Use the dropdown menu to validate your credentials and populate the list. Choose the desired database.
> Sequential export options
– Application name – Use the dropdown list that is populate the list once the login is validated. Choose the desired Application.
– Initial doc ID – Optionally you may enter the Initial doc ID as a starting point to export.
> Additional options
– Convert COLD documents to TIFF– Select the checkbox to enable the Additional options
– Web service URL – Enter the URL for the web service to connect to the ApplicationXtender system.
– AX user name – Enter the user name to connect to the service.
– AX password – Enter the password to connect to the service.
– Data Source name – Select the data source from the dropdown where the COLD documents are compiled from.
The subsequent pages provide only simple configuration options. After clicking Next through the series, you will be shown a Settings summary page. Confirm the information is correct, then click Finish.
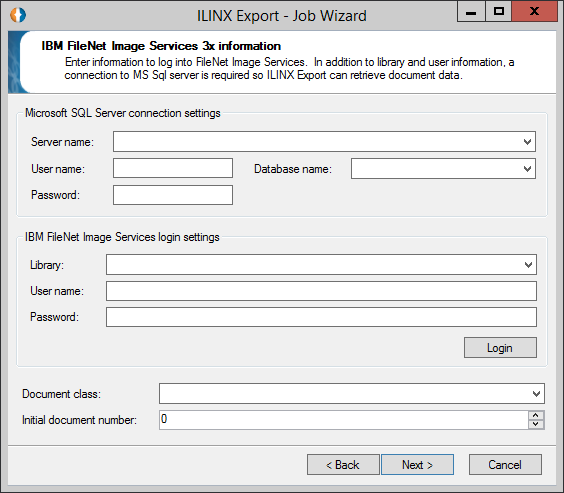
IBM FileNet Image Service 3x
Screen Elements
The elements for this screen are:
> Microsoft SQL Server connection settings
– Server – Select the name of the server the IBM FileNet Imaging System database resides on.
– User name – Enter the user name to connect to the server.
– Password – Enter the password to connect to the server.
– Database – Use the dropdown menu to validate your credentials and populate the list. Choose the desired database.
> IBM FileNet Image Services login settings
– Library – Select the Library on the IBM FileNet Imaging System to export content from.
– User name – Enter the user name to connect to the Library.
– Password – Enter the password to connect to the Library.
– Login – Click this button to validate you have entered the correct login information.
> Document class – Use the dropdown list that is populate the list once the login is validated. Choose the desired Document class.
> Initial document number – Optionally you may enter the Initial document number as a starting point to export.
The subsequent pages provide only simple configuration options. After clicking Next through the series, you will be shown a Settings summary page. Confirm the information is correct, then click Finish.
General Configurations
The following configurations are displayed after you have configured your job source selections. These configurations are general for any given job source type.
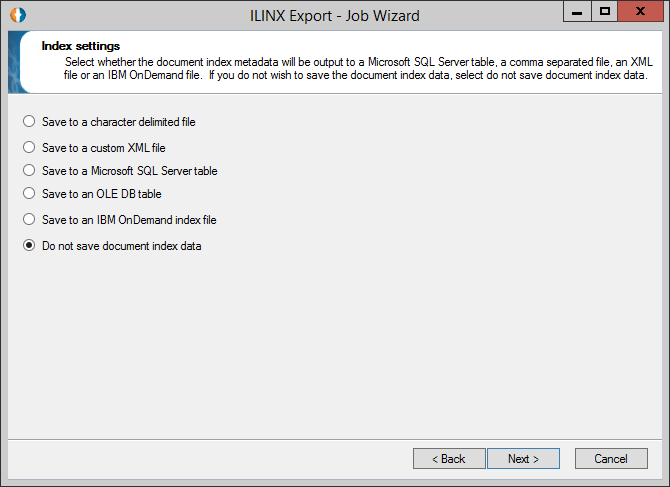
Index Settings
This page will appear after the configuration page(s) unique to your job source selection. You can use the options listed here to output document index metadata to any of the listed destinations.
Screen Elements
Some of these elements will not be available depending on your job source. For some, only the last option is available. But for others, the following index settings are available:
> Save to a character delimited file
This option allows you to save document metadata to an index file delimited by a character of your choice.
> Save to a custom XML file
This option allows you to save the index values in an XML file, either with the exported image files or in a separate directory. You also have the option to Edit Custom XML Template to dictate how the information will be stored in the file.
> Save to a Microsoft SQL Server table
This option allows you to save your document metadata to a SQL Server table. Enter your credentials, choose your database and table, and configure your web service options.
> Save to an OLE DB table
This option allows you to save your metadata to an OLE DB table using a connection string.
> Save to an IBM OnDemand index file
This option allows you to save metadata to an IBM OnDemand index file, which can be used in conjunction with IBM Content Manager OnDemand.
> Do not save document index data: Choose this option if you do not wish to save document index data. For some job sources, this is the only option.
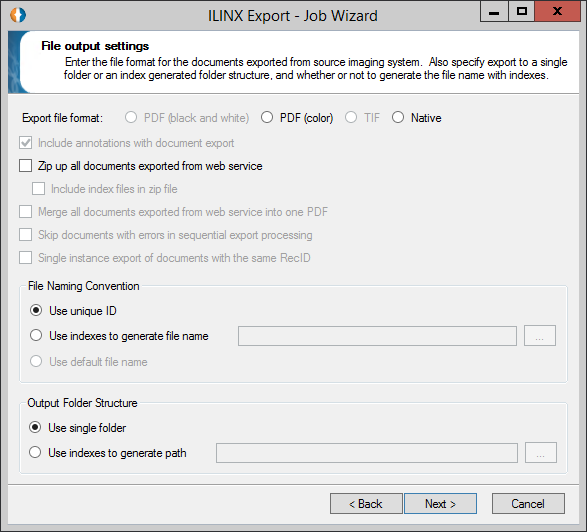
File Output Settings
Screen Elements
Some of these options will not be available, depending on your chosen job source (as evidenced by the screenshot above). For instance, the Single instance export of documents with the same RecID option is only available when using the Oracle IPM job source. The options available to most jobs are:
> Export file format – Choose the format of the documents you are exporting. For most sources, the only option is Native.
– PDF (black and white)
– PDF (color) – Check this option if you wish to export color TIFFs to color PDFs.
Note: this option is only available for Imaging and WebCenter Content 11g, and only applies to TIFF files. All non-TIFF documents are always exported in their native format.
– TIF
– Native – This option is the only available option for exporting “universal” documents (PDF, Microsoft Office, CAD, etc.) in Imaging and WebCenter Content 11g.
> Include annotations with document export – Check this box if you want annotations included with document export.
> Zip up all documents exported from web service – Selecting this option will export all content into a single zip file as the documents are exported.
– Include index files in zip file – This option will become active after the above option is selected. This will include the selected index fields in the into the zip files.
> Merge all documents exported from web service into one PDF – Check this box if you want to merge all documents exported from web service into PDF.
> Skip documents with errors in sequential export processing – Check this box if you want to skip documents with errors in sequential export processing.
> Single instance export of documents with the same RecIDs – Check this box to enable single instance export of documents with the same RecIDs.
> File Naming Convention – You can choose to Use unique ID or Use indexes to generate file name for the documents you export.
– Use unique ID – Check this button to have the system create a unique ID.
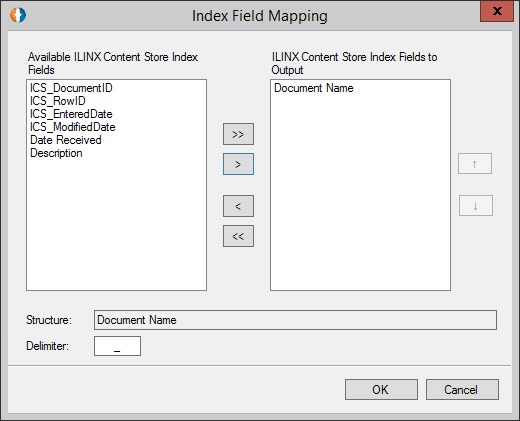
– Use indexes to generate file name – Checking this button enables the browse button beside it, which launches an index mapping window. This window allows you to select the indexes you want to use to generate a file name as well as the delimiter separating them.
– Use default file name – Selecting this option will use the name that is used by the source system. This name is dependent on the default settings of the source system.
> Output Folder Structure – You can choose to Use single folder or Use indexes to generate path for the structure of your output folder.
Note: When using ILINX Export to export documents from Oracle IPM 11g, only TIFF files will be converted to PDF; other file types that are not TIFF will be exported in their native file type.
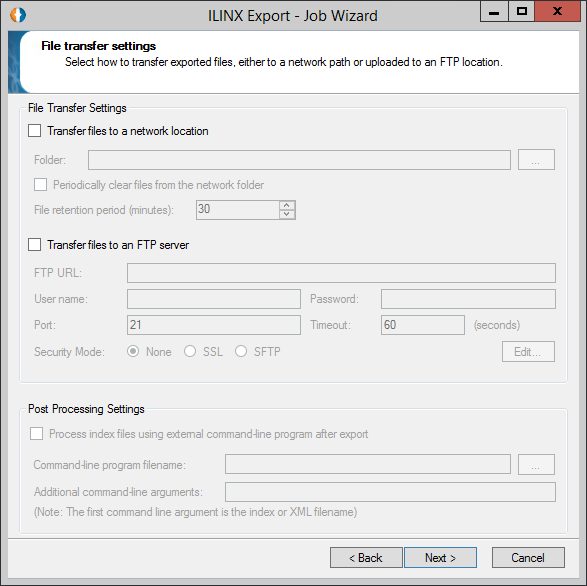
File Transfer Settings
Screen Elements
The elements for this screen are:
> File Transfer Settings (you must choose at least one):
– Transfer files to a network location –
» Folder: Select the network location you want to export document files.
» Periodically clear files from the network folder: Check box the box to specify the period of time you want to retain the files.
» File retention period (minutes): In combination with the check box above, enter the amount of time in minutes to retain the files before clearing them from the network folder specified.
– Transfer files to an FTP server – You can export the documents to an FTP server if you prefer not to store them in a network location.
» FTP URL: Enter the FTP location where the files should be transferred.
» User name / Password: Enter the credentials required for Export to connect to the FTP site to deliver the files.
» Port / Timeout: These are configured with default settings but may be changed if desired.
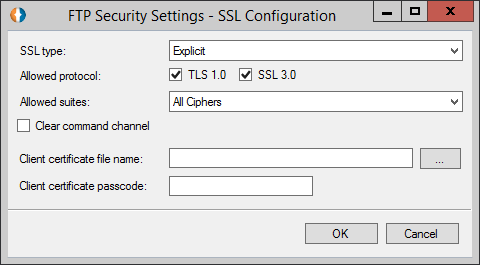
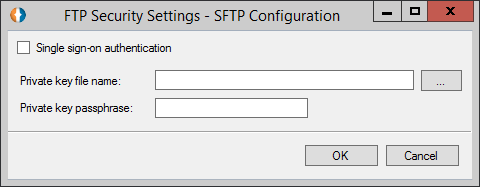
» Security Mode: Depending on the FTP connection requirements, you need to select None, SSL, or SFTP. Selecting SSL or SFTP will open a new screen for additional configurations based on the mode selected.
> Post Processing Settings: (Post-processing is only available for jobs that use the Save to character delimited file or Save to custom XML file options.)
– Process index files using external command-line program after export: Select this option to process index files using an external command-line program after you export the files. The command-line program is executed after the job finishes all processing for a given index file, but before starting a new index file.
» Command-line program filename: Use the browse button to select the .exe for the program.
» Additional command-line arguments: You can also pass additional command-line arguments to your program, keeping in mind that the first argument passed to the program is the index or XML filename of the index file.
Note: For every job configured with a post-processor, ILINX Export writes a log entry with the complete command line that was launched.
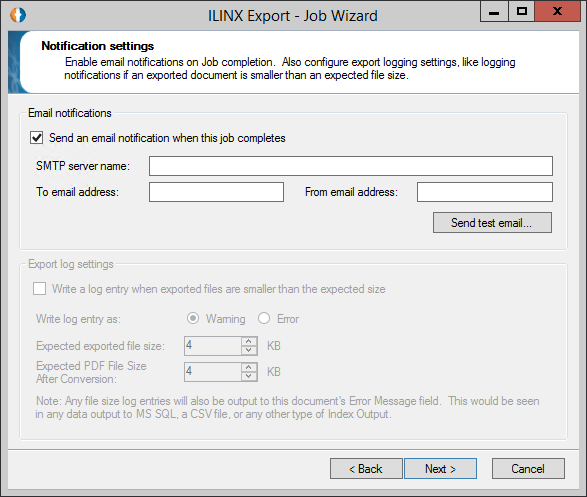
Notification Settings
Screen Elements
The elements for this screen are:
> Email notifications – You can configure ILINX Export to send out confirmation emails when the job completes.
– Send an email notification when this job completes: Select check box to enable the fields for further configurations.
– SMTP server name – Enter the mail server name for your organization.
– To email address / From email address: Enter the email addresses you want to be notified when the job completes as well as the address you want the email to be sent from.
– Send test email: Click this button to validate the settings are correct.
> Export log settings: (The Export log settings are only available for certain job source types.
– Write a log entry when exported files are smaller than the expected size: Select this check box to enable the fields for further configuration.
– Write log entry as: Choose how you wish to write to the log file. Select either Warning or Error.
– Expected exported file size: Use the up/down arrows to select the specific size expected or type the entry in kilobytes.
– Expected PDF File Size After Conversion: Use the up/down arrows to select the specific size expected for the converted PDF or type the entry in kilobytes.
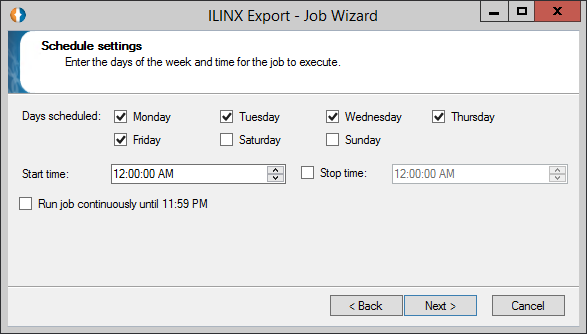
Schedule Settings
Screen Elements
The elements for this screen are:
> Days scheduled – Select as many or as few days as you want to run the job.
> Start time – This time represents the moment ILINX Export will begin running the current job.
> Stop time – Enter the time when the job should not start executing after. Any current executions will complete if the specified time is reached.
> Run job continuous through 11:59 PM – Checking this box will determine if the job is only run once, or if it is run continuously until the day ends at 11:59 PM.
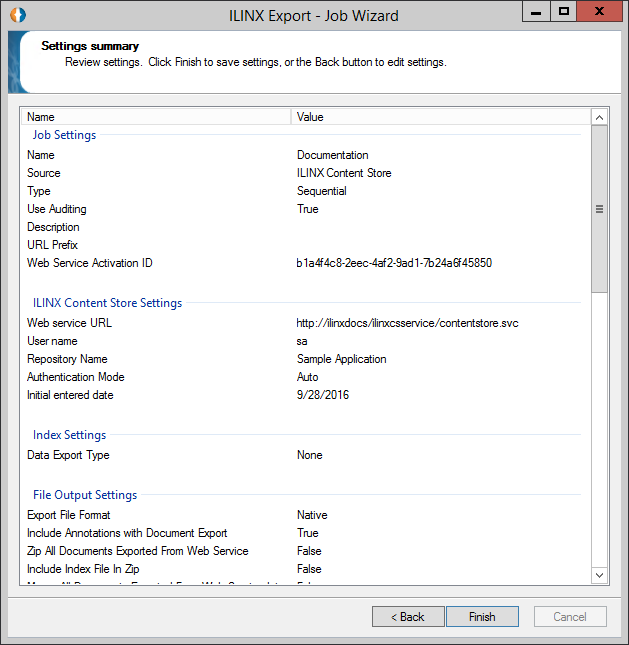
Settings Summary
Screen Elements
Allows review of all settings and can be completed by clicking Finish, or you can click the Back button to edit settings prior to completing the configuration.
The elements for this screen are:
> Name – Provides a list of all configuration setting names.
> Value – Provides a list of all configuration values assigned to the job setting name.
Programming Interfaces
Enabling Programming Interfaces
The programming interfaces for ILINX Export are Web applications hosted within Microsoft Internet Information Services.
The following settings in the Web.config file control whether or not methods in the web service are enabled. The Web.config file is located here:
\Install path\ImageSource\ILINX Export\WebService
The ILINX Export license file must be in the following path:
\Install path\ImageSource\ILINX Export\WebService\Bin
After a successful install, navigate to https://localhost/ILINXExportService/ILINXExport.asmx to see the web service interfaces. This link is only available to be executed on the server where ILINX Export is installed.
The Web.config file allows you to turn multiple features of the programming interface either on or off. The following list of settings can be configured to suit your needs:
> GetDocumentEnabled – Enables the GetDocument interface.
> GetDocumentByUrlEnabled– Enables the GetDocumentByUrl interface.
> GetDocumentByUncEnabled– Enables the GetDocumentByUnc interface.
> GetDocumentByFileContentsEnabled– Enables the GetDocumentByFileContents interface.
> DeleteDocumentMethodEnabled – Enables the DeleteDocumentsForSearchResult interface.
> RetentionManagementMethodsEnabled – Enables the RetentionManagement interface.
> VariedSearchMethodsEnabled– Enables the GetAvailableSearchFields, GetSearchResults and GetDocumentForSearchResult interfaces.
Note: this option must be set to “true” to use the Public Search web application with ILINX Export.
Web Services Programming Interface
If you can do it in ILINX Export, you can do it through code using the ILINX Export Web Services API. The ILINX Export Web Services API is available as a set of standards-based ILINX Export web services that allow you to export-enable your solution or custom application.
After successful installation of the ILINX Export product, navigate a browser to https://yourservername/ILINXExportService to see a list of the available ILINX Export web service interfaces:
Note: This must be executed on the ILINX Export server. All of the services listed below can only be tested from the local machine.
The image below shows the list of ILINX Export web services:
For web services that receive and return data types (i.e. strings), the Microsoft .NET support within IIS will allow you to test these web service interfaces directly. All of the operations listed on this page can be tested directly, except for the following, which do not take any parameter types:
> DeleteDocumentsForSearchResult
> GetDocumentForSearchResult
> GetRetentionManagmentDocument
> GetSearchResults
> SetRetentionManagementDocumentStatusToConfirmed
These services must be consumed and called from your code created within Visual Studio or other development environment.
Example: GetDocument
Parameters
> webServiceActivationID – This field is needed to provide a key at the programming layer. From the Job Information page of the desired profile, copy the generated activation ID and paste into this web form field.
Note: This is used only in the application programming mode.
> jobName – Enter the name of the export profile job that was configured in ILINX Export.
> documentFieldNameValues – The Saved Search field names and values that identify the requested document. Examples of valid documentFieldNameValues are:
– field=fieldValue
– field1=field1Value; field2=field2Value; field3=field3Value
Return type
> Invoke – Select to activate the ILINX Export job.
> Success – The requested document is released to the output location the user specifies on the job information screen.
> Failure – The requested document is not released to the output location.
To use the ILINX Export web service API from your own custom application:
Step 1: From your custom project in Visual Studio, right click on your project node in the project navigator and select Add Service Reference.
Step 2: In the resulting dialog, enter the URL to the ILINX Export web service interface, which will be in the following format:
https://[ServerName]/ILINXExportService/
Step 3: Click Go. You should see the “Export” service listed.
Step 4: Provide a namespace for the imported Export service and click OK. This will create the .Net wrappers around the ILINX Export web services to make it easy to leverage from your project.
For other detailed info on these other web services, please contact ImageSource technical support.
Public Search Tool
The ILINX Export Public Search application allows customers to deliver content search and retrieval capabilities to anonymous users inside or outside the organization. The ILINX Export job definition specifies the credentials that are used to execute the search and retrieve the content as well as the ILINX Content Store target application that is to be used. The ILINX Export Public Search application can also be deployed separately from your ILINX Content Store application to facilitate your desired level of security and firewall protection.
Customers have used the ILINX Export Public Search application to quickly content-enable various internal line-of-business applications using its simple URL entry point. Public sector organizations have also used the ILINX Export Public Search application to deliver searching and viewing of public disclosure documents through their self-service portal. The ILINX Export Public module delivers a small web site to facilitate the searching of ILINX Content Store documents without requiring the user to authenticate into ILINX Content Store. This is a useful capability that can be embedded into an existing intranet or internet web site to deliver content quickly and easily with no coding required.
To use the Public Search Tool included with your ILINX Export installation:
Step 1: Create a new ILINX Export job. To do so, open up your ILINX Export UI. Select ILINX Content Store as the Job source. Click Next.
Step 2: Enter a Job name. In this example, the job name will be “Public Search.” Select Varied under the Job type Click Next.
Step 3: Enter your Web service URL, User name, and Password. Click Login. Choose an application from the drop-down menu. The Initial entered date field is optional, and its default value is the current date. Click Next.
Step 4: On the Index settings page, choose Do not save document index data. The index data is obsolete when using the Public Search tool. Click Next.
Step 5: On the File output settings page, under the Export file format setting, choose Native. Do not modify any other settings. Click Next.
Step 6: On the File transfer settings page, choose Transfer files to a network location. This will be the folder from which your web application will retrieve the files. Choose a location to save the file, then click Next.
Step 7: For this job configuration, Notification settings and Schedule settings are not enabled. Click Next on each of these pages.
Step 8: Review your settings on the Settings summary If everything is correct, click Finish.
Step 9: Navigate to your ILINX Export install directory. The default location is C:/Program Files (x86)/ImageSource/ILINX Export. Open the PubWebApp directory, and open the Web.config file contained there.
Step 10: Modify the following fields to match your desired configuration options:
> WebServiceUrl: Change “localhost” to your web server name.
> JobActivationID: This is the Web service activation ID from your Export job. To retrieve this number, Edit your job in the Export UI. Copy the Web service activation ID and paste here.
> JobName: Enter the name of your Export job.
> tempFileStorageLocation: This should be the same directory as the one you entered in the File Transfer Settings page. To view this directory again, click your Export job and select View. You will find the path you used under the File Transfer Settings heading. Enter the same directory in this field in the Web.config file.
> sessionDataURL: Change the server name to your web server name.
> showFirstXColumnsInResults: The number associated with this field dictates how many columns will be shown to the user when a search is performed using this tool. The default is 10, but you can change it to whatever value best suits your purposes.
Step 11: Save the file.
Step 12: In order to use the application from your browser, IIS must have read and write permissions to this directory. Right-click the PubWebApp directory and select Properties.
Step 13: In the resulting window, choose the Security tab. Click the Edit button to edit user permissions. Click the Add button to add a new user.
Step 14: In the name box, enter the name corresponding to your instance of IIS. Click the Check Names button to verify this name. Click OK.
Step 15: With your new user selected, check the box giving it permission to Modify this directory. Click OK. You should now be able to use the public search by opening your browser and navigating to https://[ServerName]/ILINXEP/search.aspx.
Note: ILINXEP is the name of the default web application created along with the installation of ILINX Export.
Public Search Tool via URL
In addition to using the search.aspx page to enter search criteria into the text boxes, you can add search criteria directly to the URL.
To enter search criteria into the URL, enter a “?” after your URL (which should be in the form https://[ServerName]/ILINXEP/search.aspx, where ILINXEP is the name of the web application you created), followed by “FieldName=SomeValue.” Use a plus sign (+) in place of spaces in the name of the field. Use an ampersand (&) to separate search criteria. An example URL would be in the form:
https://[ServerName]/ILINXEP/search.aspx?Title=Microsoft&Owner=Stanley&Client+ID=987654321
This tool will display PDF files and automatically convert TIFFs to PDF files for display. All other files will prompt the user for download.
Note: The URL search capability only supports the equal operator when searching for documents.
The Export Public tool will also automatically deliver/open the document when only a single result is returned from a URL search. Navigate to your ILINX Export install directory. The default location is C:/Program Files (x86)/ImageSource/ILINX Export/PubWebApp and open the Web.config file contained there.
Modify the <add key=”autoLaunchSingleResult” value=”true” /> as desired.
Modifying the Public Search
After you complete the setup steps, you can modify the look and feel of the web application by modifying the style.css file located in your web application’s directory. You can change colors, fonts, etc., and you can show or hide certain search parameters, or even the entire search panel.
If you would like to enable public search for other ILINX Content Store applications, you can create a custom public search web application. To do this:
Step 1: Open a Windows Explorer window. Navigate to your ILINX Export install directory (the default location is C:/Program Files (x86)/ImageSource/ILINX Export), and duplicate the PubWebApp directory, giving it the name you desire for your web application. For this example, the web application’s name is “PublicSearchTool.”
Step 2: Enter this new directory and open the Web.config file. The following fields require modification:
> WebServiceUrl: Change “localhost” to your web server name.
> JobActivationID: This is the Web service activation ID from your Export job. To retrieve this number, Edit your job in the Export UI. Copy the Web service activation ID and paste here.
> JobName: Enter the name of your Export job.
> sessionDataURL: Change the server name to your web server name.
> tempFileStorageLocation: This should be the same directory as the one you entered in the File Transfer Settings page. To view this directory again, click your Export job and select View. You will find the path you used under the File Transfer Settings heading. Enter the same directory in this field in the Web.config file.
> showFirstXColumnsInResults: The number associated with this field dictates how many columns will be shown to the user when a search is performed using this tool. The default is 10, but you can change it to whatever value best suits your purposes.
Step 3: Launch Internet Information Services. You will need to create a new Web Application under your desired web site. In this example, the web application will be created under ILINXEP. To create your application pool, right click and select Add Application. When the Add Application window opens, choose an Alias for your application, which will be incorporated into your URL. Your URL will be myserver/Alias.
Step 4: In order to use the application from your browser, IIS must have read and write permissions to this directory. Right-click the PubWebApp directory and select Properties. In the resulting window, choose the Security tab. Click the Edit button to edit user permissions.
Step 5: Click the Add button to add a new user.
Step 6: In the name box, enter the name corresponding to your instance of IIS. Click the Check Names button to verify this name. Click OK.
Step 7: With your new user selected, check the box giving it permission to Modify this directory. Click OK.
Step 8: You may now open a browser and navigate to https://[ServerName]/Alias to access your custom public search web application.
Additional ILINX EP Settings
You can use ILINX Export Public to return only the search results and remove the search panel from viewing. This comes in handy when you’re doing an integration into a line of business system for example. You can launch the Search URL from the line of business system, when the users click this button they immediately get a list of results but have no option to search for other documents. To hide the search panel from view, edit the style.css file and add the code below:
#ctl00_ContentPlaceHolder1_pnlSearchFields
{
display: none;
}
Additionally, you can choose to automatically open the result, displaying the image, if only one result is returned. You can use the built-in conversion to convert tiff files to PDF for viewing in the ILINX Export Public WebSite viewer. Below are the two web.config keys that will allow this, they are named accordingly.
<add key=”autoLaunchSingleResult” value=”true” />
<add key=”convertTiffToPdf” value=”true” />
An example of the default ILINX Export Public web site is shown in the figure below:
The figure below shows the ILINX Export Public web site embedded within a sample web site and styled to match the host’s look and feel.
Other topics
Field Naming for Saved Searches and Database Tables
The exported document index metadata can be output to a SQL Database. This is a free standing Microsoft SQL table contained within a separate Microsoft SQL Server database.
The target database table(s) in the SQL database and the selected application’s saved search should use the same naming convention for the fields. This will simplify the fetch process by giving the fetch programmer all of the information needed to input into the fetch process and the ILINX Web Service API.
The database will house the following data elements:
> All the document index metadata returned from ILINX Export job execution of user selected saved searches
> ILINX Export specific index metadata, including:
– Job names
– Error messages
– The URLs that provide the fully qualified path for retrieving the documents.
Validation
While configuring an ILINX Export profile, entered values will be validated when the next button is selected. If a value does not pass validation, an exclamation character will appear next to the offending entry.
File Conversion Process
On the file output settings screen, you have the option to specify one of three different file formats to be used as the final file format upon document export. Documents can be exported as TIFs, PDFs, or in the native format. If you select the PDF file format option, a conversion process will occur after the documents are exported from the source system.
There is a built-in distilling engine that performs the PDF conversion process. If additional performance is needed, in terms of file compression, the purchase of a separate performance based distilling engine would be required.
The File Transfer Process (Replication)
The document content file transfer process (replication) for ILINX Export is a file transfer job configured in the file transfer settings screen. In that screen, you can configure one of two options for transferring the exported document content from the storage folder specified in the file output settings screen to its final destination.
The available options are:
> Use network path – This option allows the transfer of the document content to a network file system for consumption or further disposition by any external group or process.
> Use FTP – This option allows the transfer of the document content via FTP to a web hosting file system for consumption through a web portal.
Note: This process will be triggered by the scheduler component.
Temporary Working Folder
When jobs are in execution, after the export, file conversion and file transfer processes occur according to the job configuration. The files remaining on the ILINX Export server will be deleted immediately upon confirmation of a successful file transfer (replication) to the target destination. This is an automated process that is the last task in the Replication procedure.
Storage Options Upon Export
ILINX Export allows two options for the storage folder hierarchy when jobs are executed. These options are configured in the file output settings screen.
> Use single folder – This option allows you to specify a single folder for storage of all documents.
> Use indexes to generate path – This option is system generated, based on the user-selected index values. Each document will be stored in a separate hierarchical subfolder structure built on those index values, using the folder selected on the file transfer settings screen as a base or starting point.
An example for the INVV2 application with the beginning folder of V2, with the index values of Invoice Date (6-1-2007) and Invoice Number (123456) chosen as the folder name configuration and PDF as the output type will produce a folder structure and file name (using the unique ID option) like the example below.
V2 | 20070601 | 123456 | E85BD40D-6077-489a-93F5-DF7F7C69793F.pdf
The URL for this returned as part of the data set to the database would look like this:
http:\\www.customersite.com\V2\20070601\123456 \E85BD40D-6077-489a-93F5-DF7F7C693F.pdf
Export a Single Document with Multiple Fields
Note: Please keep in mind that ILINX Export only exports the file to your desktop computer and uses the Window’s default program to view the images. ILINX Export does not have a single Image viewer to view all of the documents.
Example
https://amaibsqa01/ILINXEP/Search.aspx?LaunchResult=true
& xIPM_APP_1_0=000000003359151
& xIPM_APP_1_1=1/23/2013
& xIPM_APP_1_2=10:52:55%AM
& xIPM_APP_1_3=bbelina
& xIPM_APP_1_4=CAC73901LH
& xIPM_APP_1_5=
& xIPM_APP_1_6=
https://amaibsqa01/ILINXEP/Search.aspx?LaunchResult=true&xIPM_APP_1_0=000000003359151
Note: For the above examples please use the following charts to build the needed URLs.
IPM_APP_1 = E1Invoices
|
ILINX Export Field for E1Invoices
|
11g E1Invoices Index Fields
|
|---|---|
| xIPM_APP_1_0 | BARCODE VALUE (B1BCFS1) |
| xIPM_APP_1_1 | SCAN DATE (B1UPDJ) |
| xIPM_APP_1_2 | SCAN TIME (B1UPTM) |
| xIPM_APP_1_3 | SCAN USER (B1AQID) |
| xIPM_APP_1_4 | SCANNER ID (B1MKEY) |
| xIPM_APP_1_5 | EXTRECID |
| xIPM_APP_1_6 | RECID |
IPM_APP_2 = Tax
|
ILINX Export Field for Tax
|
11g Tax Index Fields
|
|---|---|
| xIPM_APP_2_0 | UNIQUE ID (UKID) |
| xIPM_APP_2_1 | SHAN |
| xIPM_APP_2_2 | AN8 |
| xIPM_APP_2_3 | Capture Date |
| xIPM_APP_2_4 | EXTRECID |
| xIPM_APP_2_5 | RECID |
Log files
Location of the Log Files
The log files can be accessed from the Home screen of ILINX Export. Click on the open button at the bottom of the screen to display the Log Folder. The location of the log directory is:
\application path\ImageSource\ILINX Export\logs
Note: On a Windows XP machine and server operating systems prior to Windows Vista, the application path is found at: C:\Documents and Settings\All Users\Application Data\. For Vista operating systems and forward, the application path can be found at: C:\ProgramData\
New Generation and Renaming
The current log file will be named ImageSource.log
When the log file reaches 50MB in size, or each day that the file does not reach 50 MB in size in a given day, the log file is saved, it is renamed with the following format:
ImageSource.log01-07-2010
This format indicates the month, day and year that the file was generated. A new file is created for each new day. Each log file will in turn be saved and renamed using the same format to provide for an easy method of reviewing historical logs.
If more than one file is created for any given day, the files will be saved and renamed in the following format:
ImageSource.log01-07-2010.1
Contents and Format
Each line of the log will represent a singular event that is being logged in ILINX Export. For each event, the logged data is presented in columns.
Note: ILINX Export will delete log files older than 30 days.
The order of columns and data contained within those columns are:
> Date and Time Stamp – This is the exact time of occurrence for each event logged.
> Level – ILINX Export outputs at three different logging levels: info, warn and error.
– Info level – Designates informational messages generated from normal operational events
– Warn level – Designates potentially harmful situations. In most cases, these messages can be ignored after the Administrator develops a more thorough understanding of how the system operates
– Error level – Designates error events that warrant immediate investigation
> Thread – This is the name of the thread associated with the system process that created the log entry.
> Detailed description – This is the detailed description for each event logged.
Email Logging
Within ILINX Export, the administrator can modify the configuration to give the ability to log warnings and errors to an email. This email is sent to a designated mail account, and is best sent to an account within your company’s system.
The following steps describe how this can be accomplished. Be sure to do this under the supervision of the ImageSource staff.
Step 1: Go to the installation directory of ILINX Export and find this file: Log4net.xml.
Step 2: Open the file in a text editor.
Step 3: Scroll to the “List of log appenders” section of the file.
Step 4: Immediately after this commented out section, add the following.
Note: Values in blue/bold must be modified according to your installation. Those values in red are subject to change, depending on your requirements.
  <appender name="SmtpAppender" type="log4net.Appender.SmtpAppender">
    <to value="to@domain.com" />
    <from value="from@domain.com" />
    <subject value="test logging message" />
    <smtpHost value="YourSmtpHost" />
    <username value="..." />
    <password value="..." />
    <EnableSsl value="false" />
    <bufferSize value="512" />
    <lossy value="true" />
    <evaluator type="log4net.Core.LevelEvaluator">
      <threshold value="ERROR" />
    </evaluator>
    <layout type="log4net.Layout.PatternLayout">
      <conversionPattern value="%date{MM-dd-yyyy HH:mm:ss} [%property{log4net:HostName}] [%level] [%thread] - %message%newline" />
    </layout>
  </appender>
Step 5: Under the “logger” section at the end of the file, remove the comment characters displayed in Orange below:
<!--<appender-ref ref="SmtpAppender"/> -->
Step 6: Save the file.
Step 7: Restart the ILINX Export service.
ILINX Export Service
This service is responsible for taking job configurations configured from within the wizard and processing them. It is installed on the system and started automatically as part of the installation process.
> Service name – ILINX Export service
> Service description – Core service for ILINX Export which allows administrative users to create, edit, start, stop and delete export jobs from Oracle IPM
> Startup type – Automatic
> Service status – Started
> Log on – Local system account
Note: If the ILINX Export Service has one or more jobs running but is stopped (i.e. via Task Manager), the service shuts down and the jobs stop. When the UI is restarted, any jobs that had been running do not restart until manually restarted.
ILINX Export Web Service
This is a web service (as opposed to a windows service) and it facilitates access to the ILINX Export Application Programming Interface (API). For more details on the API, see the Application Programming Interface section of this document.
An additional configuration must be made for this service post-installation. Within the Microsoft IIS Administration tool, the settings must be configured to allow for anonymous logins. For more information on this configuration, please reference the General Considerations section of this document.
ILINX Export Command Line
A command line application exists to execute the run Job now command, as well as a command to stop a running job. This functionality is in a program called “ExportCmd.exe.”
Available from the command line are:
> ExportCmd.exe “JobName” – runnow – Used to run a specific job
> ExportCmd.exe “JobName” – stop – Used to stop a specific job
> ExportCmd.exe – ? – Displays the available uses of this application
Polling Time
By default, the system will poll ILINX Export every ten minutes. This value is configurable by the administrator. To change this value, go to \application folder\ImageSource\ILINX Export, and edit the file exportservice.exe.config.
Search for the pollingIntervalInMinutes key. Change the value of 10 to the desired polling time, in minutes, and save the configuration file. Stop and Start the ILINX Export service to have the new value take effect.
Troubleshooting
|
Description
|
Resolution
|
|---|---|
| In reviewing the log files, there are some skipped entries, particularly when the job is running overnight. | At midnight, the daily log file is closed and a new one is created. If the ILINX Export UI is open at that time, log entries can be missed. The UI only needs to be open when configuring a job, or running a varied job. As a best practice, close the UI unless configuring. By doing this, the log files will be able to run as expected. |
| We run an export, using a varied job type, but it takes a long time to run, and may never finish. In this particular case, we expected a very large export from Oracle IPM. | The number of images returned from a varied job type is dependent on your SMS setting for the maximum results in the Gencfg (by default, it is set to 1,000).
A varied job type wasn’t built to be used as a bulk exporter of Oracle IPM documents. If a user needs a large export, the best option is to create/run a sequential job type, but when creating it, narrow the search to fit your needs. |
