Contents
Note: ILINX Engage 23-24 is required to use this product
About
The Tribal Enrollment Management (TEM) product allows for ILINX Engage users to search, view, and manage tribal enrollment records. Tribal Employees can manage multiple member attributes such as contact information, member status, membership photos, signatures, genealogy, family relationships, and other membership options related to the tribe member. This guide will discuss the various tabs and features of the TEM package and how to manage tribal member information through Engage.
Note: The TEM Module is available to any user who has permission to access the view that is configured for the setup of this module. Contact your ILINX Administrator to confirm that you have access to this Tribal Enrollment Management view
Accessing
Step 1: Navigate to the URL that your Administrator has provided you to log into Engage.
- https://<your server>/ilinxengage/<tenantid>/login
Step 2: Enter your Engage user credentials and log in to Engage.
Step 3: Click on the TEM Home Page Card or Navigation that has been configured in the Engage layout you have permission to access.
Adding a User
The Adding a User section will go over the steps to add a new person into the TEM module, where they will be saved to the database and their profile can be managed through the TEM module:
Step 1: Click “See all…” on the TEM Home Page Card or click on the TEM Navigation Card.
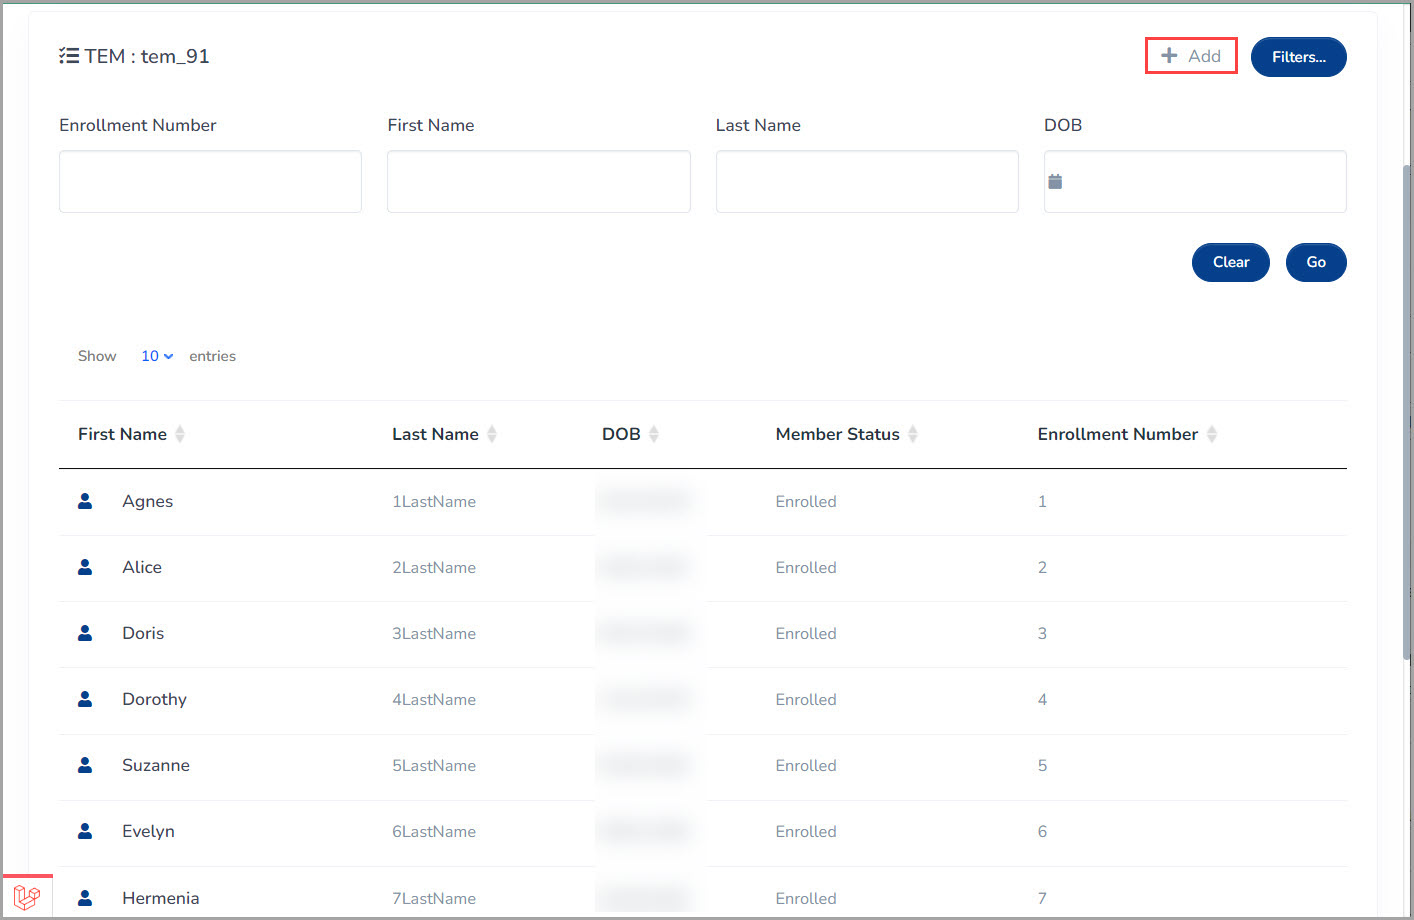
Step 2: Click “+ Add” in the top right of the module.
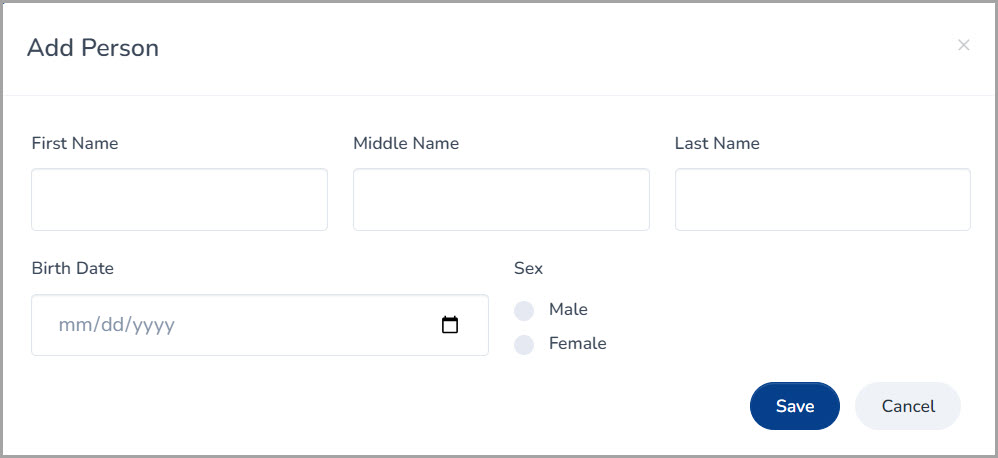
Step 3: Give the new user a First Name, Last Name, and Birth Date, and assign their sex (M or F).
Step 4: Click Save.
After saving, the user should then be accessible from the TEM module after they have been added to the database.
Note: When a user is added, their membership status will be set to ‘non-member’ by default
Tribal Enrollment Management User Tabs
Personal Tab
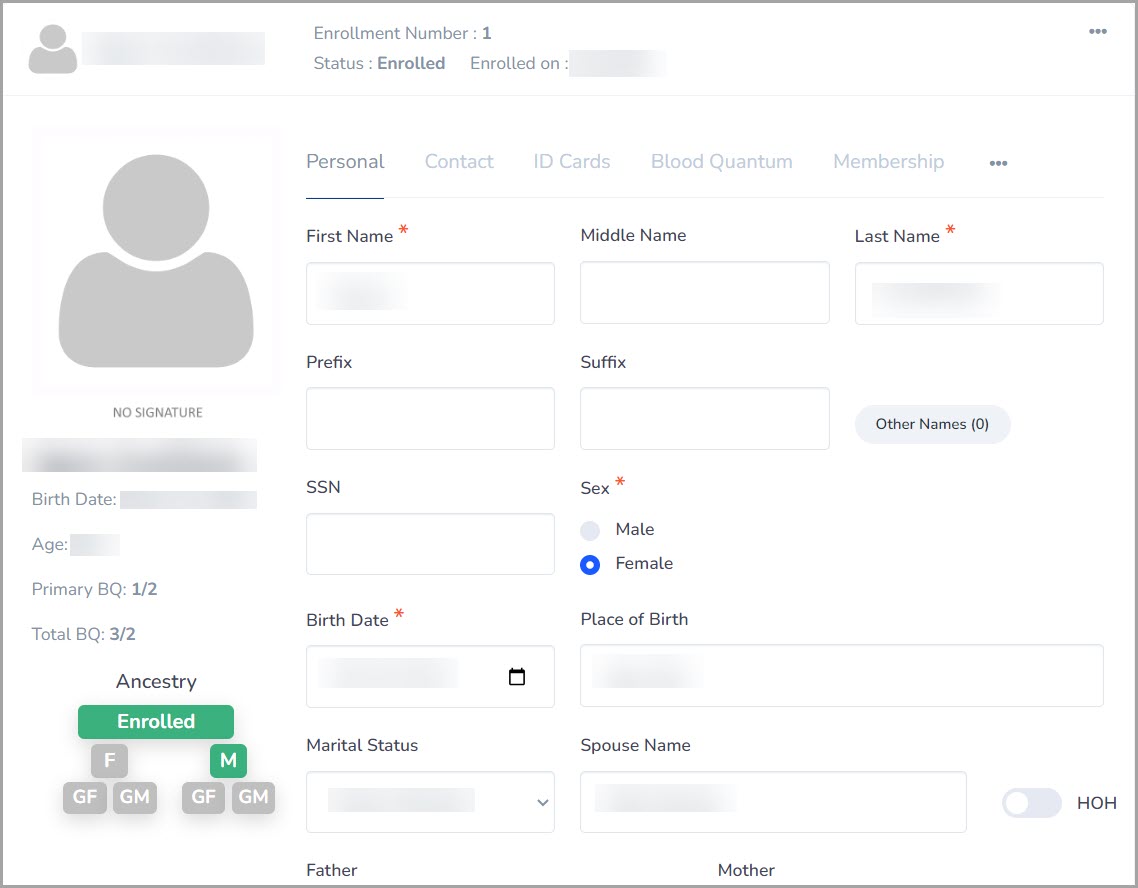
The Personal Tab displays the personal information of the tribal member, which includes their name, SSN, Sex, and DOB for example. All of the information can be edited and saved to the database:
- First Name (required)
- Middle Name
- Last Name (required)
- Prefix
- Suffix
- Other Names
- This button displays other names that the specific user has, such as their tribal name or nickname. You can add a name to the user if they don’t have one already.
- SSN
- Sex (required)
- Birth Date (required)
- Place of Birth
- Marital Status
- Spouse Name
- HOH
- Father Name
- This field will conduct a database lookup to find only names that are already existing in the system.
Note: Changing this field will affect the calculated attributes which could include membership eligibility, blood quantum values, and the family tree in the Genealogy Tab. Furthermore, you cannot assign a new parent when a person has a current blood quantum value, so that person’s blood quantum will have to be deleted from the ‘Blood Quantum’ tab
- Mother Name
- This field will conduct a database lookup to find only names that are already existing in the system.
Note: Changing this field will affect the calculated attributes which could include membership eligibility, blood quantum values, and the family tree in the Genealogy Tab. Furthermore, you cannot assign a new parent when a person has a current blood quantum value, so that person’s blood quantum will have to be deleted from the ‘Blood Quantum’ tab
- Confidential – This flag will mark the Father or Mother names as confidential and will not be divulged in the generated “Certificate of Degree of Indian Blood” documents.
Note: Assigned parents will auto-assign their records as confidential
- Adopted
- This flag will mark the person as adopted, where the ‘Adopted Father’ and ‘Adopted Mother’ fields will appear. These fields interact in the same way as the ‘Father’ and ‘Mother’ fields and also have confidential flags associated with them.
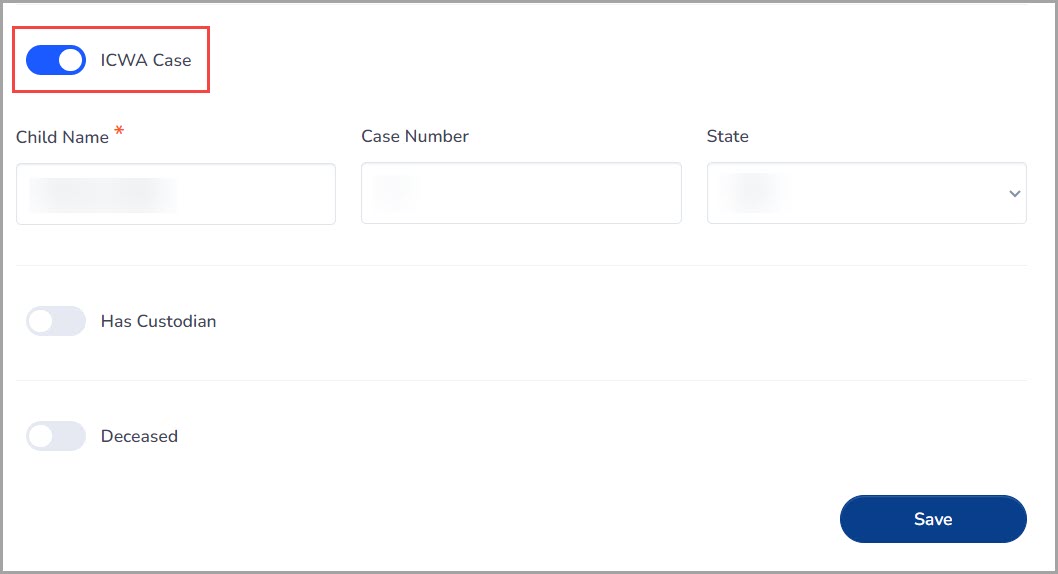
- ICWA Case
-
- Enable this value to mark the application as an “Indian Child Welfare” case.
- The ‘Child Name (required),’ ‘Case Number,’ and ‘State fields’ display once enabled.
- Has Custodian
- Enable this value to mark that this member is in the custody of another guardian.
- Fill out the following fields once enabled:
- Custody Order
- Custody Order Type
- Start Date
- End Date
- Custody Person Name (required)
- Relation
- Deceased
- Enable this value to mark that the individual has been deceased.
- Fill out the following fields once enabled:
- Deceased Date (required)
- Cause of Death
- Category
- Internment Place
- Notes
History
When you have a person’s profile open, if you click the three dots at the top of the profile, and then click History, you will see audit messages of all changes that occur on the person’s profile. Use the Filter button to filter these audits based on selected criteria.
Contact Tab
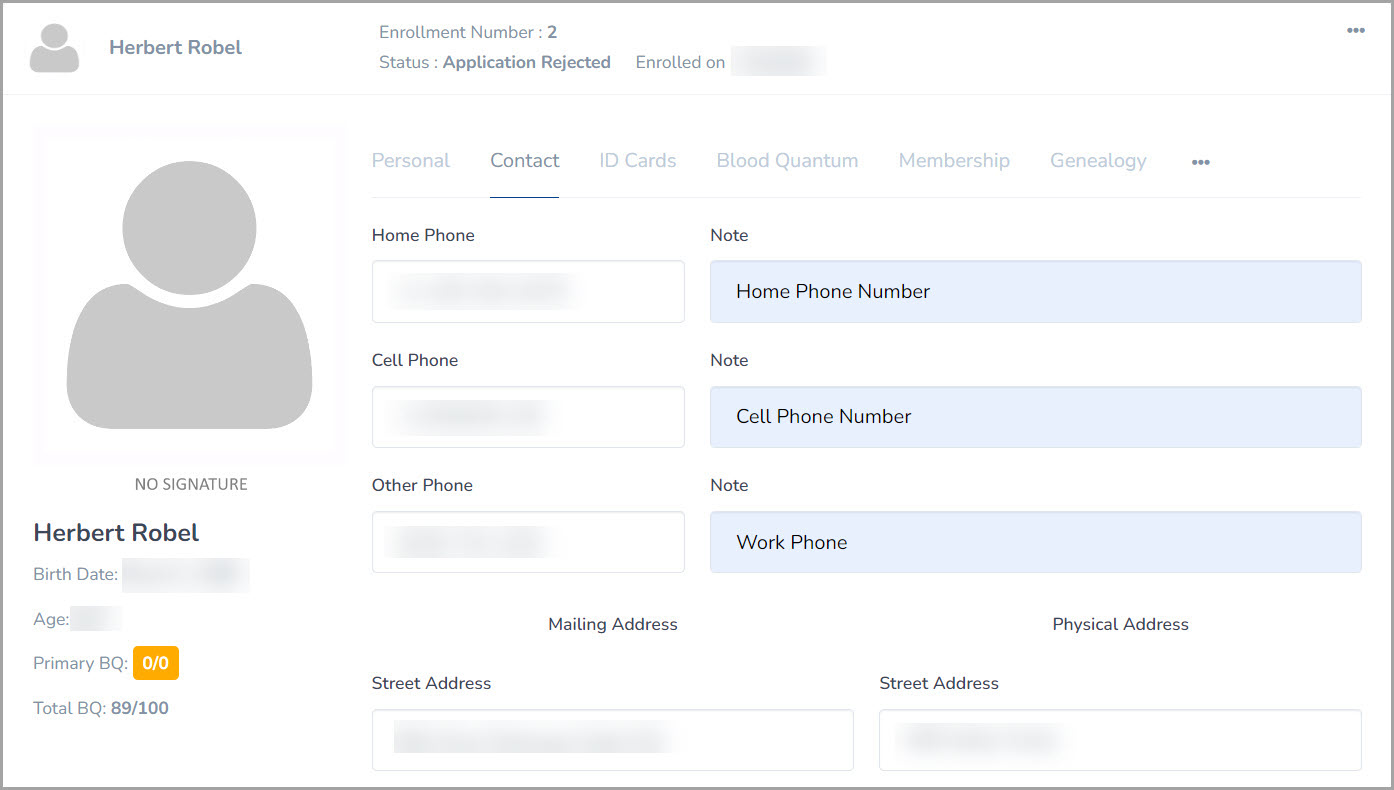
The Contact Tab displays the contact information of the tribal member, which includes their phone number(s), addresses, and other contact information. All of the information can be edited and saved to the database:
- Home Phone
- Note
- Cell Phone
- Note
- Other Phone
- Note
- Mailing Address
- Street Address
- City
- State
- Zip
- Country
- Physical Address
- Street Address
- City
- State
- Zip
- Country
- Undeliverable
- Inactive
- Newsletter
- Emergency Contacts
- You can add Emergency contacts that will display at the bottom of the Contact tab. When adding, the Name, Content Type, and Phone values are required.
ID Cards
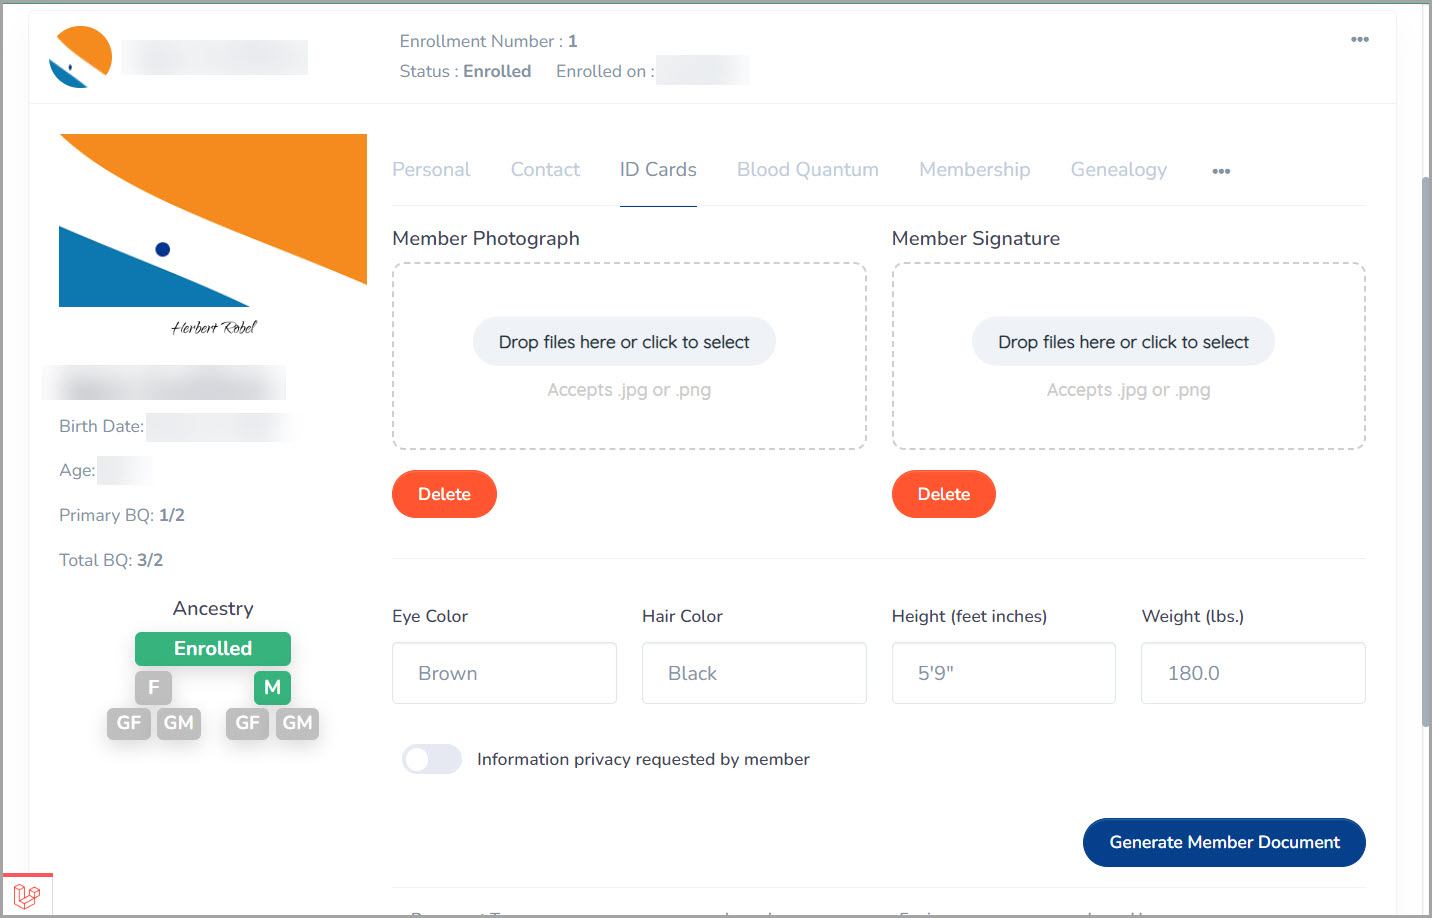
The ID Cards tab is used to configure the ID card of the tribal member, which includes information like their Member Photograph, Signature, and other identification credentials.
- Member Photograph
- This will update the member photo that displays to the left of the UI. You can add images to the ID card by either dropping files into the Member Photograph box or clicking the button to select a file. Only .jpg and .png files are allowed.
- Member Signature
- This will update the signature that is displayed under the Member Photograph. You can add signature images to the ID card by either dropping files into the Member Signature box or clicking the button to select a file. Only .jpg and .png files are allowed.
- Eye Color
- Height (feet inches)
- Hair Color
- Weight (lbs.)
- Information privacy requested by a member
- Enabling this will alert the administrator to not share the member’s information or official documents with external entities.
Generate Member Document
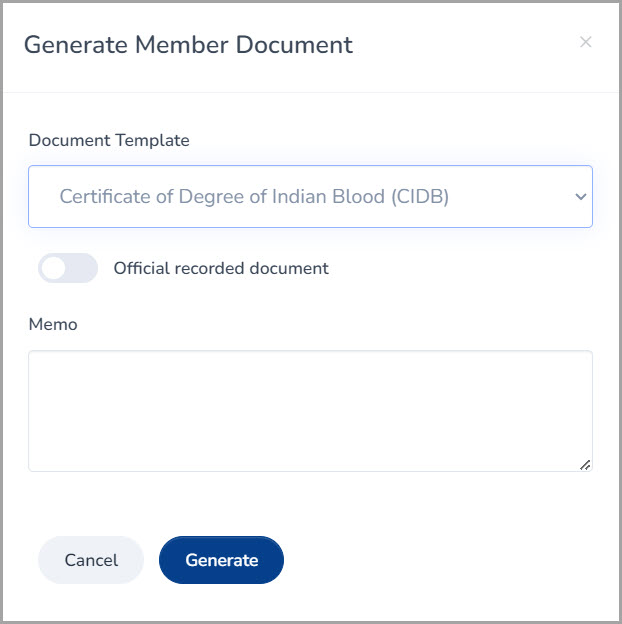
Clicking the ‘Generate Member Document’ button will create a downloadable member document based on a document template that comes from an ILINX Content Store View that Administrators configure from the “Content View for Print Templates” section of the ‘Tribal Enrollment Management’ configuration menu. Refer to the ILINX Content Store – Administrator Guide for information on how to configure the Application’s Index Fields.
Note: The Content Store Application for document templates requires Administrators to include an integer index field called “Expiration Period,” otherwise this feature will not work
Generating a Member Document will extract the ‘Member Photograph,’ ‘Member Signature,’ ‘First Name,’ ‘Last Name,’ and ‘Birth Date’ fields and burn them into the generated document based on the template selected. When the ‘Official recorded document’ option is enabled, the document that is generated will be added to the repository that Administrators configure for the ‘Repository for Official Records’ setting, and will display in the ‘ID Cards’ tab. The list of generated documents displayed at the bottom of the tab comes from the ILINX Content Store View that is configured from the ‘Content view for Official Records’ setting. The ‘Content view for Official Records’ view contains index fields for when the document was Issued and when it Expires, which is configured in the ‘Official Documents expire after # months’ setting after it is issued. Once expired, the document will be deleted from the repository and will need to be updated.
Note: The fill-template REST API service can be used to generate a member document as well. Add the ‘tribe’ key to the API body and the value will be either a “1,” for Affiliated Tribe, or “2,” for Primary Tribe. Refer to the ILINX Content Store REST API Services at ‘https://< Your Server>/ILINXCSService/’ for configurations of the ‘fill-template’ REST API service and all other Content Store REST APIs
Blood Quantum Tab
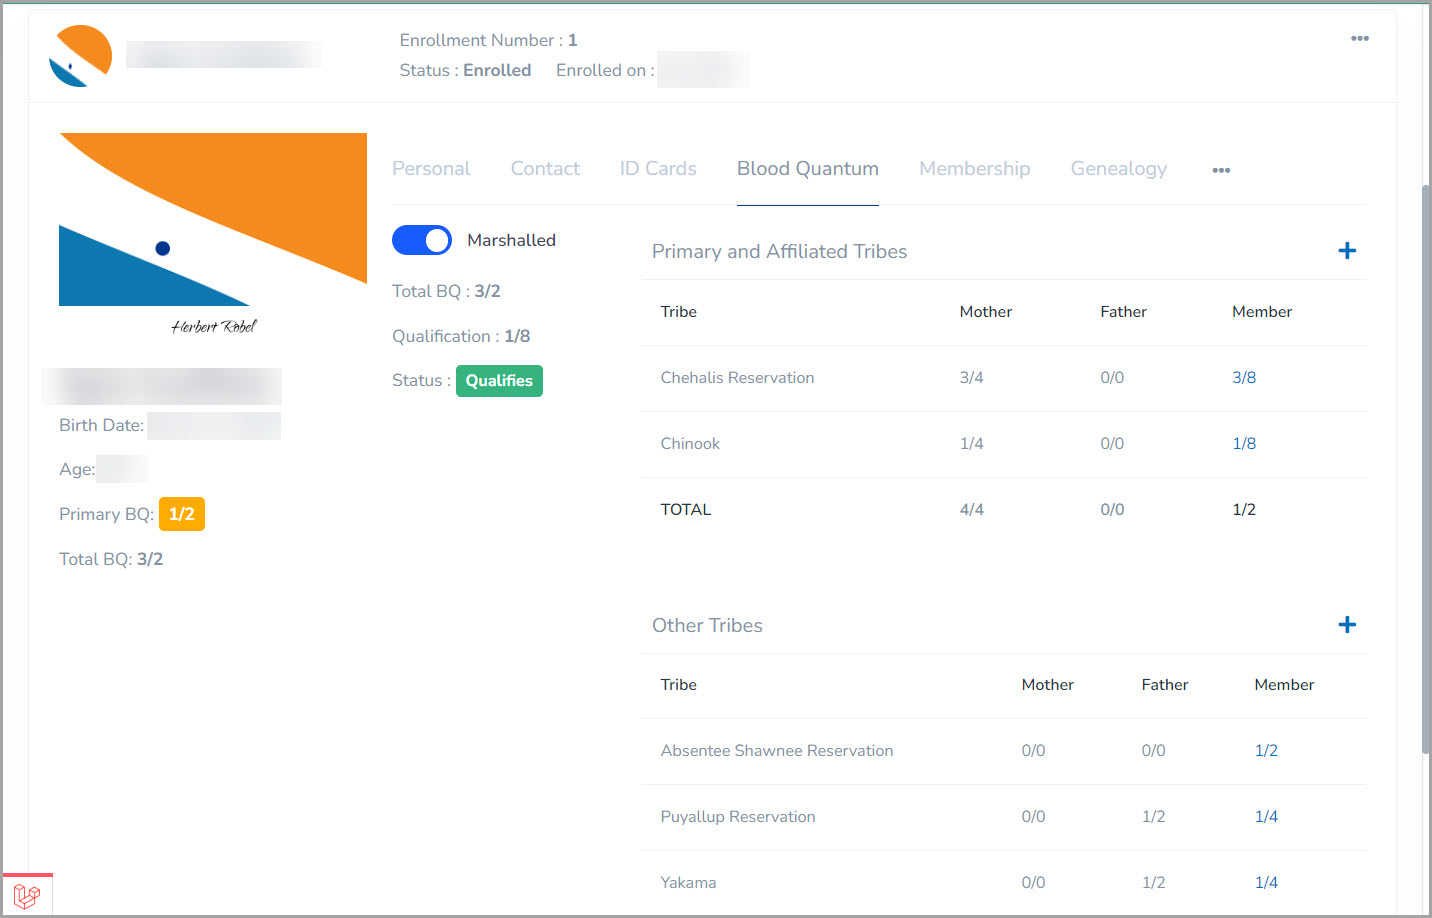
Blood Quantum is one of the most important factors used to determine a person’s enrollment status into a tribe. The Blood Quantum tab will display the Blood Quantum levels that a person contains from a multitude of different tribes. The blood quantum values are calculated based on the person’s mother and father’s blood quantum values, which those values cannot be edited. However, the member’s recorded value can be edited, and other tribes that aren’t currently displayed can be added to the list in this tab. Each person in the family tree only gets half of the sum of the parent’s Blood Quantum values. The TEM package allows for BQ value entry/edit only if the person is the oldest person in their specific tree branch, which means that they do not have defined parents in the tree.
Qualifiers
- Marshalled
- Represents that the person’s blood quantum is marshalled into enrollment.
- Total Indian Blood
- Represents the sum Blood Quantum value that a person contains based on their blood quantum values from all associated tribes.
- Qualification
- Represents the fraction of blood quantum that is required to qualify as an eligible value to enroll into the Quinault Tribe. This value is configurable by Administrators from the ”Blood Quantum Degree” section in the ‘Tribal Enrollment Management’ Menu.
- Status
- The Status value will only display when the Membership Validation mode is set to Blood Quantum/Degree, where it will display if the person is eligible for a tribe membership or not.
Other Tribes
Clicking the + button to the right of ‘Other Tribes’ will open a menu that allows you to select a non-displayed tribe from a drop-down list and enter the blood quantum from the tribe. This list can be edited by Administrators.
Membership Tab
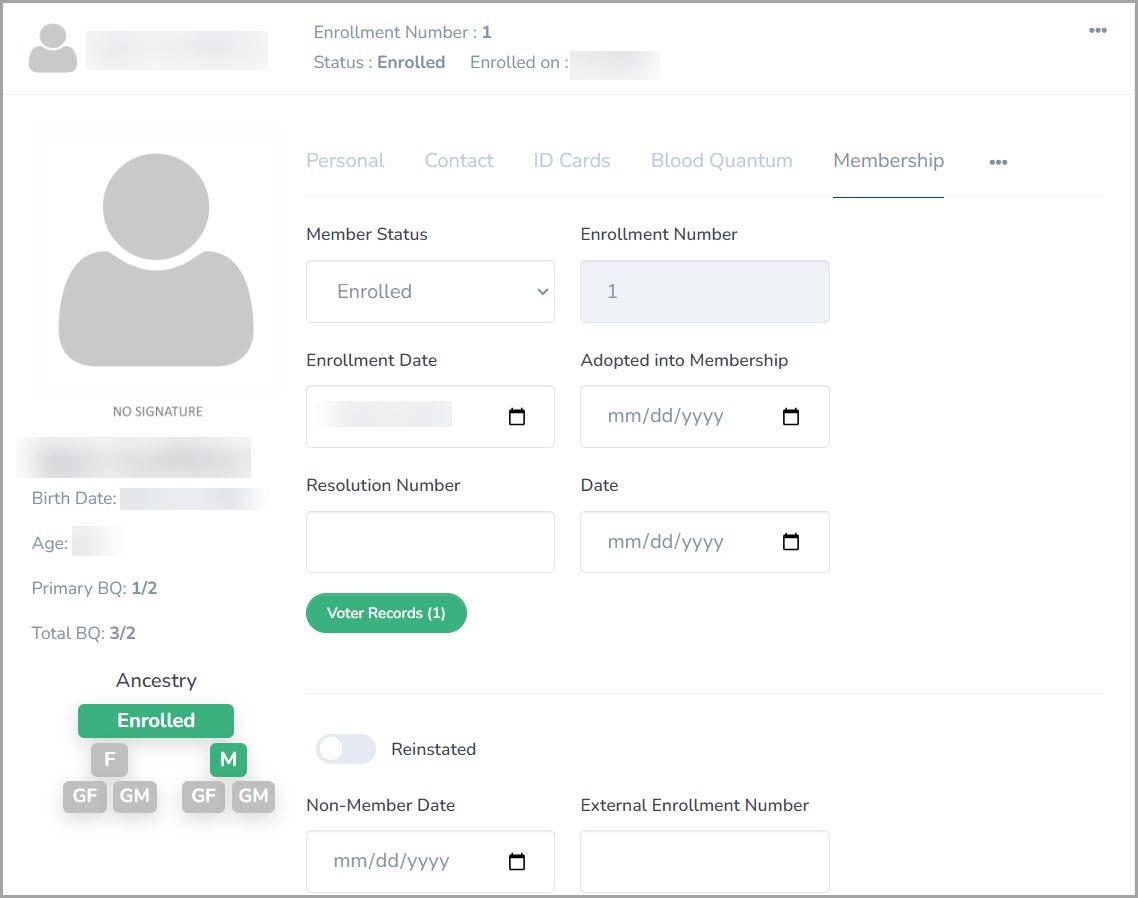
The Membership Tab is used to manage the user’s membership configurations. The available settings include Member Status, Voter Records, History Records, and other membership credentials.
- Member Status
- The following status options are available:
- Enrolled
- Enrolled-Adopted
- Relinquished
- Pending
- Resigned
- Application Rejected
- Dis-enrolled
- Non-member
- Enrollment Number
- This field is inaccessible until the Member Status value is set to ‘Enrolled’ or ‘Enrolled-Adopted.’ At that point, the ‘New Number’ button will display, this button allows you to generate an Enrollment Number for the member.
- Enrollment Date
- Date value of day of enrollment.
- Adopted into Membership
- Date value of the day of enrollment if the member was adopted into the tribe.
- Resolution Number
- Value for the Tribal Resolution document that is created for the person’s membership.
- Date
- Resolution date value.
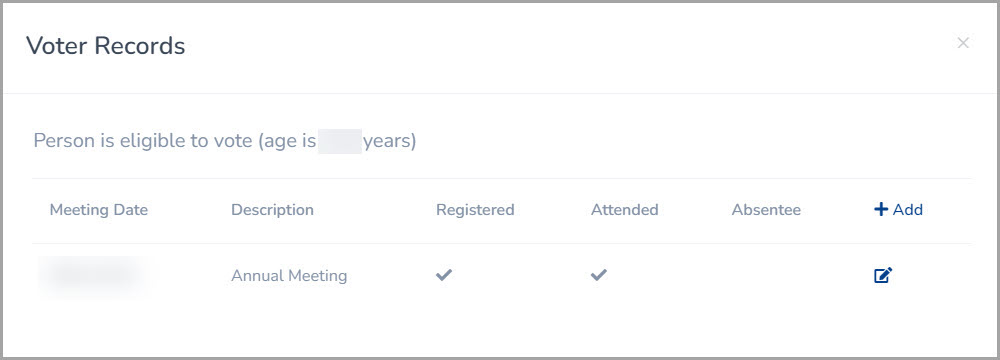
- Voter Records
- This button is used to assign records of member’s status of voting events if they have participated in voting for any recorded events in the past. Voting events are added to the system through the ‘TEM Configuration’ menu by Administrators.
- The following status options are available:
-
- Reinstated
- This button represents a Boolean value that when enabled, will express the person’s profile as a restored or ‘Reinstated’ application.
- Non-Member Date
- External Enrollment Number
- Relinquished from Tribe
- This drop-down will mark that the user has relinquished from a selected tribe.
- Historic Enrollment Information
- If the member was enrolled in another tribe in the past, you can add their previous enrollment information to this tab. When adding, the ‘Reason/Record Type’ field is required to fill out.
- Reinstated
Genealogy Tab
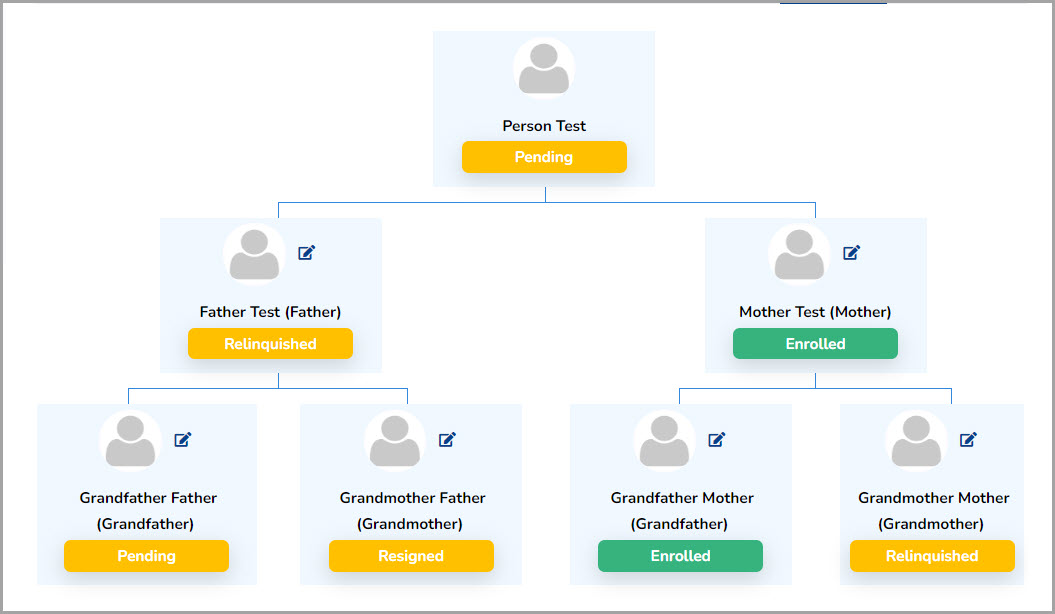
The Genealogy Tab displays a family tree for the person which shows who they are related to and how that qualifies their enrollment into the tribe.
The screenshot above shows an example of a family tree that is displayed in the Genealogy tab. While the Person at the top is showing that their enrollment status is pending, since one side of their family is enrolled into the tribe, then the person is eligible to enroll into the tribe.
Note: People with adopted family enrolled cannot be edited within the Genealogy Tab. Blood Quantum values and Genealogy trees are derived exclusively from biological parents
From this tab, you also can print out a person’s family tree using the Print button or manage the children in the tree using the Children button.
Note: Confidential records will not be printed
Documents Tab
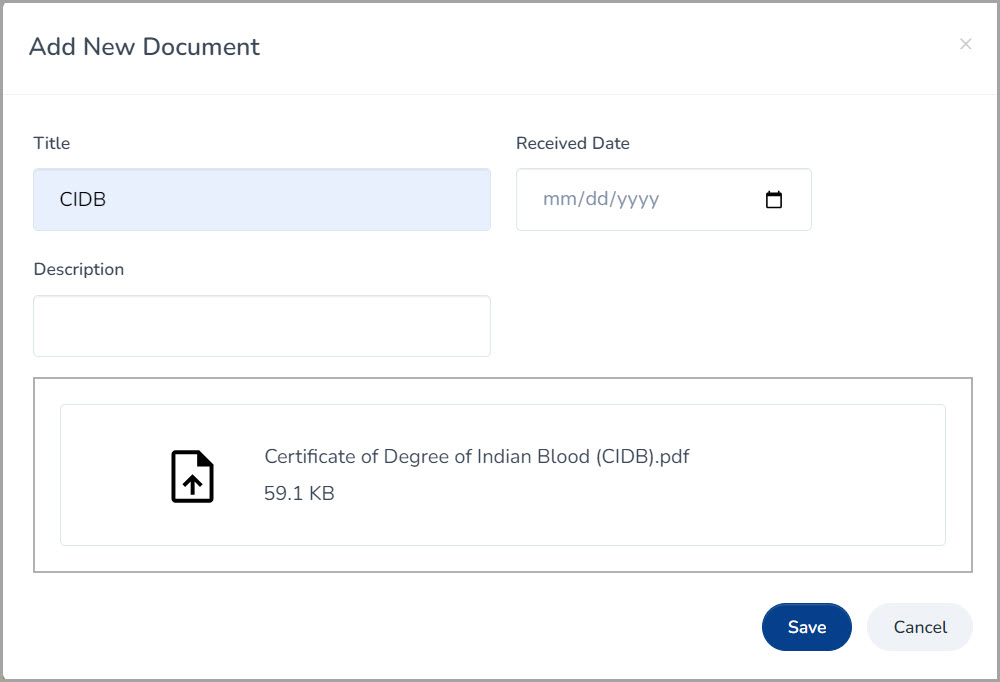
The Documents Tab works similarly to accessing an ILINX Content Store View in ILINX Engage, however, you can also add documents to the repository. Keep in mind that the ‘Add New Document’ dialog presents index fields that Administrators define in the Content Store Application selected in the TEM configuration. The Content Store view for this tab then will return any of these indexes for display in the Documents list. For further information, refer to the ILINX Content Store – End User Guide.
Note: Administrators must add ‘[Application Name]’ AS ‘ICS_AppName’ into the select statement of the View query to open the documents from the view, otherwise the data will appear as “read-only.” If openable, the document will download to your local machine with the name of the file being the document ID in Content Store. For more information, refer to the ILINX Engage 24 – Administrator Guide
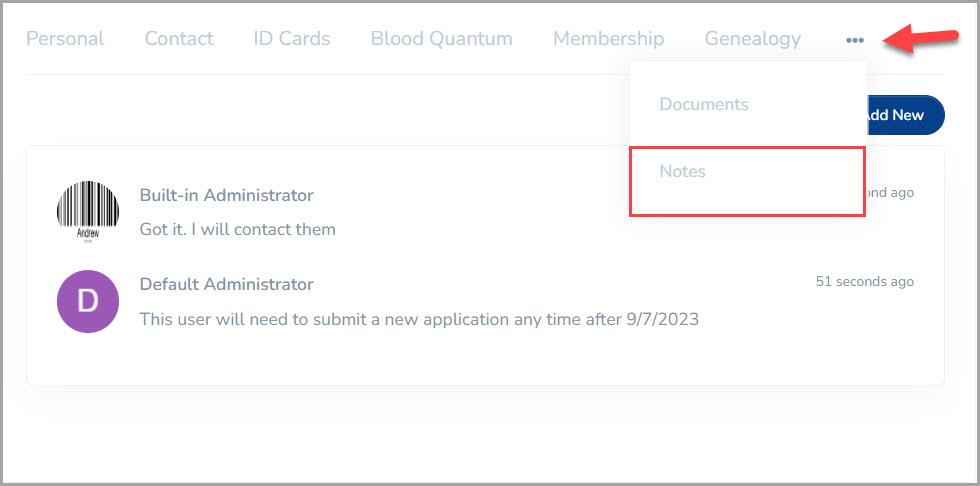
Notes Tab
The Notes Tab works exactly like it does within the ILINX Engage interface when opening a batch. All users can add a note in any profile that will be displayed within this tab.
